Related Posts Widget for Blogs by LinkWithin

Andalusian tortillas de camarones

>> Friday, June 26, 2009


Tortillas de camarones from Andalusia are made with a tiny type of shrimp called camarón and are typical of the Cádiz province. They are delicious with a glass of chilled fino or manzanilla, on a bar terrace...

I've got to confess: I've never been to Cádiz in my life. I don't have any relatives in the area. I don't even have friends from Cádiz. I've only eaten tortillas de camarones in an Andalusian restaurant close by. With this I mean that I'm not an expert in the subject. But I'm crazy about them all the same and I admit my crime: I cook them in my own kitchen. Therefore I ask all connoisseurs of tortillas de camarones out there to have mercy on me. Although I'm more than willing to learn and am open to any recommendations for the next time I make them...


Fine, after this apology I can say anything I want about tortillas de camarones... The recipe I normally use was found at the site Pisto y Nopisto. You can find in the Internet long and brainy arguments in Spanish about what bar is the best place in Cádiz to eat the tortillas. Some say it's Casa Balbino at Sanlúcar de Barrameda and some people even warn you about the impossibility of preparing decent tortillas de camarones out of Cádiz province... because, among other reasons, ingredients are hard to find. Camarones are tiny shrimps that are cooked whole, because it would be impossible to shell them. Even in Spain they are not easy to find everywhere. The same happens with chickpea flour. You can make your own flour with a stout food processor from chickpeas though.


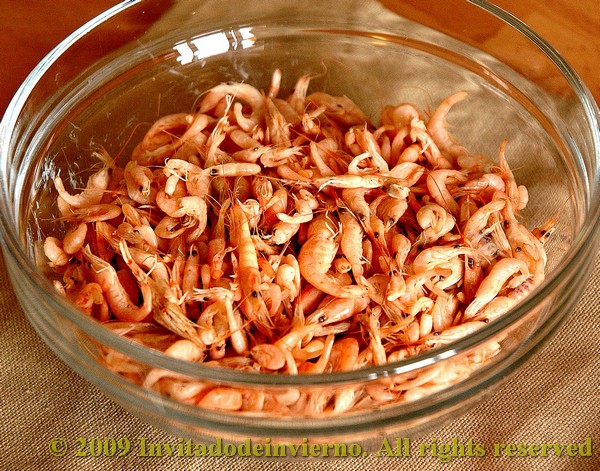
Tortillitas de camarones (adapted from Pisto y Nopisto)

  • 1 cup all-purpose flour
  • 1 cup chickpea flour
  • 1 cup camarones (you can substitute shelled shrimps, but not too big. It won't be the genuine thing, but I'm sure it will be delicious anyway)
  • 1 cup finely diced onion and parsley (I didn't have any parsley this time, so no nice green touch)
  • 2 cups water
  • 1 teaspoon sea salt
  • Virgin olive oil for frying


Mix thoroughly both flours with the water to avoid any lumps. Then add the rest of the ingredients, mix well and leave to rest for two to three hours. I guess the purpose is the hydration of the flours.

Pour olive oil in a shallow and wide pan to a height of 1-1.5cm and put the pan on medium-high heat. When the oil is hot enough, pour a tablespoon of the batter in the oil. Pat it with the spoon to spread it a bit and get a thin tortilla. At Casa Balbino they recommend that the oil shouldn't go higher than 80 ºC. According to my experience, that's the secret for getting uniformly browned tortillas: to cook them on medium temperature, even if it takes long. If the oil is too hot, the edges will brown too soon and the center will be softer and puffier. I like them this way too, but my family prefers them crispy. You can try both ways. As a sidenote, the oil will splash quite a bit, so prepare yourself to make a mess on your range. In my case, I cook and D. does the cleanup... (holding back a smile).


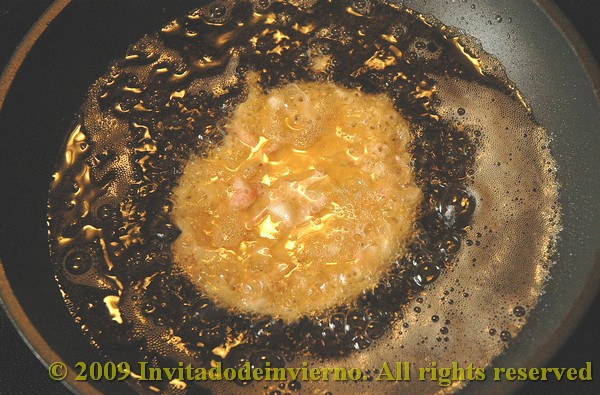
Then put in the pan as many tablespoons of batter as you can fit. Flip them over when they are nicely browned on one side. And... that's all folks. Lay them on a paper towel as you go to absorb some of the oil (yes, they do soak quite some oil) and... just eat them... I like them in any way, even when I burn my tongue or when they are cold... Should I be punished for that?

Last advice: please don't use any other kind of oil but olive oil for frying these... it would be sacrilege.

Eager to know more?

Moroccan style lamb tagine

>> Monday, June 22, 2009


I've wanted to make a tagine for long, and I finally found the drive to do it thanks to the monthly roundup of the Spanish blog Hecho en mi cocina. The proposal for June was Arabic and Middle East food, so I couldn't resist any longer. Maybe I'm losing the sense of taste as I grow older, but I like spicy and hot food more and more every day. The story of my choosing this dish begins some time ago...


The thing is that one of my books on bread (one of many!) includes a recipe for a Moroccan bread with "ras el hanout". This lead me to do some research (ahem...) on this serious matter. For those of you who didn't know about it, like me, ras el hanout is a misterious spice mix, with as many formulas as Moroccan households. During my research and investigation... I found many interesting recipes along the way, the one I present here was among them. Then, some time later, while leisurely wondering in a supermarket my eyes fell upon a jar of... ras el hanout! My eyes nearly popped out of my head! I never thought I could find it in a regular supermarket. This is thanks to the many Moroccan immigrants we have. I had to buy it. When I arrived home I noticed the ingredients were not listed on the label... don't they push the secret-formula-thing a bit too far? Especially because it is compulsory to state the ingredients in the label.


Anyway, with my ras el hanout of unknown composition I decided to gamble with my family's health as well as my own and try this thing on a tagine. Tagines are a type of stew, typically cooked in these very beautiful pots with conic lid. Oops, this is a kind of pot I don't have! Well, to the point:

Moroccan style lamb tagine with ras el hanout (adapted from the blog Soulsman.com)

For the from-scratch ras el hanout:

  • 1 1/4 tsp allspice
  • 1 nutmeg
  • 20 strands saffron
  • 1 tsp cayenne pepper
  • 2 tsp black pepper
  • 1 1/2 tsp mace
  • 1 stick cinnamon
  • 2 tsp cardamom seeds
  • 2 2-in pieces dried ginger (or 1 piece grated fresh ginger)
  • 1 tsp ground turmeric
  • 1 tsp dried rose petals
For the tagine:
  • 1 kg lamb shanks, cut into slices about 1 1/2 in thick (I had a whole leg... and I didn't have the tools nor the strenght necessary to cut it in smaller pieces, so there it went into the pot...)
  • 4 tsp ras el hanout
  • 125 g carrots, peeled and cut in chunks
  • 2-3 onions, sliced
  • 2 cloves garlic, crushed
  • 4-5 potatoes, peeled and cut in chunks
  • 250 g tomatoes, thickly sliced
  • 75 g dried apricots (I doubled the amount, 150 g, I thought it was too little)
  • 2 tsp honey
  • 1 liter chicken or vegetable stock (I used plain water)
  • 3 bay leafs
  • 1 tsp salt (to little, I added at least 3 tbsp to overcome all the sweetness of the vegetables. You have to adjust depending on whether or not you use salted stock)

The recipe includes some couscous for garnish, but you can use rice also. I prepared some spelt couscous, but I must admit... again... that couscous is not my cup of tea.

To make the ras el hanout: mix all the spices and process them in a powerful food processor or coffee mill (clean the coffee mill before using it for this. Grinding some rice would do the trick). I've already told you how I had some smuggled ras el hanout, to add some color to my colorless life. Therefore no spices, no mill, no nothing.

Salt the lamb. Put some olive oil in a large pan, large enough to hold all the ingredients inside, and brown the lamb. Once it is as crisp as you like, put it aside. Stir-fry the onion till tender and translucent. Add the crushed garlic, fry a little, then add the ras el hanout... everything turns yellow! And the aroma is hard to describe... I suddenly felt like doing a belly dance... Then continue stirring and frying the yellowish mix for a minute or two so that the spices release their aromas, then add the rest of the vegetables along the dried apricots. Stir well for the vegetables to soak the spices, leave for another minute, then add the meat on top of the vegetables and add the stock or water. Lately I refuse to use any store-bought stock full of additives and glutamates. Being that I didn't have any frozen homemade stock in stock... I added water. It must cover the lamb almost completely. Then add the bay leafs, the honey and salt. You can adjust the salt later as you go.

Bring to a gentle boil and let simmer for 1.5-2 hours. After one and a half hour try the lamb for tenderness. I had to take out the lamb and vegetables and let the sauce reduce somewhat further, because it was a bit too liquid.


Don't you think my earthenware dish from Úbeda is simply gorgeous? Please, say yes.

Result: the vegetables garnish and the sauce are de-li-cio-us, addictive, with the precise hot touch. Not cutting the lamb was, on the other hand, a bad idea. The center of the shank was a bit hard. Besides, small chunks of meat tend to soak the flavour of the sauce more. I knew... but I couldn't do it any other way. Anyway, now I have an awful lot of scrumptious sauce with vegetables, I'm thinking about processing it and making a wonderful Moroccan soup...

Eager to know more?

Richard Bertinet's bread sticks with cheese

>> Wednesday, June 17, 2009


Another recipe from the book by Bertinet. I alternate between Bertinet and Dan Lepard. Maybe I should tell D. my interest in these two guys is something to worry about. This time I've chosen some twisted bread sticks with pecorino, olives and herbs. To go against the tide, as usual, I've only added the cheese. Maybe this way there might be some chance that my youngest tries the sticks. This boy, he's so badly brought up. I don't know who's to blame. Not me, it's never me. Bertinet makes the sticks with white bread dough, but I've used whole spelt flour dough for a change...


Cheese bread sticks (adapted from the olives, pecorino and herbs bread sticks by Bertinet)

For the dough:

  • 150 g spelt white flour
  • 100 g whole spelt flour (in the original recipe the ratio white/whole flour is reversed)
  • 5 g fresh yeast
  • 5 g sea salt
  • 175 g water
For the filling:
  • 50 g shredded cheese, any kind you like, but not too tender.

Weigh the flour and rub the yeast in. Add the water and mix well until is all absorbed. I usually allow a quarter of an hour for autolysis. Here's an explanation of autolysis from Heartland Mill:
Autolyse (or dough autolysis) A process in which the flour and water in a formula are mixed together at low speed and allowed to sit for a rest period, usually of 20 minutes. This pre-hydration allows for better links between gluten and starches and results in shorter mix times and improved dough extensibility. Loaves made with autolysed dough will be easier to shape and will have more volume and better crumb structure. Due to the shorter mix time (less oxidation), the dough may retain more of the carotenoid pigment responsible for the creamy-yellow color desired in well-crafted bread.
You've got to do it before adding the yeast. I promise I'll be good next time and do it right. But that'll be next time.


Once the dough has been allowed to rest, add the salt and knead it. This time I've used the traditional kneading method, not the French Bertinet's method, because the dough was quite hard, in spite of having a lesser ratio of whole flour than the original recipe called for. After 8-10 minutes, put it into an oiled bowl to proof and cover it; mine took more or less an hour.

Tip the risen dough on the counter and flatten it with your palms to obtain a rectangle 1 cm thick approximately. If the dough is reluctant to keep the size you want, leave it to relax for a while and stretch it again after that. Spread the shredded cheese on top along with any other ingredient, if you like; press the cheese with your fingers so that it sticks to the dough. Then fold the dough in thirds, like a letter. Flatten the dough again so that the assembly sticks together.


Preheat the oven to 220 ºC. Then cut strips of dough with a scraper or a similar tool, a little bit thicker than your finger. Twist these strips one by one and roll them on the counter to make them thinner and longer. Flour the counter as needed. Put them on an oven pan as you go or wherever you prefer to allow the sticks to proof. I wanted to bake the sticks in a big oven dish, covered with aluminum foil as directed by Dan Lepard for baguettes. So I put them straight on the pans to proof. Leave them for half an hour.


Look at that, the charm of handmade things, completely unequal... ahem. Put the dishes in the oven well covered in aluminum foil. The recipe calls for a baking time of 10 to 12 minutes. I had to bake them longer and uncovered in the end to get them to brown correctly.

This cunning Bertinet says you can dip the sticks in olive oil for eating... obviously olive oil doesn't go to his rolls of fat. Lucky man.

And... this goes to Susan of Wild Yeast for her weekly Yeastpotting!

Eager to know more?

Asturian tuna fish pie

>> Tuesday, June 16, 2009


While I wandered around the supermarket, ever so happy, something caught my eye as I passed by the fishmonger section... some streaked and dark hunk of fish... I couldn't help myself, I had to buy a kilo of fresh tuna fish. Another love at first sight...


Doesn't my tuna fish look cute in the pictures?... My falling in love with inert materials is becoming a medical matter. The fish dealer was surprised at my request of a whole kilo... so what? The bigger the tuna, the better. As I was obliged to cook it straightway (it had been thawed), I reached for an excellent book on Asturian cuisine, Cocinar en Asturias, to find a suitable recipe there. Here it is:


Pastel de bonito or tuna fish pie (adapted from Cocinar en Asturias)

  • 2 medium onions
  • 1 green pepper
  • 2 medium tomatos
  • 3/4 kg fresh tuna fish
  • 6 eggs
  • 1/4 l cream
  • Virgin olive oil
  • Salt
Cut the onion and pepper as in mirepoix, which means very thinly diced, as tiny as your wrist or glasses allow you... oh, you don't wear glasses... you don't know what you're missing then. Now do the "sofrito": put the onion and pepper in a pan with 4 or 5 oil tablespoons on medium heat. The onion must turn transparent and the pepper must dim its color. In the meantime scald the tomatos to peel the skin off and dice them thinly. When the onion and the pepper are done, add the tomato and finish the "sofrito"... shoop, shoop.


While the "sofrito" is cooking, cut the tuna fish as thinly as you can. I did it by hand... what a massacre.

Then beat the eggs with the cream and the salt, at least 2 teaspoons; mix thoroughly. I used creme frâiche instead of cream, I had a pot on the verge of passing its use date. Drain some of the oil of the "sofrito" and mix it with the liquid. To be sure of the seasoning, I take a small portion of the mixture, put it on a plate and microwave it; then I try it for the salt. Adjust the salt if necessary. Oil or butter a loaf pan and pour the mixture. I used two pans, I thought only one would make a very tall pie.

According to the recipe, put the pans into a bigger dish with boiling water for "bain-marie", in an oven preheated to 120 ºC for 1/2 hour. I covered both pies with aluminum film, maybe that's why they didn't even dream of being done after half an hour. Mmmm, this meant something was wrong with the recipe directions or that I had varied the process somehow... too little egg for such a lot of ingredients? Maybe the cover prevented the cooking liquid from the tuna to evaporate? Very likely. Anyway, I took away the cover, increased the oven temperature to 160 ºC and bake them for another hour... the last half hour with the grill on, to get the damn pies cooked... disastrous. After keeping D. and my mother in law waiting at the table, with the first course already digested, I arrived with the very famous tuna fish pie which fortunately turned out very tasty. If you happen to be in such a situation, just stuff your guests with wine. They won't complain.

First remark: I believe the tuna fish pieces were a bit too large, I should have minced it a little bit more. A nice food processor would do the job. I didn't dare to put it in my Thermomix because I didn't want to puree the fish. The recipe calls for very small pieces, but recognizable like the fried vegetables.

Second remark: the recipe asks to butter the pan, I recommend to put some bread crumbs too. If not, the pie sticks to the pan like SuperGlue; I had to run a knife through the sides and beat the pan on the counter and so on so that I could manage not to end up with scrambled eggs with tuna.

Third remark: the pie is delicious anyway, especially cool from the fridge and with some mayonnaise. An excellent dish for this warm weather. The green pepper gives it a nice touch.


Tuna fish is very popular all over Spain, especially canned, like from Conservas Ortiz. Although I'm old enough to know, I have no idea of the different species of tuna you can find. They have different colour when fresh, that's all I know. Another pending subject... sigh... so many things to know and so very little time.

Eager to know more?

Watermelon and tomato soup by Ferrán Adriá

>> Sunday, June 14, 2009


Still preparing blood-red dishes... do you think this means something? Better not find out.

Do you know Ferrán Adriá? Here's a recipe of his I found in the net ages ago and that lay quietly asleep in my scrapbook. The scorching heat we suffered yesterday here in the Spanish plain (the rain in Spain doesn't stay mainly in the plain, mark my words) compelled me to prepare something refreshing. And I felt like bluffing about preparing something by Ferrán Adriá... one of his few recipes accessible to poor mortals.


Watermelon and tomato soup with basil oil by Ferrán Adriá

  • 1/4 watermelon
  • 6 medium tomatos
  • Basil infused oil (amount of basil to your taste)
  • Salt and pepper
I had run out of basil, but I did have some sage infused oil. My desertic garden is not fit for basil, though we have a plant of sage. You can't always get what you want, like the Rolling Stones said. Tumbleweeds and basil don't go very well together.

Slice and peel the watermelon; try to get rid of as many seeds as you can. Cut the tomatos. You don't need to peel and seed them if you're going to process the soup in a very powerful food processor. In any case I prefer to put the final mixture through a sieve or food mill for thinness. Once processed, season with salt and pepper to your taste (I always skip the pepper... don't like it). The recipe calls for a final oil drizzling on each soup serving. I preferred to just add a generous dash of oil to the whole soup for a sage-aroma touch. The sage flavour is delicious, but be careful and add the oil little by little while you try the taste every now and then.

This soup is really simple, quick to make and refreshing. Remember it should be served chilled, so put it in the fridge for a while before serving it. Watermelon lovers will love it. I'm not fond of watermelon and I liked it. We'll have some more tonight on the veranda...

Eager to know more?

Breakfast on the veranda and some plums

>> Tuesday, June 9, 2009


Sometimes when I go into a shop and some food catches my eye, I buy it even when I don't know what I'm going to do with it... I know, it's not a good idea, it could end up in the garbage. Last saturday I visited my favourite greengrocer, to find some gorgeous red plums... I don't like them fresh very much, but they were so red, so round, so cute with their little plum eyes, looking at me saying... take us with you! I couldn't resist so much irresponsibility. So I took some with me and went back home wondering what to do with them. I decided to keep things simple and make some jam/compote to garnish the fresh cheese I usually have for breakfast.


Red plum jam/compote

  • 1 kg red plums
  • 100 g fructose (you better adjust the amount to your taste, I don't like it very sweet)
  • 1 tablespoon pectine powder
I use pectine to shorten the boiling time. Besides the mixture takes longer to thicken with fructose than with sugar. You know I'm lazy.

I had to peel the plums because this variety has quite a bitter peel. So peel them, cut them in half and pit them. Put them in an enameled pot with the fructose or sugar, whatever you prefer, you just have to adjust the quantity (I use a ratio of 60/100, fructose/sugar).


Boil on medium heat while stirring every now and then, until it starts to thicken. Drop a small amount on a plate, let it cool and check the consistency and sweetness. Whenever it's done, put off the heat and add the pectine. I had no intention to mix it, by I had to do it because I got a lot of nice pectine lumps I didn't want to smash one by one. Pour the hot jam in a esterilized glass jar (half an hour in boiling water, with a cloth on the pan bottom to prevent the jar from breaking although some claim that washing in a dishwasher is enough), cover with the lid and leave the jar to cool in an upside down position. I think this prevents condensation on the lid, only I don't remember why this is so bad and haven't been able to find out where I got this idea.


Today I had some plum jam for breakfast with my everyday fresh cheese, on the veranda...

The Bulbul to the garden winged his way,
Viewed lily cups, and roses smiling gay,
Cried in ecstatic notes, "O live your life,
You never will relive this fleeting day."

Omar Khayyam

Eager to know more?

Dan Lepard's simple milk loaf

>> Wednesday, June 3, 2009


Another Dan Lepard recipe, this time of a delicious milk loaf for sandwiches, with an exquisite buttery aroma and a wonderful flavor. I bake it for my children, to prevent them from eating the nasty sandwich comercial loaves. Have you ever read the ingredients list? Do it, you're old enough. Why on earth does it need so many strange ingredients? When a loaf can last several weeks in the fridge like any uncorrupted saint´s relic, there can be no good in it... This bread is fairly easy to make and keeps very well for several days, just long enough for the children to eat it all.


Dan Lepard's simple milk loaf (from the book "The handmade loaf")

  • 250 g strong flour
  • 250 g all-purpose flour (you bet I used spelt)
  • 350 g whole milk at ambient temperature
  • 20 g golden or maple syrup (I used maple)
  • 1 1/4 teaspoons good sea salt
  • 1 1/2 teaspoons fresh yeast (I used dried yeast, one package)
Mix everything in a bowl, except the salt. Knead it lightly on a floured counter and leave to rest for 10 minutes. Then add the salt and start kneading. In case you don't know, this Lepard man does a series of short light kneads, 10 to 15 seconds, three times every 10 minutes ending with a half an hour rest, until the dough is smooth, elastic and soft like a baby's cheek. In this case I used the traditional kneading method, 8-10 minutes, watch this video. Then I made a ball, I put it in an oiled bowl, covered it with a plastic shower cap and left it to proof. As I used the super quick granulated yeast, it took less than an hour to rise.

Once the first proofing is done, deflate the dough beating it on the counter or flattening it with you hands (be rough on it!) and divide it into two balls. Butter and flour a loaf pan and put both balls inside. Leave them to proof for the second time till almost doubled. Brush the top with some milk and to the oven, preheated at 210 ºC. Bake for 15 minutes at that temperature and then lower the temperature to 180 ºC and bake the bread for another 20-25 minutes. I think I overbaked it a little, that's why the crust looks to brown. The smell in the whole house made me dizzy.

In the picture of the cut the bread was still a bit warm (I'm impatient!), that's why the crumb looks a bit "dragged" by the knife, but the cut looked better when completely cold. The crumb is dense for a sandwich loaf because of the spelt, which has less gluten than normal bread flour. That's why you can cut thinner slices, they don't need to be thick because this bread is a lot more flavorful than normal sandwich bread... well, if you call that normal. This beautiful bread goes to this week Yeastpottings!

By the way... don't you think my butter dish is really cute?


Eager to know more?

Double chocolate tart

>> Monday, June 1, 2009


This is my eldest's favourite tart. My children are quite choosy regarding food and as they don't appreciate very much my cooking, I feel very happy when they like some of my dishes. Mothers are this idi... I mean, we're so nice! And yes, he does eat portions as shown in the picture. The original recipe calls for only one kind of chocolate, dark chocolate, from the book Coffee & Espresso, which doesn't seem to be translated into English. Well, the thing is that no one in the family is a great lover of dark bitter chocolate... Therefore I substitute half white chocolate and half milk chocolate for the dark one. And I think the tart looks more beautiful that way too. And all chocolate purists will come and burn me at the stake... just dare!


It's a very easy and good-looking tart, perfect for impressing all those people you wished they envy you. To the point. Take into account that it is better made the day before you're going to eat them, to give it time to set properly in the fridge. Here goes the original recipe:

Chocolate and almond cookies tart

Base:

  • 100 g ladyfingers
  • 100 g almond cookies (any kind would do)
  • 75 g melted butter
Filling:
  • 450 g dark chocolate
  • 600 g whipping cream
  • 5 cl amaretto
Topping:
  • 100 g whipping cream
  • Unsweetened cocoa powder
  • 6 almond cookies

And here goes the recipe I use. The base doesn't resemble the one in the recipe at all, mine is healthier and non-sugar. I learnt how to make this type of base in a course on raw sweets:

Base:
  • 1 1/4 cups almonds
  • 1 cup dates or dried apricots
  • 1/8 teaspoon salt
Filling:
  • 600 g whipping cream
  • 250 g white chocolate
  • 250 g milk chocolate
  • No amaretto, hate it.
Topping:
  • Unsweetened cocoa powder
For the ladyfingers base, mash the cake and the cookies, mix with the melted butter and lay on the base of a removable base mold (mine is 20 cm). Press to pack and even the mixture all over the base and put it in the fridge while you make the filling. For the almonds and dates base, grind the almonds first and then the dates or apricots. Mix them and add the salt. If you think the mixture is too crumbly, add a little melted butter (it happened to me last time, I think my dates left from Christmas sweets are getting a bit too dry), I added 2 tablespoons. Lay the mixture on the mold base, pack and put it in the fridge. I strongly recommend you to make this base, it's non-sugar, a lot more nutritious than the cookies base and it adds a very interesting crunch to the tart.

The filling couldn't be easier: whip the cream until stiff. Meanwhile melt the chocolates in two separate bowls. I do it in the microwave oven, and it works out beautifully, but you've got to watch it. You must not overheat it. Do it in a double boiler if you prefer.

Once you have the cream whipped, divide it in two and pour it in different bowls. Pour each melted chocolate in one of the bowls, don't be afraid that the cream loses some stiffness, it's not important. When everything is thoroughly mixed, take the base out of the fridge (you mean it was not there? Shame on you!) and pour the color you prefer. I always put the darker color first, seemingly for no reason. Smooth the surface and put it in the fridge again, at least for a quarter of an hour so that it sets partially for it to bear the weight of the second chocolate-cream mixture. Both colors must be clearly separated. When the first half is set enough (touch it with your finger), pour the rest of the chocolate-cream. Smooth the surface with a spatula as much as you can and put it in the fridge overnight.

The original recipe uses cocoa powder dusted on top and some whipped cream with almond cookies, but I like mine with cocoa powder only. It makes a nice contrast with the white chocolate layer.

The tart is very soft with these chocolate flavours, my guests have always loved it. The dark chocolate option is completely different of course. Try both! Some day I've got to try and make a 3-chocolate tart: dark, milk and white... yummy.

The weather here gets warmer everyday, so it's nice to sit outside and have a refreshing tart al fresco...


Eager to know more?

Followers

About This Blog

Lorem Ipsum

  © Blogger templates Palm by Ourblogtemplates.com 2008

Back to TOP