Related Posts Widget for Blogs by LinkWithin

Staititai or Ancient Roman pizza

>> Wednesday, September 23, 2009


Some time ago I bought a book about Ancient Roman cookery, called exactly Roman Cookery, by Mark Grant, who is a British classics teacher. It includes quite a lot of interesting recipes, but the most interesting thing to me was to realize how different Mediterranean cooking was before the discovery of America and the spreading in Europe of crops that we now feel so naturally Mediterranean like tomato, pepper and many more. Take pizza for example... think about it, without tomato? Well, no problem, that's white pizza. But the dough would be made with spelt instead of white wheat. And you'd have neither red nor green pepper to add for garnish. There's a very simple and delicious pizza-like recipe in this book, cooked on a skillet instead of baked, named Staititai, coming from a book called The partying professors, by the Greek writer Athenaeus. According to Mr. Grant, this Greek book would be widely known in Rome.


The recipe calls for baker's yeast, but I used sourdough instead, because anyway that's what the Romans would have used. I'm trying to be more authentic than the author...

Staititai from Roman Cookery (tweaked for sourdough)

  • 200g authentic spelt sourdough, 100% hydration (baker's percentage)
  • 400g authentic spelt flour (I used whole spelt for more, you know... authenticity)
  • 200ml authentic water
  • 1 tsp authentic sea salt
Filling for one pizza (20cm wide)
  • A handful of crumbled feta cheese (to your taste)
  • 1 tbsp sesame seeds
  • 1 tbsp runny honey

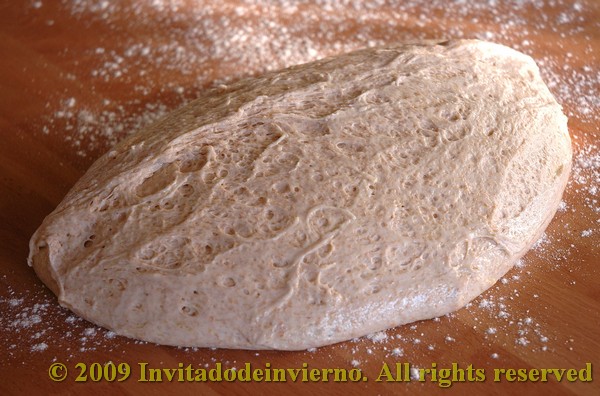
Mix the sourdough with the flour and the water. Leave to autolyse for 15-20 minutes. Then knead around 10 minutes by hand or 7-8 minutes with a blender, until the gluten is developed. Place into an oiled bowl, turn the dough so that the oil covers all the surface, cover with a plastic shower cap and leave till double in bulk. Mine took quite long to double, at least 6 hours. Then tip the dough on the counter, make a neat roll and divide the roll in 5 pieces. These pieces make small pizzas, around 20cm diameter. You can change the size of the pieces if you like by dividing the dough in more pieces (or less). Remember the pieces must fit into a skillet.


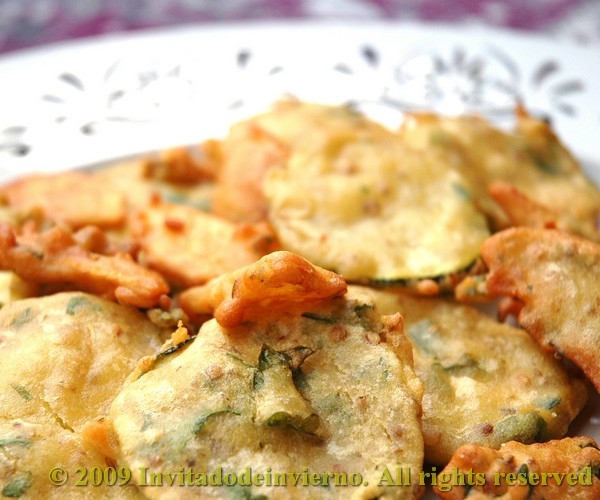
At this point I wrapped 4 of the pieces in plastic and put them in the freezer for a rainy day. I left one to proof in my refrigerator overnight, to eat it the next day. I work at home and I eat alone (sounds like an existentialist rhyming couplet). The next day I took the dough out and left it to temper for half an hour. Then I rolled it with a rolling pin to a 20cm-disc, more or less. I put a skillet on low heat, sprinkled it with olive oil and lay the disc of dough. It started to puff up nicely. When the underside showed quite some browned spots, I brushed some oil on the upperside and turned the disc. I waited for the whole thing to brown and cook, it puffed in a similar way to a pita bread. Switch on the oven grill in the meantime.

Fine, now you have a nice browned bread base where you can put the cheese and sprinkle the sesame seeds. The recipe's direction is to add the honey at this point too, but I preferred to add it after grilling. Then put the base with the filling under a hot grill and let the cheese get soft for 5 minutes or so, to your taste. Remember that feta doesn't really melt. You'll start noticing the wonderful smell of the roasting sesame seeds. If you're anything like me, the aromas will make you feel like pouring yourself a glass of white wine... ahem (I did). When it is sufficiently grilled (keep an eye on it, otherwise the bread can brown excessively), take it out of the oven and drizzle with the honey while warm.


I must admit that I found the result stunning, much better than expected. I didn't think that such a simple combination of ingredients would make such a delicious dish. Trust me, the combination of the toasted sesame seeds with the cheese and the sweet touch of the honey makes a wonderful assembly! I could have eaten another one, no doubt. And this pizza cut in wedges and piping hot can make a very interesting appetizer... alongside some spiced olives... and a glass of wine... yes, I picture myself dressed in a tunic, sitting under a holm oak... overlooking some cliff by the sea... softly playing a lyre... don't you smell the Mediterranean? Wow, I get carried away!

This bread goes to Susan/Wild Yeast for this week's YeastSpotting.

Eager to know more?

Postre de músico or musician's dessert


The Autumn has arrived, my favorite season, and it feels like eating those foods that used to be seasonal, like nuts, which started to be available around this time of the year after the harvest. All fruits and nuts were seasonal not so long ago and we always related them to a certain time of the year. Now we can find almost anything at any time of the year and to tell the truth... a lot of the charm is gone. And I won´t talk about the luxury in bringing food from the Southern hemisphere to the Northern so that you can pamper yourself with oranges in Summer, for example. Nor of how fruit kept in industrial freezers have their season artificially prolonged, so that what we eat is not at its best regarding ripeness and flavor nor of course has the optimal nutrient content. These matters could fill one hundred posts (sigh).


I believe I first tried this dessert in Andorra a long time ago. D. and I love nuts, we eat a lot of them at home. So a selection of our favorite nuts and dried fruits is a very good option for dessert, especially if you combine them with a glass of moscatel... That's exactly postre de músico (músic in Catalan), which means musician's dessert literally, a very traditional dessert in Catalonia. I've hardly found any information about it in the net, but it seems the name comes from the times when traveling musicians used to play in village celebrations and they were invited to eat whatever nuts and dried fruits people had in their homes.


Postre de músico

One handful of each of the following nuts and dried fruits (much better if they're organic):

  • Hazelnuts
  • Pine kernels
  • Almonds
  • Walnuts
  • Dried apricots
  • Dried grapes
  • Dried figs
  • Dried plums

Of course you can vary the ingredients according to your preference or what you have at hand. Put the fruits handfuls on a beautiful large dish, without mixing them, along with the moscatel glasses or a bottle for serving. It couldn't be easier. I used some delicious almonds from my neighbor. A couple of huge branches of his almond-tree overlook my garden. The crop has been enormous this year, the largest in the 9 years we've been living here. It's so frustrating that we are forced to eat such a large amount of scrumptious, hyper-organic and super-natural almonds... We frugal people.


If you have a real sweet tooth you can eat the dessert on waffles, adding honey, maple syrup, custard... you name it. Although there's no need for much garnish if the food is of good quality. And if you have the chance to eat postre de músico on a Sunday afternoon, on a veranda under the already not so warm sun, smelling the Autumn... You should try it.

Eager to know more?

Tapa or ración? Boquerones fritos or fried fresh anchovies

>> Saturday, September 19, 2009


What's the difference between tapa and ración? I guess a lot of people out of Spain already know that tapa is a small serving of food, served along with the drinks in most of Spanish bars. The price of the tapa is included in the price of the drink and it's something you don't need to ask for (well, most of the time) . In fact a tapa can be made with nearly anything, from some olives to fried chicken wings, as long as the amount is small. There are places though that are known for their enormous tapas, like the town of Granada, where you can make a substantial meal just by taking a tour through different bars.


A ración is a different thing. It's a bigger portion of food which is usually shared by several people and something you have to pay for separately. At a bar it is quite usual to have a whole meal just by piling up some raciones on the table, instead of a formal meal with first course, second course and so on.


After this cultural introduction to raise the level of the blog, ever so poor, one of my favorite ración or tapa has always been anchovies, either fried or in vinegar. Both are very typical all over Spain. For those who haven't tried them, the flavor of fresh anchovies has little to do with that of the more common salted and cured fish. It is a lot milder. Fried fresh anchovies were quite a staple at home when I was small, as it was inexpensive and tasty. Oily fish like anchovies, sardines, mackerel and tuna are very much appreciated in Spain. And now I give them to my kids, because this type of fish is supposed to be very healthy... until some brainy research demonstrates the opposite.

Boquerones fritos (makes 4 normal servings)

  • 1kg fresh anchovies, gutted and clean (I'm lucky that my fishmonger guts them for me)
  • All-purpose flour or chickpea flour for coating
  • Salt
  • Virgin olive oil for frying
  • A wedge of lemon for garnish

Wash the fish in cold water to get rid of the blood. I usually take off the central bone also and open them. Be careful to leave intact the final part of the bone, ending in the tail. It's normal practice to break the bone just before the tail and leave it so that it can be used to grab the fish for eating. Yes, it's typical to use your hands for eating fried anchovies... we're not civilized, I know. We still kill bulls for fun, don't we?


Let the fish drain the water for a while on a colander, salt and coat them with the flour. Chickpea flour is very commonly used for coating fish in Andalusia, either alone or mixed with plain flour. Pour oil in a pan till you have a level of 1cm more or less. Put the pan on high-medium heat and fry the fish in batches. I like them quite crispy, but that's very personal. You can lay them on a paper towel to soak some of the oil if you prefer. Drizzle with some lemon juice and enjoy with a beer or a glass of Spanish white wine, like fino or manzanilla... mmmm.

Eager to know more?

Panizas, Andalusian chickpea fritters and a Taste of Yellow

>> Saturday, September 12, 2009


I've made this recipe for the lovely initiative Taste of Yellow 2009, hosted by Barbara of Winosandfoodies with the aim of supporting the Lance Armstrong Foundation and raising awareness of cancer issues worldwide by... cooking yellow food! Check her blog for more information. I found her via the blog Use real butter, one of loveliest food blogs in the net and one of my favourites.


It didn't take very long for me to decide what to make, as I'd been wanting to cook this appetizer for a while. Yellow Panizas are typical from the Cádiz province in Andalusia, where the Sherry wines are made. They are made from yellow chickpea flour, boiled in water, made into a yellow dough thicker than potato mash and then sliced in yellow small pieces and fried. They look suspiciously similar to yellow Provençal panisses, that I first heard about in David Lebovitz's blog (one of my favourite blogs too). I have no idea of how they are connected, but the recipe is almost the same and the name is quite similar. I've found no information about their connection though.


Well then, to the point!

Panizas

  • 250g chickpea flour
  • 750ml water
  • 1 tsp sea salt
  • Pinch of turmeric (optional, to boost the yellow color)
  • Virgin olive oil for deep-frying
Put the water in a pot or deep pan and bring to the boil. Add the chickpea flour and the salt and stir to avoid any lumps. You can use a hand mixer to break the lumps. Cook while stirring continuously, until the dough starts to come off the sides of the pot and is as thick as a good potato mash. It can take 5 minutes at least. You can add a pinch of turmeric like me, to enhance the yellow color, or any other flavouring of your choice. I'm sure they must work very well with curry powder, paprika or even some chilli.


Pour the mixture while still hot in an oiled shallow dish or large plate. Be quick, as it solidifies the moment it starts cooling down, preventing you from spreading it properly (trust me, that's exactly what happened to me... I found myself wrestling with the dough, ahem). Then leave it to cool.


Once the dough is at ambient, cut it in small slices or French fries-sized pieces, then deep-fry in olive oil until golden. The original recipe calls for frying in pork fat, but I didn't have any. Olive oil is perfect. I sprinkled them with some additional salt after frying, but that depends on your personal taste.


And... enjoy! Even though I tried to cheat my kids telling them that the yellow fingers on the plate were some kind of Fritos, I had to pay 2 euros each for them to try the panizas... they're difficult. On the other hand, I loved them and ate most of them... the panizas, I mean, not my kids nor the euros... So what? Pulses are very healthy, so they say...

One last thing, it's traditional also to eat them as sweetmeats, with cinnamon, sugar or honey! I guess you need to decrease the amount of salt then, but the recipe I found doesn't give any hint on that.

And last but not least, I want to remember here my husband's eldest sister, Carmen, who died in 2000 of colon cancer.

Eager to know more?

Pakoras or Indian spiced vegetable fritters

>> Sunday, September 6, 2009


For the monthly roundup of the Spanish blog HEMC, Asian cooking, I have opted for something I've been wanting to try for a long time but never got to it: pakoras, delicious vegetable fritters originating from India. So far I had only eaten pakoras once in my life, four summers ago in a restaurant in Scotland, in a village called St. Andrews. But I obviously was quite impressed, because I had not forgotten the pakoras since then. I found them delicious among the Scottish mist, so far from their homeland, poor little pakoras... To prepare them at my home I looked for a super-genuine recipe. And there's no better place for Indian vegetarian cuisine than the wonderful site Manjula's kitchen. Mrs. Manjula is a lovely Indian granny featuring in her site a lot of cooking videos so very practical that you feel almost like she's demostrating the recipe in your own kitchen. I want to be just like her when I'm old(er).


For me these vegetable fritters are a hybrid of the Spanish type fritters and the tortillas de camarones, because the batter is very similar to the dough of the tortillas, made of chickpea flour. The result is crispy and scrumptious.

Pakoras from Manjula's kitchen

  • 1 cup chickpea flour (called besan or gram flour)
  • 3 tbsp rice flour (Manjula says it's optional, but it really aids to the crispness)
  • 1 tsp coarsely ground coriander seeds
  • 1 tsp cumin
  • 2 green chilies (I had none of these, so I used three whole Cayenne peppers instead, crushed. Adjust the heat to your taste)
  • 2 tbsp fresh chopped cilantro leaves
  • 1 tsp salt (I added more in the end, not salty enough for me)
  • 3/4 cup water (I needed almost double this amount as it depends on the type of chickpea, if you add the rice flour or not, etc.)
  • 1 small potato, thinly sliced
  • 8 thin slices of coliflower
  • 1/2 zucchini, thinly sliced
  • Vegetable oil for deep-frying

Mix both flours with the water. The consistency must be similar to a pancake batter. Even though Madame Manjula doesn't say anything, I left the batter to rest for a while for the flour to hydrate properly. The batter thickens a little bit if you do so. In the meantime crush the coriander seed, chop the cilantro leaves and chilies and add everything to the batter. Slice the vegetables and dip them in the batter. As per Manjula's instructions, deep-fry them in at least 1 1/2 inches of oil. The oil must be medium-hot, so that the vegetable pieces don't brown too quickly. They must take between 4 and 5 minutes to cook. You can turn them halfway. Fry them in small batches and put them on kitchen paper to get rid of some oil. And... enjoy them! I've found pakoras delicious and very easy to make. So delicious that I've eaten the remaining ones cold for merienda when no one was looking... Next time I will try this recipe with different vegetables, mushrooms or artichokes can be a good match.


Eager to know more?

Peter Reinhart's 100% rye sourdough bread

>> Friday, September 4, 2009


First of all, Mr. Reinhart, are you cheating on us? Because in spite of the name, this bread includes a small ratio of wheat flour and, though included in the sourdough section of The bread baker's apprentice, it carries normal bread yeast too. Reinhart, you should be punished... :-).


This is a 2-3-day bread, since it requires a sponge that needs to sleep in the fridge overnight and the second fermentation is retarded in the fridge too. I made the bread in two days because my kitchen was very warm and the second fermentation was really speedy... so much that the bread overfermented while waiting for my bloody oven to get the right temperature. Pathetic. When I'm rich I will revamp my kitchen and install a professional 90 cm oven that reaches at least 1000 ºC in the shade, a volcano of an oven.

But you're wondering, I know... if the bread came out wrong, why is she posting it? Because you can learn from my errors, be patient. And I can do it better next time if I record all my mistakes now. And because in spite of everything the taste was delicious.


100% rye sourdough bread from "The bread baker's apprentice"

Sponge

  • 100 g sourdough 50% hydration (Reinhart's is made out of wheat, I had rye's and that's what I used. It worked out fine)
  • 130 g bread flour
  • Vegetable oil
Soaker
  • 55 g whole rye flour, coarsely ground (I didn't have coarsely ground rye flour, I used 20 g mixed grain and the rest of flour)
  • 120 ml water at ambient temperature (funny, ambient temperature is not the same in August as in January, not very accurate hint...)
Final dough
  • Sponge
  • Soaker
  • 380 g white rye flour
  • 1 1/2 tsp salt
  • 2 tsp dried bread yeast
  • 175-240 ml warm water (32-38 ºC)
  • 2 tsp caraway seeds (I preferred not to. Chicken.)
Prepare the sponge. Mix all the ingredients and add some water if needed to make a ball. The ball must be firm, not very sticky. Just mix, don't knead it very much. Oil a bowl, put the ball in, turn it for all its surface to oil, cover with some plastic film and leave it to ferment until doubled. Once fermented, leave it in the fridge overnight.

Prepare the soaker by mixing the flour, seeds and water. Put some plastic film on it and leave it overnight at room temperature. According to Reinhart, the soaker helps condition the grain and allows for the enzimatic activity to develop, so that more sugar in the flour is released.

Now, did you already get up and do you have your soaker and sponge at hand and ready? Reinhart recommends to cut the sponge in a few pieces and leave it at room temperature for a while for it to temper more easily. I didn't do it because of the heat in my kitchen and because I'm an unruly girl. Mix everything (adjust the amount of water according to the dough consistency) and knead by hand for 4 or 5 minutes, a bit shorter if you use a mixer. Put the dough in an oiled bowl, cover with plastic film and let it double its volume. Mine took only two hours and a half.


Once the dough has doubled, tip it on the counter and shape two bâtards, trying not to degass too much. I preferred to put all the dough in a loaf pan. So I left it to double and that was my main mistake... I went away to another room and forgot about it. I thought it would take at least one hour more and it didn't. At this point you can also put the wrapped bread into the fridge and leave it to proof overnight. The thing is that when I went to have a look at the bread it was nearly doubled in size and then I immediately turned on the oven and had to wait for it to reach the righ temperature. At some point I thought I couldn't wait any longer because I didn't have the guts to see my bread sinking to the bottom of the pan and then I put it in the oven when it had barely reached 200 ºC (Reinhart advises to start the baking at 260 ºC, spray water in the oven several times after putting the bread in and then go down to 230 ºC). In short, I tried to do my best. As can be seen in the pictures, the bread had no oven spring at all. It even sunk a little bit because of the overfermentation, and the crust was a bit too hard because of the longer baking at a low temperature. It took 40 minutes to bake, when the advised time is less than 30.

But... in spite of so many blunders... the bread was scrumptious! The consistency is similar to those creamy and dark German breads and the taste is delicious. I strongly recommend it for breakfast, with butter and smoked salmon, with cheese, with scrambled eggs...

By the way, this bread goes to Susan's Wild Yeast, as a rentree after this very long summer...

Eager to know more?

Followers

About This Blog

Lorem Ipsum

  © Blogger templates Palm by Ourblogtemplates.com 2008

Back to TOP