Related Posts Widget for Blogs by LinkWithin

Tea-smoked salmon

>> Friday, October 30, 2009


I love salmon, especially smoked. Some time ago we were lucky to be served a delicious homemade hot-smoked salmon by my brother-in-law H., who's a great cook. Home hot-smoking? I even hadn't any idea that such a thing as hot-smoking existed. So my little children, if you're as little informed as I was, I warn you that there are two techniques for smoking fish: hot- and cold-smoking, with utterly different results. H. explained to me that he used some kind of gadget he had bought in Sweden, along with a bag of sawdust, for smoking... but, I don't know... Sweden is not on my way, I'm too busy today... Nevertheless I had been so deeply impressed by the hot-smoked salmon that I had to find some way to make it.


Here's a short explanation on the fish smoking subject, from this web site:

The preservation of fish has been an integral part of every seafaring culture. Over the course of thousands of years of drying, salting and smoking fish the technique has developed to a point where once common food has become a delicacy. In this article let's look at hot smoked fish. Cold smoking requires temperatures of around 80 degrees F. for several days. Hot smoking however can be done at temperatures of up to 200 degrees F. and only takes a few hours. It is best to start with a saltwater brine. The brining process is quick so don't worry about having to start out the day before. Plan on the fish being in the brine for about 15 minutes per 1/2 inch of thickness. Also plan on 1 quart of brine per pound of fish.
On my quest for the best way to hot-smoke fish at home, I happened to find a recipe for tea-smoking in an Argentinian blog, here. And I said to myself: if she can do it, you can do it. Therefore I opted for a delicate tea-smoking instead of the sawdust smoking (sawdust? what a lack of distinction). Using tea leaves for smoking food seems to be an ancient Chinese technique. Besides I had a bag of green tea in my pantry. I had bought it because of its antioxidizing action, so that I could antioxidize myself... Unfortunately I was stopped by a recurrent issue: no matter how many times I try it, I-don't-like-tea. So there was the tea, quietly resting without exerting any antioxidizing power on me... So this would be a good opportunity to get rid of it (do burnt antioxidants do any good?). You only need a deep pan or casserole with a tight lid, I guess a wok would be great.

Tea-smoked salmon
  • 600g salmon
  • 3 handfuls rice
  • 3 handfuls sugar
  • 3 tbsp green tea leaves (I guess any kind of tea would do)
  • Salt to taste
  • Aluminum foil

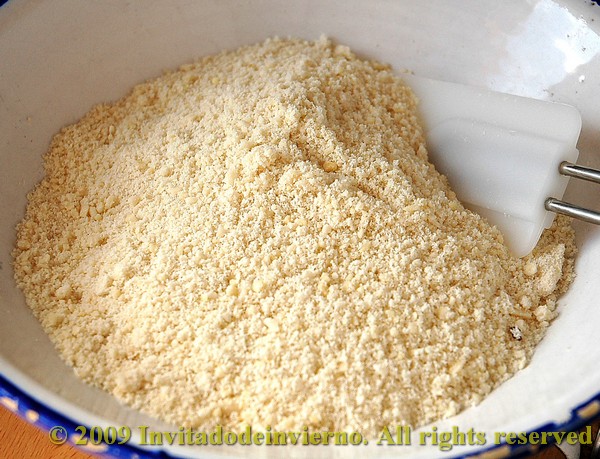
Line the pan or casserole with aluminum foil. Sprinkle a layer of rice, sugar and tea. Put a circle of aluminum foil on top, so that the rice, sugar, tea mixture is covered. Salt the fish thoroughly. The best thing is to rest the fish on a grid or rack that fits into the container, so that the fish oil can drip and the smoke contact surface is larger. I didn't have any, so I laid the pieces on the foil. Then cover the pan and put on the heat on medium. You'll soon start noticing smoke spirals (if your pan has a glass lid like mine). My fish took around 20 minutes to cook, although the time depends on the thickness of the pieces. The fish is cooked and aromatized at the same time. And trust me, the result is worthwhile, the tea gives the fish a wonderful flavor. The only disadvantage is that a nice burnt smell pervades the whole house... maybe my pieces of fish took a bit too long to cook and the rice burnt completely. I'll make smaller pieces next time. I'm sure my neighbours were on the verge of calling the fire brigade. Well, maybe it would be a good chance to make friends...


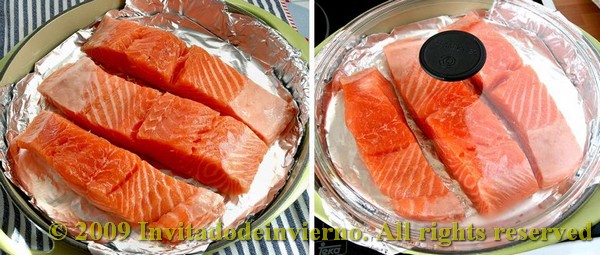
My brother-in-law served this salmon with some mayonnaise on a toast... but the possibilities are endless. I had some after preparing it with just some soft-fried potatoes, nothing more... simple and delicious.

Eager to know more?

Arsenio's bica

>> Sunday, October 25, 2009


On October 10th I attended another course at La cocina de Babette (I've become addicted), this time on organic corns and the use of their flour in traditional baked goods in Galicia, more exactly in the Orense Province. When I saw the program I couldn't resist myself... it would include making corn empanada and bica... two of my favorite Galician delicacies!


Bica is a kind of popular dense cake, typical in some areas of Orense. I know the bicas of Puebla de Trives, as I've been there two or three times. From the wonderful book Repostería en Galicia (Pastry in Galicia) by Mariano García and Fina Casalderrey, here are a couple of paragraphs about bica (the original is in Galician, the mumbling translation is mine):

The lands of the province of Orense are the masters of the art of baking bicas, and they use that name as of their own property as they claim that right. (...)
It is true that the bica de Trives is the one that outsiders find more familiar, even though, as we learnt in Castro Caldelas, its origin is not very clear and there is a certain rivalry among the neighbouring villages, who claim that right.(...)
The bicas mantecadas (with butter) from Vilariño de Conso or Manzaneda... are equally tasty.
The book includes five recipes for bica, representing the various versions of this cake: yellow bicas, white (only the egg whites are used), corn, mantecadas (with butter), etc. The bica mantecada carries an oscene amount of butter and also bread dough for rising. Strong bread flour is recommended for all of them.


Back to the thread again, this course of traditional baked goods made with corn flour was given by the very charming Mr. Arsenio Landa, owner of an organic farm at the Baixa Limia land. This farm is essentially dedicated to growing native corn varieties. The cultivation of these native corns has been largely abandoned in Galicia in favour of hybrid corn varieties. Besides learning about the virtues of native corn, how it is grown and how it can be used, this course had some added value. All the baked goods that we were going to prepare along the day, empanadas, pizzas, breads and the like, would be eaten for lunch at the very cooking school... I know what you're thinking... yes, all the pupils ended up conveniently stuffed, like pigs.

We didn't have time to make this corn bica mantecada in the class, and Arsenio strongly recommended that we did at home, because it was delicious. And being that I am a very obedient girl, I made the bica a few days after.

Bica mantecada with corn flour
  • 180g butter
  • 450g sugar (I only added 400 and I found it sweet enough)
  • 8 eggs
  • 250g corn bread dough
  • 250g mixture of strong white flour and corn flour, 50%
  • Lemon zest
Corn bread dough
  • 700g mixture of strong white flour and corn flour, 50%
  • 450ml tepid water (mine was at 25°C)
  • 1 package dried baker's yeast
  • 2 tsp sea salt
This makes for almost 1 kg bread dough and you only need one quarter for the bica. You can choose to divide the amounts by four or make the whole mixture and freeze it for a future use (or just use it for pizza, it's wonderful).


First prepare the bread dough. Mix the yeast with the flour and then the tepid water with the salt. Make a well in the middle of the flour and pour the salted water, keeping a small amount for later. Mix by hand, Arsenio recommends this method for a better control of hydration. Knead till the dough is soft but not sticky. Add more water on the go if the dough is too stiff. Then leave it to double in bulk in an oiled bowl, covered, for around two hours depending on ambient temperature.


Once the bread dough is well risen, you can really start to prepare the bica. Cream the softened butter (not melted) with the sugar, until light and fluffy (see picture). Add the eggs in two batches along with the zest and mix until thoroughly incorporated. Then add the bread dough little by little while you go on mixing. Finally add the flour mixture. Pour the mixture into a rectangular or square baking dish, well buttered and floured. Bicas are traditionally baked in a tin. I lined the tin with some waxed paper so that the bica could be unmolded more easily. My baking dish is 35cm x 31cm approx.; it's a bit too large for this amount of cake mixture. The bica turned out not thick enough, it is traditionally a little bit higher, but I had to get by. Then put the cake immediately into the oven preheated to 190ºC and bake it for half an hour. It rises very homogeneously and the surface gets very nicely browned. Check for doneness with a skewer and take it out of the oven. Then leave it to cool a little and unmold it by pulling the waxed paper. When cold, serve it in small square portions, sprinkled with powdered sugar and cinammon.


And Arsenio was right: it is delicious. The flavour is excellent, you can lightly notice the corn bran on chewing (the corn we got from Arsenio was almost whole corn, though with a very soft husk) and the succulent and deep yellow colour in the pictures is not exaggerated at all. This is the perfect cake for a cold and windy Autumn night, by the chimney, with a hot chocolate...

I'm sending this cake to Susan's Wild Yeast, for her weekly YeastSpotting.

Eager to know more?

Tapa of quail eggs on buckwheat tartlets

>> Wednesday, October 21, 2009


What an over-elaborate title. It sounds like Haute Cuisine and I tell you: it isn't. I'm just updating a very, very traditional Spanish dish, huevos al plato, meaning eggs cooked on a plate. But this time, instead of using chicken eggs on a plate or earthenware cazuela, I've reduced the size of the dish to make it a tapa and used quail eggs on a tartlet. Which means they are not huevos al plato, but huevos a la tartaleta... never mind, I'm not a purist. I hope you're not either...


Huevos al plato were a very typical dish at home when I was a child. Well, at least it was very typical among the household adults, because my sister and I wouldn't consent to trying something soooo very different, almost opposite, to the fried eggs and tomato sauce we loved... Now that I've become more mature (¿?) I thought it'd be a good idea to "revisit" this almost historical dish to turn it into a miniature plate, a two-bite-sized tapa. I don't believe I'm the first to do such a thing with huevos al plato, I'm sure it's been done before. But I don't give a damn. This time I chose to make the pastry dough with buckwheat for a change, you know I love to use less-common flours.


Quail eggs on buckwheat tartlets

Pastry dough:

  • 140g all-purpose flour
  • 140g buckwheat flour
  • 125g butter
  • 1 pinch salt
  • 100ml cold water
Huevos al plato, per tartlet:
  • 1 quail egg
  • 1 small handful peas (a 3-year-old handful...)
  • 1 small handful diced Spanish jamón or chorizo
  • 1 tsp good tomato sauce (preferably homemade, the little tomato background layer gives the tapa half its flavor)
Start by making the pastry dough. I adapted my usual pastry dough recipe by substituting half the amount buckwheat flour for half all-purpose flour. Mix the flours and the salt and add the diced cold butter. Mix the butter in the flour either by rubbing with the tip of your fingers or with a mixer, till you obtain a sandy-crumbly mixture. Then add the cold water and knead by hand or with a mixer just until the water is thoroughly incorporated and the dough forms a ball. Don't overprocess. Butter and flour the molds you're going to use (mine are around 7cm in size). Roll out the dough to an approximate thickness of 2mm, and line the molds. Be careful as this dough is not as elastic as an all-wheat dough. Once the molds are lined I usually put them in the freezer for the dough to freeze lightly (small size tartlets freeze very quickly). This prevents the dough from bubbling when blank-baked, you don't even need to prick it with a fork. This trick works for me.

Preheat the oven to 180ºC. Blank-bake the tartlets for 10 minutes, enough for the dough surface to seal. Take the molds out and leave them to cool a little, so that you don't burn yourself. Lay the filling by spreading a teaspoon of tomato sauce on the base, then carefully crack one egg and lastly sprinkle the previously boiled peas and the Spanish jamón or chorizo, uncooked.


Put the filled molds into the oven. The tartlets don't need much time to get cooked, but it really depends on the oven; mine took around 10 minutes. The perfect outcome is a thoroughly hard white with a liquid yolk... but it's tricky to get with such small eggs. My eggs were hard all over, grrrr. I made a second batch where I separated the yolks (tricky stuff!) and put them aside, then cook the yolk-less tartlets, only to add the yolks for a final 2 minute cooking. Well, maybe you don't care about hard yolks, but I do. I prefer them liquid, so that their juices spread when you bite and drip down your chin... ahem... yum. Despite all imperfections, D. loved the tartlets... and me too... with a tasty red wine... they make for a very traditional appetizer. (Why is it that I almost always finish my posts with a drink?)


Eager to know more?

Middle-class brioche

>> Sunday, October 18, 2009


I haven't made brioche too often and I don't seem to get hold of it. When I cook a recipe some times I'm lucky and it turns out right the first time and some others, like this one, I have to go through a trial-and-error process. The previous brioche I had baked was delicious, very fluffy, but somewhat overfermented. It had to wait for its turn to get into the oven. It was in a queue behind a roast and a bread... I told you, I need a second oven. This brioche suffered just the opposite: I didn't allow for a complete proofing. But it turned out so beautiful, my little brioche, that I can't resist but posting it.


The middle-class thing comes from the brioche categories included in Mr. Peter Reinhart's book The Bread Baker's Apprentice. The rich-man's brioche is made with a butter weight approximately the same as the weight in flour, the poor-man's brioche is made with a butter weight which is a fourth of the flour weight and the middle-class brioche... well, it's something in between. Nonetheless in the end I took the recipe from the book 100 Great Breads, by British baker Paul Hollywood. I used this one instead of Reinhart's because the process is shorter (yes, I'm always short of time). Reinhart prepares a sponge, leaves it to ferment and then he mixes the sponge with the rest of the ingredients. The complete dough is then left to proof overnight in the fridge. Mr. Hollywood skips the sponge without any remorse.

Middle-class brioche from 100 Great Breads

  • 375 g strong white flour
  • 40 g sugar
  • 15 g fresh baker's yeast
  • 1 pinch salt
  • 75 ml milk
  • 3 medium eggs
  • 185 g butter at ambiente temperature
Mix all the ingredients except the butter in a mixer or by hand. Then knead for 5 minutes by machine or 8 minutes by hand, till the dough is smooth. Add the diced butter and knead again for 5 minutes by machine or 10 minutes by hand. Put the dough into a bowl, cover tighly and leave in the fridge overnight.


Take the dough out of the fridge the next day and make 60 g balls while cold. I could make 13 little balls and there was a bigger ball leftover which I used for a brioche a tête in a muffin mold. My eldest son ate this one, straight from the oven. I'm sure he burnt his mouth, but he won't admit it. Then shape the balls and put them into the mold, with seam face under, leaving quite some room among them as they expand quite a lot. Cover the formed brioche and leave to proof at least one and a half hour, till more than double in size. I should have left it a bit longer, but I had to bake it for me to take it to my parents' house, to be served for dessert at some family meal... I lead a hard life. In the meantime preheat the oven to 200 ºC. Once the oven is a the right temperature, bake it for 20 minutes. It can be brushed with egg yolk prior to baking, but I preferred to make an apricot jam glaze (it seems I never find the right ocassion to use the frozen egg whites) for glazing when cooled. I used two large spoonfuls of apricot jam, heated and strained, with a sheet of gelatin. Brush the cooled brioche with the glaze, leave it to drip and you're done.


And... eat it with a tall glass of cava... or two... or three... I'm sure it's perfect for killing the H1N1 virus. You can use the leftover as toast for breakfast... nothing's to be wasted, we're in a crisis!

By the way, this bread goes to Susan/Wild Yeast for her lovely YeastSpotting.


Eager to know more?

Daring Cooks' challenge October: Vietnamese chicken pho from Steamy Kitchen

>> Wednesday, October 14, 2009


I was missing something in my life... a little bit more chaos perhaps, so I decided to join the Daring Cooks. For my first challenge I had to cook something Vietnamese and that I hadn't even tasted before: a pho from the delightful blog Steamy Kitchen by Jaden. Timely challenge for me, as so far I've never been especially fond of Far East food...


Before this event, I had only tasted Vietnamese food once in my life. When I was 25 and lived in The Netherlands, a Vietnamese girl joined my company. She had had the most peculiar life. She had fled Vietnam in a boat when she was 12 or 13... yes, she had been one of those "boat people" we used to hear about in the news. She had two older brothers approaching the military service age. At the time Vietnam was in a non-declared war with some neighboring country (I don't remember which, she told me this a loooooong time ago). That meant an almost certain death for the two boys. Therefore their parents collected all their savings, bought two boat tickets for the boys and another one for my friend. Yes, she was sent along to take care of the boys, that is to cook, wash, do the laundry and the like, those things a servant... excuse me, a woman usually does in a lot of countries in the world for no wages at all. The boat was rescued by a Dutch ship which took the refugees to The Netherlands, where they were well catered for. They were given refugee status and received acommodation and education. My friend studied Chemical Engineering and ended up working for my company. We didn't work together for a long time, just a few months I believe. When I decided to go back to Spain, I was leaving some furniture and household equipment behind that I gave to her. She then organised a Vietnamese dinner to thank me. I don't seem to have been too impressed by the cooking, because I hardly remember what we had. My memories of her and her husband are a lot more vivid. She was a tremendously happy person, nothing gave away all the misfortunes she had gone through. Her name was Nga. Here's looking at you, kid.


The October 2009 Daring Cooks’ challenge was brought to us by Jaden of the blog Steamy Kitchen. The recipes are from her new cookbook, The Steamy Kitchen Cookbook.

You can find the recipe here. As Jaden says, the most important thing is to obtain a very clear broth though packed with flavor. I chose to make pho with chicken, you could choose among some other varieties like vegetarian, beef or shellfish broth. I know how to make a Spanish chicken broth, but I tell you, the flavor of this broth has nothing to do with it. The spices and condiments are so very different, regardless of the chicken base. Some condiments are really peculiar for me, like the fish sauce and the star anise (in a savory soup? Are you nuts?).


The most important part of the challenge was to obtain a broth packed with aroma while keeping it clear. It seems I did all my skimming well, because the final broth came out quite transparent. The only change I made was to boil two additional carcasses with the whole chicken, to add even more flavor. Well, I'm not telling the truth, I made another change, a mistake in fact. I forgot to toast the spices, shame on me. But the ginger and onion were beautifully charred, don't you think? After the boiling I let the broth cool and left it overnight in the fridge, so that I could easily defat it the next day, it seems my chicken was rather fatty. You know how that's done, don't you? Just get rid of the solidified fat on the surface by spooning it out.


The broth was wonderfully aromatic and tasty. I found it difficult to adjust the seasoning though... how can you tune something when you have no idea of how it should taste? I did the best I could. Regarding the garnish, I couldn't find red onion at this time of the year and I hate bean sprouts, so I skipped them. I only used the noodles, cilantro leaves, shredded chicken and lima slices (the noodles are at the bottom of the bowl, that's why you can't see them). Instead of boiling the noodles in plain water, I boiled them in the broth itself for more flavor. Despite my initial reluctance, I found the soup delicious. The flavor is so different from what I'm used to in a soup, yet so good. I could clearly make out the ginger and the star anise flavors (even though my star anise dates from the 12th century...). This was a very interesting experience for me, as so far I've been a complete ignorant of the Far East cuisine. And it brings some colour to my dull life... Jaden, I hope you're proud of your disciple!

Eager to know more?

Another chestnut and squash soup

>> Wednesday, October 7, 2009


Fall is here. I still keep a certain amount of dried chestnuts in my pantry. My favorite fruit store has squash. Saturn is aligned with Jupiter. Everything pushes me to prepare a flavorful and comforting soup. It's not a very original proposal, but I've renovated the recipe by adding an obscene amount of alcohol...


Boozy chestnut and squash soup

  • 1/2kg squash
  • 250g dried chestnuts (equivalent to 400g fresh chestnuts, though I prefer them dried, at least you don't need to peel them)
  • 1 large onion
  • 1 generous glass sweet wine (OK, two glasses, one for the soup and another one for the cook... I used a Pedro Ximenez wine, Dos pasas, but any good tawny Port or moscatel would do)
  • 1 pinch nutmeg
  • 1l water, chicken or vegetable stock
  • Oil for frying the onion
  • Salt to taste
If you use dried chestnuts, leave them overnight in water to soak. Afterwards I thought it would have been maybe a good idea to soak them in the wine, the flavor could have been stronger. The next day heat the oven to 180°C. Brush the squash portion with oil and roast it for around half an hour till cooked through. In the meantime, boil the chestnuts in the wine and prepare the sofrito with the finely minced onion and a little oil. Test the squash with a knife for doneness. If it's cooked, peel it, cut it in several pieces and add to the chestnut pan. Add the sofrito when the onion is thoroughly soft. Then add the liquid and boil everything until the chestnuts are tender.


Finally add the nutmeg and the salt. Puree the mixture in a blender until very fine. Of course I use my Thermomix. Use a foodmill if your machine is not powerful enough to get rid of little hard chestnut pieces. Once everything is pureed, adjust the salt to your taste. I had to add a lot, more than 2 teaspoons, because all the ingredients are sweet in fact. Adjust the liquid also if needed, depending on the thickness.


I loved the result, you can clearly notice the sweet wine flavor, therefore I recommend to use a medium-high quality wine (well, not too high, that would be a sin). Funnily enough, you can clearly make out the different flavors: the sweetness of the squash and the onion, and the earthiness of the chestnuts. For serving this kind of soup I find that little slivers of bacon or jamón, fried or roasted till very crispy, are a match made in heaven (no, don't fry or roast Ibérico ham for this! That would be another sin). I cut the slices in little pieces and microwave them. It's quick, clean and easy. Mmmm, this soup matches the Sunday roast perfectly...

Eager to know more?

Shabby almond tart

>> Thursday, October 1, 2009


This hybrid of tart/cake looks shabby. And it's all my fault. But it's so delicious that still it deserves a whole post. It's very similar to tarta de Santiago, very typical from Galicia, only in this case the eggs are whipped with the sugar until light and fluffy, yielding a much lighter tart than the Santiago type.


But let's start from the beginning. Like Sophia Petrillo, one of my idols, used to say: picture it, Sicily, 1920... ahem, Galapagar, non defined year... I had prepared this tart a long time ago, from a Thermomix recipe in the Internet (unknown author). I had found it delicious and very easy. I had baked it for some celebration where all the guests loved it. In spite of that, I had never made it again. And now I felt like testing it in a sugar-less fashion, for the sake of health. On top of that, it's a gluten-free recipe, double healthy. No baking powder either. Couldn't be simpler.

Almond tart/cake

  • 250g almonds
  • 250g sugar
  • 6 eggs
  • Lemon zest
That's the original recipe and here goes my tweaking: I substituted 100g fructose and 50g agave syrup for all the sugar (fructose and agave are sweeter than sugar). I didn't dare to use only agave syrup because it's liquid and I was afraid it could interfere with the airing of the eggs (I don't know if that can happen). There's a lot of controversy regarding the benefits of fructose, I know... When you substitute agave syrup for sugar you need to reduce the global amount of liquid, therefore I used only five eggs instead of six.


Firstly grind the almonds if you haven't bought almond meal. Then whip the eggs with the sweetener until light, fluffy and almost white in color. In my Thermomix it's very easy: fit the butterfly, add the eggs and the sweetener or sugar, and set 8 minutes at 40° and speed 3 (Thermomix 21). Turn the heat off after 2 minutes and let the mixture cream for the remaining time. Of course you can cream the eggs with the sugar in any mixer, like here. Mild heat is supposed to aid the creaming, therefore I've seen the advice to put the mixture in a bowl which is inside another bowl with tepid water (I haven't tried this though).

Once the eggs are creamed, add the ground almonds and the lemon zest, either with the mixer or with a spatula. I forgot to add the lemon zest... that was my first mistake. The second mistake was that I used a removable-base mold that I only buttered and floured (with rice flour to keep the thing gluten-free); because of the high sugar content the tart is very sticky and it indeed got stuck to the base and walls. I had to struggle to peel it off, that's why its looks are not... let's say... perfect. OK, I could have used a beautiful frosting to hide the disaster, but I generally hate frostings, unless they are made of marzipan... but wait, that's not frosting, is it? I find a much wiser option is to line the mold with parchment paper, thoroughly buttered. I almost forget: bake the tart/cake in the oven at 180 ºC for half an hour approx., depending on the browning. Better try with a toothpick for doneness (a fondue stick in my case) . It rises quite a lot in the oven, although it sinks when cold (maybe that's not the purpose, but it does happen to me). But, in spite of all my mistakes, the flavor was excellent. The consistency is very moist and fluffy. You can play around with the almond, using a more finely ground or less finely ground almond. I like mine not too fine, so that you get a nice crunch in each bite. And I'm sure you're wondering if there is any noticeable difference by using fructose instead of sugar. Well, yes, fructose caramelizes at 110 ºC, while sugar does it at 160 ºC, therefore there's a noticeable caramel flavor which you don't get with sugar. That is, the result is different, but equally delicious. And a lot less energetic.


You can sprinkle some powdered fructose or cinnamon or both for finishing. I find that cinnamon is a good match. I encourage you to make this tart, I know you'll do it right, the same as me next time...

Eager to know more?

Followers

About This Blog

Lorem Ipsum

  © Blogger templates Palm by Ourblogtemplates.com 2008

Back to TOP