Related Posts Widget for Blogs by LinkWithin

Finnish cherry tartlets

>> Wednesday, May 27, 2009


The same thing again: I had some cherries in the fridge softening and wrinkling... I still remembered how nice they looked when they entered my life... time flies. I resolved to use them in a nastily healthy and easy dessert without a hint of sugar (revolting). So what better use than in some nice tartlets with minimal doughness and maximal fruitness, this type, but smaller and with a dough recipe from a Finnish cookbook D. brought me some years ago from a business trip to Finland. That's the gift I like best: an indigenous cookbook.


Besides it was an unbeatable excuse to dig out that indispensable gadget every decent family should have at home: a cherry pitter. Because... I'm sure you've been in desperate need of a cherry pitter some time in your life. I don't remember my life before it, it has changed so much ever since that summer I found my cherry pitter in a trip to Germany... sigh. Clever people, those Germans... enough to sell us any absurd cooking gadget. In the same trip I bought a nice lattice pastry roller (another sigh). Haven't used it yet though, but it doesn't matter, there's still hope.

Being that Finnish don't get to grow many cherries in Finland, they make the tartlets with juicy forest fruits, of which they seem to have plenty. The tartlets must be delicious with cranberries and the like.


You can see the gadget is rather simple: a plunger pushes a cross-headed spike that presses the cherry against a little hole and pits it. The pits go down into the container and the pitted cherry goes out through the right side... OK, almost always... fine... sometimes it comes out that way. I love the released juice, at the end of the pitting the counter looks like some slaughter scene. And it does vent your frustration.
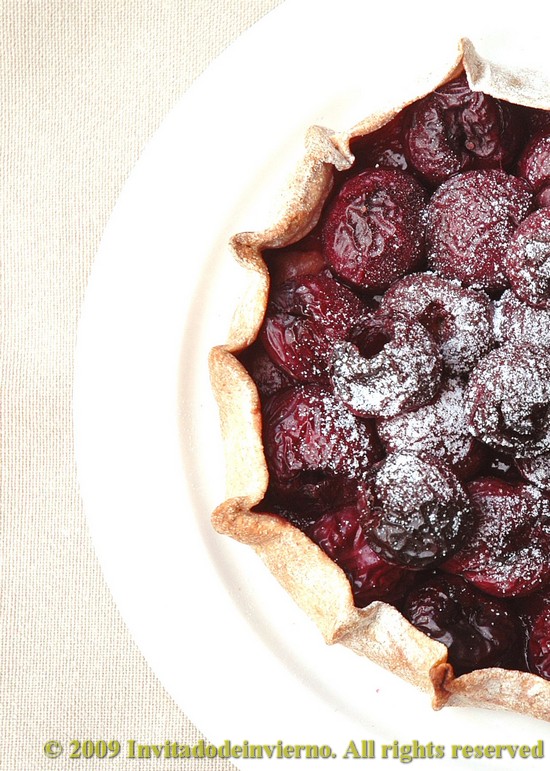
Cherry tartlets

Dough (from Food from Finland, Anna-Maija and Juha Tanttu)

  • 1 dl water
  • 2 dl rye flour (I used semi-whole rye flour)
  • 1/2 dl all-purpose flour (as usual, I used spelt)
  • 1 teaspoon salt
Filling
  • 2 handfuls pitted cherries per tartlet
  • Some sugar or sweetener, to your taste, I used stevia
Use any device you like to mix the dough ingredients, even your hands, until it is more or less blended. Roll it on a well floured counter and sprinkle some flour on top too to prevent it from sticking to the rolling pin. According to the Finnish this dough yields between 12 and 14 tartlets. They must be gnome-size tartlets. The traditional way seems to make them extremely thin, "to see seven churches through it". These Finnish are peculiar. As I am not Finnish I only made 4 round tartlets of around 13-14 cm with the edges folded. The recipe advises to form the dough into a bar and then cut it into equal balls, as many as you like, to be rolled.


Once the bases are nicely rolled, quite thin but without overdoing it, lay the pitted cherries on it and pleat the edges as far as you like, at your own free will (yes, you do have that). Sprinkle the top with the sugar or sweetener chosen to your taste. Yes, I know many people don't know what to do with so much freedom and need to have the whole way marked... But you've got to try.

And then to the oven preheated at 200 ºC for half an hour. Watch closely so that they don't get burnt.

They would have been delicious with some cream on top, you can add it, I didn't do it. I only sprinkled some powdered fructose. The salty touch in the dough is very interesting, I really liked it. Be careful with the juices released in the base, you can end up covered in juice. It would be easier to eat bite-sized tartlets. I will do it next time. This is a wonderful way to use softish fruit, I look forward to making them with peaches or apricots.

Eager to know more?

Cheese mousse and crepe tart with strawberry sauce, part II

>> Saturday, May 23, 2009


And here goes the strawberry sauce, nothing complicated. Did it deserve a dedicated post? I don't know, but the saucer is soooo cute...

Strawberry sauce

700 g strawberries
Juice of one lemon
1 tablespoon pectine
Sugar or any other sweetener like fructose, to your taste

Put the previously washed strawberries in an enameled pot on low heat and add the lemon juice and sugar. Leave the strawberries to soften and release the juices slowly, stirring from time to time. I added the pectine, which is a thickener or gelifiant because that let's you shorten the cooking time. You add it almost at the end, I cooked the sauce for almost 20 minutes. Anyway, I don't really recommend this method because, at least here in Spain, pectine is quite expensive and I'm sure the gas or electricity you use to thicken the sauce is cheaper. According to some purists, pectine lets you achieve a creamier texture without having to cook it all the way, which is supposed to keep a fresher texture, color and flavour, more similar to the fruit the sauce comes from. I think I overcooked it anyway. Once reached the desired consistency, I mixed the sauce and put it in the potato masher to get rid of the seeds. The sauce turned out to be delicious, though inmodest it may seem (¡!). The perfect complement for the cheesy softness of the tart.

Eager to know more?

Cheese mousse, caramelized apple and crepe tart with strawberry sauce, part I


I had been thinking about making a crepe tart for ages, but never got to it... Therefore last weekend I thought the big day had finally come... to get to it. The recipes I had seen implied multiple layers of pastry cream in between crepes. I decided I had another lazy day, so I'd rather make a proved cheese mousse for filling, easier to lay. And to add some more spark, dot the mousse with caramelized apples... yummy.

For a more professional look, I decided to build my tart into a mold, like here. The crepe recipe in fact is a "filloa" recipe. Filloas are very similar to French crepes, but typical to the northeast corner of Spain, from Galicia. I found it in this book Cocina gallega by Araceli Filgueira, although any crepe or thin pancake recipe will do, only the crepes must be thick enough to give some frame to the tart. And I also thought it was a grand day for freezer lightening, so I took out some frozen strawberries, almost fossilized, that dreamt about better days in the freezer depth... That's what I call gastronomic archaelogy.

Cheese mousse, caramelized apple and crepe tart

Rye "filloas"

250 g water
250 g milk
4 eggs
6 tablespoons all-purpose flour
3 tablespoons rye flour (I used white rye flour, without bran)
1 pinch salt
2 teaspoons fructose or 1 teaspoon sugar (the recipe does not include any of those, but I thought it would agree with the tart)

Once you have the batter well mixed, you need to try and make a crepe, to check for the thickness and adjust the flour or liquid. I had to add another tablespoon of rye flour. The amounts yield more "filloas" than you will use in the tart (I only used five), but you can have the leftovers for breakfast the next day, heated up on a skillet and rolled with honey, maple syrup or yogurt or everything together... delicious. We're in a crisis!

Fine, next you mix all the ingredients, beat them well to avoid any lumps and start forming the crepes on a flat buttered skillet. I'm lucky that I have a mold with a removable base that is roughly the same size as a crepe pan someone gave me once. So the "filloas" were nearly perfect in size for the mold. If you're not as lucky as me (sorry!), you'll have to make your crepes slightly bigger and then trim them to fit. Cook the crepes one by one and put them on a plate, separated by plastic wrap, just in case, and leave them to cool while you make the mousse.

Caramelized apples

3 cooking apples
2 tablespoons fructose or 1 plain sugar
1 tablespoon butter

Peel the apples and dice them. Sprinkle with some lemon juice to prevent discoloring. Melt the butter in a pan, add the apples and fructose or sugar and cook them on low heat. Stir from time to time taking care not to break them too much until tender. Leave to cool.

Cheese mousse

3 egg yolks
50 g water
100 g sugar (I didn't dare to substitute fructose here, maybe the thickening would be affected)
400 g whipping cream (I used 450 g)
200 g fresh cheese (I used 250 g)
4 gelatine sheets (I used 4 and a half, because of the excess cream and cheese)

Soak the gelatine sheets for 8-10 minutes in cold water. Separate the egg yolks and mix them with the water and sugar. I use my Thermomix to beat the mixture for 5 minutes at 85 ºC and low speed. If you don't have a Thermomix, you need to thicken the cream in a double boiler, or use two pans to make it in a bain Marie, till the cream is thick and covers the spoon. When the cream is done, add the soaked gelatine sheets and mix thoroughly till they're well dissolved. Leave to cool.

When the cream has cooled to ambient, add the cheese and cream straight from the fridge and whip the mixture to very soft peaks. It doesn't need to be too hard, in fact I believe a very hard consistency is simply not achievable. Put the mousse aside.


I covered the base of the mold with plastic wrap so that I could take the tart easily on to a serving dish. First put two crepes on the base and then place a third of the apples and pour a third of the mousse on top of the apples. Lay another crepe on top of this and press slightly to even the filling below and to avoid air bubbles. Then another apple and mousse layer. As you can see in the picture, I made three layers, you end up with a crepe on top. And then to the fridge overnight. You can sprinkle the top with powdered sugar or fructose and also cinammon... delicious. It is a very light and delicate tart.

And the strawberry sauce recipe to go with it will follow in the next post, for no reason at all...

Eager to know more?

Coca de escalivada

>> Wednesday, May 13, 2009


I started to bake "cocas" after buying my Thermomix ages ago... it doesn't matter how long, following the accompanying recipe book where only a slight fermentation is used. But now I've prepared it with sourdough. It's a long time since I last prepared a "coca" and I felt like eating it again, so I thought it would be a good idea to make it completely catalan and spring-like with a good "escalivada", wooonderful!

Cocas are pizza-like pies typical from Catalonia and the Eastern Mediterranean coast of Spain, including the Balearic Islands; I don't know the precise latitude where they stop being baked.... If there's someone from Murcia out there, show up and tell me if some similar pie is baked also there. I can't wait to know... please teach me! I've got an excellent cooking book written by an American, Colman Andrews, Catalan cuisine, (worth buying!) which includes several recipes and offers some explanation on "cocas" and their lore. Here it is, forgive my rendition, I'm translating from a Spanish translation of the English original:

"Coca is more or less a catalan pizza, a flat dough base which admits a wide variety of garnishes, whether sweet or not. (...) The word apparently is derived from the latin coquere, to cook, and it is used no only in catalan but also in the old Oc language of Toulouse and its surroundings.(...) Cocas are different from pizzas not only regarding their typical shape, but also in that cheese and herbs are hardly ever used for garnish. Besides they are traditionally served at room temperature"... Nice cultural touch for this blog, you know it needs it badly. And I add: "cocas" are indeed delicious at room temperature unlike pizza. Mrs. Coca, you've got a point there.

I don't know if the description of catalan "cocas" is valid for another region's, my information is scarce... mmm, I'd love to undertake a field study. Let me remind you, I'm willing to be taught. And after this cultural addition, it's time to get to the point. The amounts in the recipe make 2 medium sized "cocas" or one large "coca".

Coca de escalivada

Base dough (adapted from the Thermomix book, with sourdough)

  • 160 g whole spelt sourdough 50% hydration (use any sourdough type you like, you just need to adjust the final liquid depending on flour hydration)
  • 100 g milk
  • 70 g water
  • 50 g virgin olive oil
  • 300 g white spelt flour (according to the recipe I should have had to add 420 g white bread flour, but I had enough with 300 g)
  • Pinch of sugar (I skipped it)
  • 1 teaspoon good salt

The same recipe with normal fresh yeast and no sourdough:
  • 100 g milk
  • 150 g water
  • 50 g virgin olive oil
  • 500 g strong bread flour
  • Pinch of sugar
  • 1 teaspoon good salt
  • 30 g fresh yeast

Escalivada
  • 2 eggplants
  • 2 red peppers
  • 2 onions
  • 2 tomatos (these were leftovers, they are not really essential ingredients)
  • 1 clove garlic
  • Virgin olive oil to taste

You can cook the vegetables in the oven while you prepare the dough. Preheat the oven to 190 ºC. Brush some olive oil on the vegetables and put them in the oven on a baking tray. I coat the tray with aluminum foil because the juice the red peppers ooze is really hard to clean. And if some catalan is reading, maybe he'll kill me: it's traditional to cook the vegetables on a grill, barbecue or the like, till they are nicely browned and smoked, but... the oven is much easier, ahem. I even wrap the onions in aluminum foil so that they don't end up too burnt. When the vegetables are cooked and tender, in 30-40 minutes, take them out of the oven and put them altogether in a lidded pan for them to sweat and cool.


Meanwhile prepare the dough. I mixed a sponge first because my sourdough was past its prime at that moment and I was afraid to add all the ingredients at once, for fear that the dough would not rise sufficiently. Therefore I added the water, milk and 200 g flour to my sourdough and left it to proof for a couple of hours. Once the sponge was bubbling, I added the oil and the rest of the flour. Only 100 g more did the trick. And the salt. And to the fridge with it because I had no time to bake the coca until later on.

After 1 hour in the fridge and another hour tempering, I tipped it on a floured counter, I divided it in 2 (I put one half to freeze) and I flattened it with a rolling pin. It's traditional to make them in oval shape, with a raised edge to hold the filling and put them in the oven with a peel like a pizza. I normally put the dough in an oven tray, out of laziness... I get rectangular "cocas". And here comes another tricky question since in every corner "cocas" are made somewhat differently: many sources state that the filling is laid on the uncooked dough and then put in the oven, while in other recipes the dough is briefly blindbaked before, like some pies, and then you add the filling and take everything to the oven again to finish the baking. I take the easiest way, I bake everything altogether out of laziness (nice idea you're getting of me), but I've got to try the blind baking of the dough someday. I'm sure the result is going to be different, because the juices from the filling somehow interfere with the oven spring of the dough in the middle part of the "coca".

So let's add the garnish. When all the vegetables have cooled, peel the eggplants and peppers and separate them into strips with your hands. Slice the onion and tomatos. Start laying the vegetables on the dough. I advise to put the peppers on top for a more colourful dish. In several recipes we are advised to mince the garlic and spread on top of the vegetables before baking. I prefer to soak the minced garlic in 2 tablespoons virgin olive oil for a while and then brush the mixture on the vegetables... yummy (I used 1 clove garlic for half the dough and vegetables, I like it garlicky). Then you add plenty of salt on the vegetables to compensate for the sweetness of both peppers and onion.


Bake the "coca" in the oven preheated to 210 ºC for 12-20 minutes, baking time depends on whether you use sourdough or not. Mine took 20 minutes to bake. The result was excellent, the dough has a lot more flavour and character than the one you make with the original Thermomix recipe, of course. What I love about "cocas" is that they are equally good the day after and there's no need to keep them in the fridge, just at ambient temperature (of course not for longer than 2 days, 1 day in warm weather). You can choose to reheat them or not to your taste. It's a most delicious dish, unfortunately a lot less known than pizza... I vindicate "coca"! The "coca" also exists!

Eager to know more?

Rye flatbreads with sense and sensibility

>> Monday, May 11, 2009


I've baked these flatbreads more than once. They're super-easy because no shaping is needed, they're just cut with a round mold or a glass, like cookies. The recipe comes from the wonderful book by Dan Lepard "The handmade loaf", not translated into Spanish yet, grrrr. By the way, if there's any publisher in the room, I'm the perfect guy for the translation...

These are flatbreads with rye and honey, with a nice brown inside and a sweet honey touch, delicious with butter for breakfast... a lot of butter... more, spread more butter. Mister Lepard makes them with white strong flour, but as I don't want to eat too much white flour, I use spelt instead.

Flatbread with rye and honey

  • 250 g white spelt flour (300 g strong white flour in the original)
  • 150 g semi-whole rye flour (100 g in the original, but I wanted to put more rye to pretend I'm healthy)
  • 300 g water (Mr. Lepard advises to have it at 20 ºC, as usual I didn't pay any attention and I added the water straight from the tap)
  • 1 teaspoon salt
  • 1 tablespoon honey (Lepard says 3 teaspoons, but that is too much effort with honey)
  • 1 sachet bread yeast (I think I overdid it here, I'm not sure this is equivalent to 1 1/2 teaspoons fresh yeast as in the original recipe, but it was already late, we're going to have dinner and I was a bit in a hurry)
As usual, I mixed everything except the salt in my super-mixer and I left the dough to autolyze. I don't exactly find practical Lepard's short kneading method, I usually prefer to do all the kneading and then forget about the dough for a long while. Therefore I started to prepare the dinner and when I remembered about the dough, well, it was well autolyzed indeed. Then I added the salt and mixed it for a short while. The gluten had developed quite a lot while the dough was forgotten... good for autolysis! I've got to repeat this effect next time, I must remember to.

Then I put the dough in an oiled bowl and covered it with my famous and recycled plastic shower cap. I believe it stood for a couple of hours, till it doubled in bulk. Then I tipped the dough onto the floured counter and flattened it with a rolling pin, up to around 8 mm as per the recipe. Then you've got to leave it to relax for a short while. I cut it in circles with a glass, around 9 cm diameter. I put them on a well floured baking tray. Flour everything thoroughly, because the dough is very sticky. The scraps can be rerolled to cut more breads, until all the dough is finished. Once all the breads were formed, I put the trays inside a plastic bag for to keep the moisture and left them to double again. And this is why the breads caught some sense and sensibility... I left them in the kitchen while I watched the movie's DVD...

After one hour more or less, I took the trays out of the bags, because the breads had more than doubled, they were bursting at the seams. I made the V-sign with my fingers and... sticked them on the breads without mercy to make the nice indentations that show on the pictures. And the 25 minutes to the oven, preheated to 200 ºC. While they were baking I went back to the living room to watch Emma Thompson and Alan Rickman suffer... mmmmmm.


And, after 25 minutes they had acquired a nice dark golden colour. So I took them out to cool on a rack. Like all rye breads, they go very well with savory food, like smoked salmon, ham, etc. They keep very well for several days, I put them in a plastic bag and being so thin, if you toast them for a short while, they come out as freshly baked. Enjoy!

(Also, this is my first time on Yeastspotting, the breadmaking roundup by Susan!)

Eager to know more?

Watercress soup and also watercress pesto

>> Tuesday, May 5, 2009


This is a watercress story. One day I found myself with a watercress surplus (I'm the surplus girl...) coming from a weekend salad where not all of them found their way. So I told myself: "let's make yourself a nice soup". Vegetables soups are not among my favourite dishes, but I was trying to lead a healthy life and... get rid of my surplus.

After some research here and there, I came up with this recipe:

Watercress soup

  • 4 good watercress handfuls
  • 3 medium potatoes
  • 2 medium onions
  • 1 cup of broth+1 cup of water
  • 2 pinches curry
  • 2 tablespoons non-sugar almond butter(instead of creammmm, this is a very healthy soup
  • Salt to taste

First stir-fry the onions in olive oil. When they're wilted, add the potatoes, peeled and cut in cubes along with the broth. I used homemade broth, which is always best. I only had one cup, that's why I had to supplement with the water at the end. It will be tastier if all the liquid you add is broth. You've got to adjust the liquid at the end, because the thickness depends mostly on the potatoes and also on your own liking.

Boil until the potatoes are tender and add the curry and the almond butter just before the soup is done. Then turn off the heat and add the raw watercress. Mix everything until smooth. The watercress must not boil, then the nutrients are left intact and also adds some crunch to the soup. It's very comforting, even if you're not a big vegetable soup fan like me.

And... I still had watercress left! So I thought it would be a brilliant idea to use it in some pesto... My idea was not as original as I thought as first. A brief research in the net yielded several recipes... well, several hundreds I should say... I had regarded myself as a very imaginative and original personal for a while... another disappointment in my life... and my friends and relatives don't understand why I drink lambrusco, pfff.

Watercress pesto from UK TV Food
  • 30 g watercress
  • 1-2 cloves garlic, peeled (depends on whether you are travelling to Transilvania after the meal or not)
  • 40 g Parmesan cheese, grated
  • 30 g pine kernels
  • 75 ml extra virgin olive oil


Grate the Parmesan cheese with any gadget you prefer. Then put it in a mixer and add the pine kernels and the garlic and mix everything well. Finally add the watercresss and the oil and blend till the desired consistency. This is a very original and refreshing pesto, with a sour touch from the watercress. I will eat it tonight with some very delicious chestnut gnocchi I have in the freezer...

Eager to know more?

Followers

About This Blog

Lorem Ipsum

  © Blogger templates Palm by Ourblogtemplates.com 2008

Back to TOP