
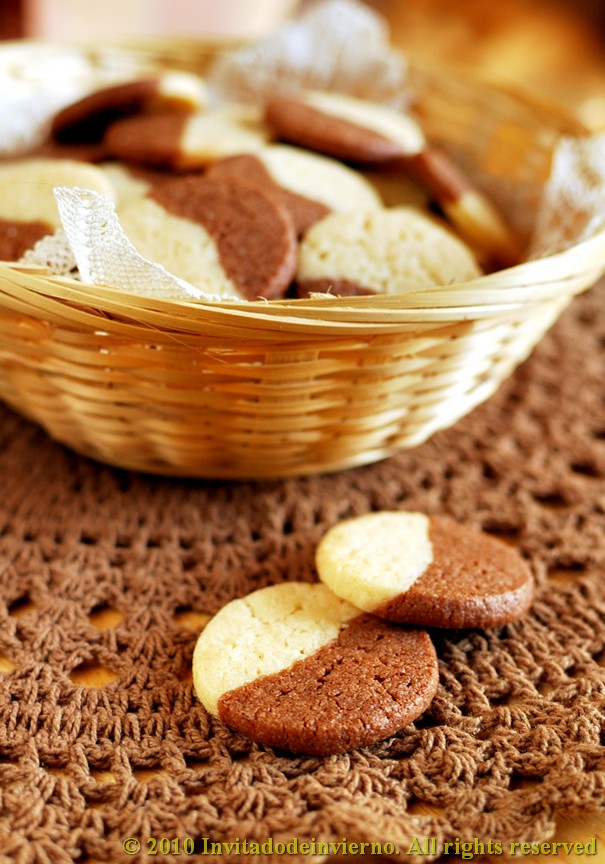
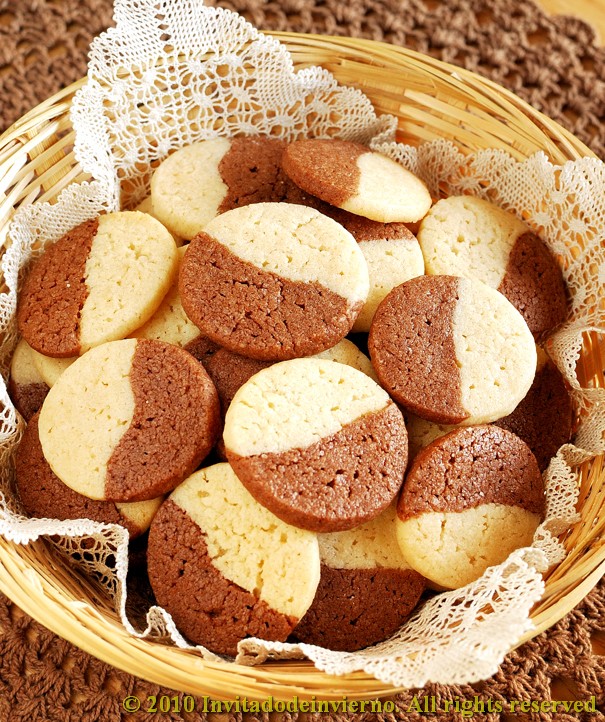
The original name of these cookies was zebra cookies, but I don't like it. So I changed it to marble cookies. I don't marbleize them much though, they are more bicolor cookies... I love icebox cookies, they are easy and practical to make, you can keep them in your freezer and bake them whenever you have guests. And don't forget to keep the carton cylinder inside your plastic wrap or foil rolls, because you'll be needing it.
To change the subject, remember I told you one of my recipes had been published in the Foodista Best of Food Blogs Cookbook? Well, I recently received my book... I feel siderally connected to all the home cooks in the Universe... I must admit I loved to see my story and my recipe on print. And in a book sold in Amazon... I can imagine what it will be like to have a whole book on sale... Beside I was so lucky to have my photo featured in king-size in the book's introduction. I guess I overdid the resolution. So I'm giving away a copy of the book, check it out here. You just have to shout "hey, I'm interested in the book" in the comments section and leave your e-mail, so that I can contact you should you be the lucky winner. And after this "tooting my own horn" moment, let's get to the recipe.
This is the only recipe I've ever tried from this book. But it's never too late to do something you never did before, right?
Marble cookies (adapted from The Art of the Cookie, Jann Johnson)
- 1 large egg
- 115g butter at ambient temperature
- 160g sugar
- 210g A-P flour
- 1 tsp baking powder
- 1/4 tsp salt
- 30g dark chocolate
- Measure the flour and sieve it with the baking powder and the salt.
- Measure the butter and the sugar, and whip with a hand or stand mixer till white and fluffy.
- In the meantime, melt the chocolate in a bowl, on bain-marie or in the microwave (be careful not to overheat it if using the microwave).
- Beat the egg and add to the butter and sugar mixture. Then add the flour little by little, until well mixed. Divide the dough in two portions and add the melted chocolate to one of the portions. Then knead for the chocolate to distribute evenly. It may be necessary to flour the counter top, but if the dough has right consistency it is so buttery that it hardly sticks to the surface.
- Now you have two doughs of different color. Then you can do whatever you want to make both colors mingle; you can lay one beside the other like I do, make a ball with both and knead slightly for the doughs to mingle or you can even roll them, put one on top of the other and roll them together to get spiral cookies. Once you've made up your mind about what to do next, you should make rolls as long as the carton cylinders in the center of you foil or plastic wrap rolls, you'll need 2 or 3.
- Make dough rolls that can fit into one of these cylinders, then wrap them in plastic and put them into the carton. This helps keep the round profile of the cookies, because if you let the dough rest on a flat surface it will flatten slightly on its base.

I think I learnt this trick at Martha Stewart's website. It's wonderful as it's so easy and at hand.
Once you have your dough cylinders ready, chill them overnight or a minimum of 2 or 3 hours. When you're ready to bake, preheat the oven to 185-190ºC, slice the rolls, place the cookies on a cookie sheet with parchment paper and bake for 8-10 minutes, watching closely so that they don't brown too much. Take them out to cool on a wire rack and you're all set. For Christmas I'm thinking of adding matcha tea for green dough and red food coloring for red dough... freaking awesome.
excellent idea to make that dough rolls.... well done! :D
ReplyDeleteLooks wonderful. I love the trick of keeping them nice and round...I will remember that. ;)
ReplyDeletebeautiful and colourful cookies lovely pictures Miriam
ReplyDeleteWonderful cookies! I bet they're addictive!
ReplyDeleteCongrats!! On your winner recipe. It must be an awesome feeling to have one of your recipes featured in a book.
ReplyDeleteThis marble cookies look awesome. The two toned cookies are one of my favorites I thinking of doing some this Christmas.
Have a wonderful day!
These are beautiful!! You make it look so do-able.
ReplyDeleteThey simply look delicious! Gonna try them for sure
ReplyDeleteCongratulations on your recipe in the book! I've got to check it out because so many of my favorites bloggers have been included.
ReplyDeleteWonderful cookies. Thank you for sharing this recipe. It would be great for the holidays!!
ReplyDeleteBuenísima idea de usar un cilyndro para formar tubos perfectos, los bizcochos se ven hermosísimos! Ah, y muchísimas felicidades! :)
ReplyDeleteI love that cookie. It looks great.
ReplyDeleteYou are a great photographer! Love all the shots and those cookies r making me want one right now in the middle of night :-)
ReplyDeleteadorable little cookies and great photos (as always!)
ReplyDeleteThese cookies are so cute. I know my family will enjoy this :)
ReplyDeleteI never understood calling them zebra cookies either since they never turned out striped. These are and look delicious. I like the idea of adding color to them for the holidays as well!
ReplyDeleteGreat tip for shaping the cookie rolls. Thanks!
ReplyDeleteIsn't it fun and exciting to see ourselves in print?? Loved your story and recipe in the book!
ReplyDeleteAnd love those beautiful cookies too!
These reminds me of the pinwheel cookies. I bet I can do the same technique as you have demonstrated. Brilliant and tasty ideas you have! Bravissima!
ReplyDeleteLove the marble cookies out there. First time to this beautiful place, hope to come here more often for these lovely treats. Best wishes.
ReplyDeleteI love the cookies and love the half and half rather than the marbling. Beautiful. And congratulations - again - on being in the Foodista book! Half the thrill is being in there with friends, right? I still haven't cooked any of the recipes (except mine!) but I really want to. Yours looks so delicious!
ReplyDelete"Hey, I'm interested in the book"...there I said it, and I really mean it! I like how you marbled the zebra...yum yum! Congrats on receiving the book; you rightly need to be tooting your horn. Well done Miriam. So glad for you!
ReplyDeleteWow, these look really good!
ReplyDeleteMiriam: Congratulations on being featured in the Foodista cookbook! :) What a fantastic honour and so well deserved.
ReplyDeleteI've never made marble type cookies like these before - thank you for showing how it's done, they turned out beautiful and perfect.
Miriam your photos do look lovely and the recipe delicious in the Foodista cookbook. Congrats again! These marble cookies sound so great and I love your tips. I think the Matcha would taste great, actually I made some sugar cookies with Matcha and they were perfect. I'll be looking for your Matcha Marble cookies:)
ReplyDeleteThe twisted dough for the cookies looks so great! And, I have the book but just haven't had a chance to read it yet. Can't wait to see your recipe!
ReplyDeleteCongrats on your new found fame! Must be awesome to see your recipe in print.
ReplyDeleteThese cookies sound like the perfect thing to have on hand for the festive season.
EG: thanks!
ReplyDeleteBriarrose: it's very helpful indeed...
Torview: thanks!
Cherine: they are... ;)
Mari: thanks!
Belinda: they are doable!
Reb: thanks!
WitK: thanks!
Nisrine: I'm sure!
DD: gracias, Josie!
Joy: thanks!
Prerna: ;D
Sarah: thanks!
Tes: great!
PC: ;)
Carole: you're welcome.
Simone: it's utterly fantastic...
Arthur: thanks!
Sanjeeta: I'm expecting you!
Jamie: yeah, it's such fun!
Deeba: haha, there you are!
Norah: thanks!
Cristina: thanks!
SF: ;)
Lisa: I haven't had the time to try any other recipe either... hoping for the holidays...
Marisa: it's real fun...
Wait. How did I miss this post? Am I too late to express interest in the cookbook?? Well here I am expressing it! Just in case. I also love the cookies - they remind me of black & white cookies, a favorite of Poppa Trix's, only done with frosting. (By the way, I have a giveaway going on right now that you may be interested in and it has something to do with your old friend Chef Mike!! And no, it's not dinner with him, sadly. )
ReplyDeleteWonderful idea for shaping the cookies!! I made a similar recipe tonight (testing it for an office event) and hated the fact that the cookies had a somewhat triangular shape, and then decided to do some research online to improve the appearance and came across your recipe and trick. Thank you for the post and congrats for the blog! Roxana
ReplyDelete