Related Posts Widget for Blogs by LinkWithin
Showing posts with label eggs. Show all posts

School of tapas: Spanish tortilla or tortilla española

>> Saturday, January 14, 2012

Tortilla española

That’s right, tortilla española. This famous tapa at last after a long hiatus. Spanish tortilla is one of the few dishes that can be undoubtedly found all over Spain, if not the only one. It’s so interspersed in our identity that no region can claim to be the cradle of this ubiquitous dish or tapa. And as with every traditional dish, every family claims to prepare the ultimate version. Much debate goes on about the size to which the potato should be sliced, the kind of potato to be used, the seasoning, the degree of inner “runniness” (more cooked, more raw), with onion or onionless… it goes on and on. But the fact is that no matter how it’s made, it is a true favourite on all tables and at all Spanish homes, genuine comfort food. And by the way, my mother makes the best tortilla ever, of course…

And it’s not so difficult to make. Accurate doneness and seasoning take practice, but the result will always be edible, after all… Spanish tortilla is basically nothing more than potato, egg and salt. Some people claim that tortilla should also include some onion and that is a very common addition too, as it gives it a tasty twist that I also love, therefore I’m including this option in the directions. But let’s get to it:

Spanish tortilla
(for 6-8 tapa-sized portions)

  • 3 medium potatoes (waxy potatoes preferred)
  • 5 medium eggs 
  • 1/2 onion (optional)
  • Salt to taste
  • 4 cups (minimum) virgin olive oil for deep frying

Tortilla española
  1. Peel and slice the potatoes finely (see the photos). Peel and slice the onion if using. 
  2. Heat the olive oil in a deep frying pan or in a deep-fryer, to low-medium. Add the potatoes (and onion). The potato must be poached gently, not really fried. It is essential that the potato slices don't form any hard skin (nothing near potato crisps), they must be overly soft in the end. The poaching can take anything from 5 to 10 minutes, depending on the type of potato. Turn them over once in a while with a slotted spoon if not using a deep-fryer. When done, drain them from the oil and set aside.
  3. In a large bowl, beat the eggs thoroughly and add the salt. I have my own rule of thumb for the amount of salt: one large pinch per egg, plus another one for the potatoes... sounds silly, but it works for me.
  4. When the potatoes have cooled down a bit, tip them into the bowl and mix well with the eggs. You can cut with a fork through the potatoes to make the slices smaller to better blend with the eggs. Let the mixture stand for 10 minutes, the potatoes will absorb some of the egg.
  5. Prepare a heavy bottom non-stick skillet that has just the right size to hold the mixture, it must serve as a mold to shape the tortilla. You need to form a cake that is something in between 1 and 2 inches thick. Brush it with olive oil and heat on medium-low.
  6. Cook the tortilla on low-medium heat so that it doesn't burn on the outside while it's still too soft on the inside, at least 5 minutes. Run a spatula around the edge to make sure it's not sticking. Then flip it over (that's the most interesting stage): carefully slide it on a plate large enough. Then, while you're holding the plate on one hand, turn the skillet upside down and place it on the plate. Flip the plate-skillet assembly over and cook the other side for another 5 minutes.
  7. Slide onto a plate and serve.
Tortilla española

Let me tell you something: frying in virgin olive oil is a must. It’s a sin not to cook Spanish tortilla in olive oil, be warned. And if you don't use olive oil, don't tell anyone, it could be life-threatening. Also remember: practice makes perfect. It’s easy to make an edible tortilla, but my friends, making an outstanding one takes superb ingredients and… your whole life. But I assure you, if there’s a dish worth mastering, this is it. Enjoy it on a sunny noon.

Tortilla española

Eager to know more?

Bica blanca, a typical white cake

>> Monday, May 23, 2011

Bica blanca 1

Bicas are a kind of popular dense cake, typical in some areas of the northwest corner of Spain, in Galicia. Among the several varieties of bicas, one of my favourites is bica blanca or white bica. And why is it called white? Well, because it uses only the egg whites and no yolks. White bica is a luscious cake made with egg whites, sugar, flour and... tons of cream. It's the perfect recipe to use up leftover egg whites from custards, flans and the like. I prepare this cake every now and then and it's always a huge success, my kids love it and you know they are quite picky. Though I am sure the bleak winters in the area where this cake originates help people to burn all the sugar and the cream it contains... unlike my boys, who certainly spend to much time in front of the video console.


Bica blanca 3

Bica blanca

  • 6 egg whites
  • 2.5 cup/250g AP flour
  • 1 cup/250ml whipping cream
  • 1.3 cup/325g sugar
  • Butter for the dish
  • Ground cinnamon for sprinkling
  1. Preheat the oven to 180º-200ºC/356º-392ºF, depending on the type of heating, either traditional or air convection.
  2. Separate the egg whites from the yolks if you are using whole eggs instead of leftover whites. Use the yolks to make a good custard...
  3. Measure the flour and set aside.
  4. Measure the sugar.
  5. Whip the egg whites in a food processor with a pinch of salt and add the sugar little by little once the whites have started to foam, till you have a stiff meringue. Set aside a couple spoonfuls of sugar for later sprinkling on top of the cake.
  6. When the meringue is stiff, set the speed to low and add the flour by the spoonful while beating.
  7. Whip the cream to soft peaks. Add it to the meringue-flour mixture and mix carefully and gently with a spatula.
  8. Line a rectangular cake dish with parchment paper (typical bicas are rectangular and wrapped in paper). Butter the paper and pour the batter. Smooth the surface with a spatula, then sprinkle sugar and cinnamon on top for a perfectly genuine finish.
  9. Bake 35 minutes. Then use a stick or toothpick to check for doneness and take out of the oven if thoroughly baked. Use the paper to pull the bica out of the dish and place on a wire rack to cool.
  10. Devour immediately.
Bica blanca 2

I use a 24x30cm/9.5x12" dish and my bicas are a bit too thin, as traditional bicas are 5-6cm/2-2.5" thick. This type of cake does not really expand a lot, as the batter is already quite "expanded" because of the egg whites and the whipped cream. It keeps perfectly well for 2-3 days wrapped in plastic foil, but it rarely lasts that long...

Eager to know more?

Apple cream, John Barry and Valentine's day

>> Thursday, February 10, 2011

Apple cream 1

I have a nasty cold. I am a wreck. And I do feel that way. This has not prevented me from feeling an urgent desire to make a dessert with apples though, being them one of my many addictions. I've said it before, inspiration is a very peculiar animal and comes whenever she wants to, not when it is convenient for you. Serves no programs or schedules. Just like death. That is why John Barry died on January 31st, the composer of such famous film scores as Out of Africa and well-known arranger of the original James Bond theme, when it was completely untimely for him to die... Any movie fan knows his music. He was also British and, as some say, that's a plus. Among his not so well-known compositions is the evocative soundtrack to the movie Robin and Marian, an utterly romantic movie with Sean Connery (sigh...) and Audrey Hepburn (another sigh...). Yes, the quintessential love story. I recommend you watch it, you will not regret it now that honeyed Valentine's day is on its way. Because the movie is not cloying in any way, it shows us the reunion of Marian and Robin Hood after his return from the Crusades, both middle-aged and already-done-it-all. But that does not prevent... sparks from flying between them. Delightful. Wonderful. Sublime. Totally underrated. And another excuse to enjoy the voice of Sir Sean Connery... a religious experience (although I might be thinking of something more profane). This is your homework for this cloying, sugary week. No complaining. Search for this movie and watch it, little children. And if you like it, you can watch it on every Valentine's day with your partner from now on. Though I don't wait till Valentine's day to celebrate.


You may wonder what is the relationship of the apple cream with everything that I mentioned earlier. Well, in the opening scene of the movie we see some fresh apples on a window sill that are displayed later rottening as a symbol of a world that is falling apart, Robin and Marian's. Okay, the relationship is difuse. But the ways of the subconscious are mysterious. And mine is even more mysterious, I tell you. Do not wish to know further. Also, I write my own scripts, just like Pedro Almodóvar. And that is obvious for both.

The recipe for this rather symbolic cream comes from an interesting monograph on reinette apples by a Spanish chef, famously cultivated among other regions in the north Castilian area of El Bierzo. Reinette apples are known for their tart and peculiar taste, the best for cooking desserts. Though who knows where the apples I find in my area come from. Maybe they are brought from the other side of the world, where the growers get a ridiculous revenue from them and then loads of fuel are wasted in bringing them here so that the oil companies are very happy... thanks to us. But that's another story. To the point:

Apple cream

  • 4 large tart cooking apples
  • 1 bottle natural cider (0,75 liters)
  • 200g sugar
  • 6 large egg yolks
Apple cream 2
  1. Put the cider in a saucepan and add the sugar. Bring to a boil.
  2. Peel and core the apples, cut them in chunks and add to the cider. Process everything to a runny puree.
  3. Boil the mixture to a compote consistency, about 10-15 minutes. The puree must be somewhat thick, although it will thicken further with the addition of the yolks.
  4. Once you have the required consistency, turn off the heat and add the yolks while stirring vigorously for the egg yolks to mix and set without forming threads. Leave to cool.
Apple cream 3

This simple cream is as versatile as pastry cream, because it is really quite similar. I like it well in small pots, but it can be used to fill cakes, pastries and whatever you can think of. Although to make it as pot de creme, I use a more fluid consistency than that of pastry cream, as a smooth cream for the sick... It has the pleasant color of coffee with milk, but it surprises you with the taste of apple and cider. And I've added one teaspoon of sugar on top of the cream that was conveniently caramelized with my brand new blowtorch, a gentle gift from my mother, in a créme brulée fashion.

Apple cream 4

And... celebrate your love everyday, not only when the department stores tell you to.

Firma 200px

Eager to know more?

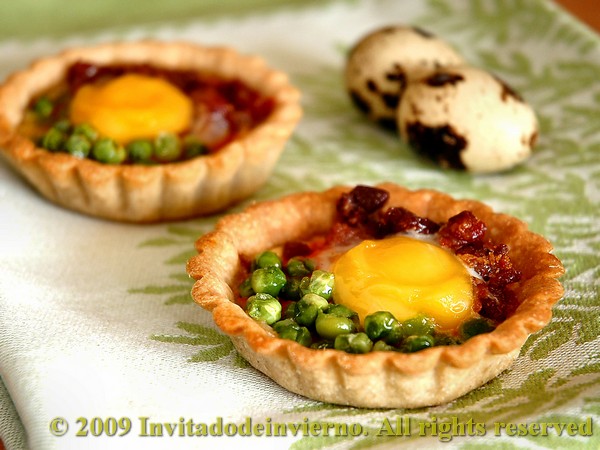
Tapa of quail eggs on buckwheat tartlets

>> Wednesday, October 21, 2009


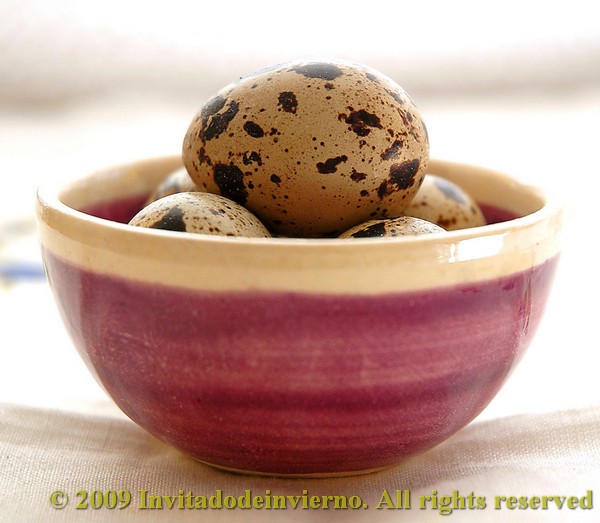
What an over-elaborate title. It sounds like Haute Cuisine and I tell you: it isn't. I'm just updating a very, very traditional Spanish dish, huevos al plato, meaning eggs cooked on a plate. But this time, instead of using chicken eggs on a plate or earthenware cazuela, I've reduced the size of the dish to make it a tapa and used quail eggs on a tartlet. Which means they are not huevos al plato, but huevos a la tartaleta... never mind, I'm not a purist. I hope you're not either...


Huevos al plato were a very typical dish at home when I was a child. Well, at least it was very typical among the household adults, because my sister and I wouldn't consent to trying something soooo very different, almost opposite, to the fried eggs and tomato sauce we loved... Now that I've become more mature (¿?) I thought it'd be a good idea to "revisit" this almost historical dish to turn it into a miniature plate, a two-bite-sized tapa. I don't believe I'm the first to do such a thing with huevos al plato, I'm sure it's been done before. But I don't give a damn. This time I chose to make the pastry dough with buckwheat for a change, you know I love to use less-common flours.


Quail eggs on buckwheat tartlets

Pastry dough:

  • 140g all-purpose flour
  • 140g buckwheat flour
  • 125g butter
  • 1 pinch salt
  • 100ml cold water
Huevos al plato, per tartlet:
  • 1 quail egg
  • 1 small handful peas (a 3-year-old handful...)
  • 1 small handful diced Spanish jamón or chorizo
  • 1 tsp good tomato sauce (preferably homemade, the little tomato background layer gives the tapa half its flavor)
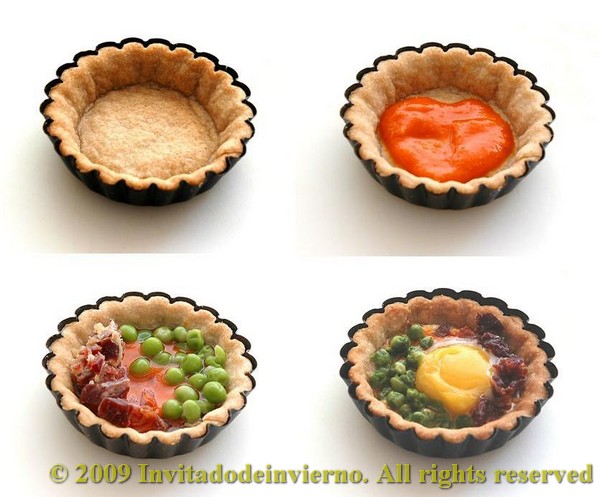
Start by making the pastry dough. I adapted my usual pastry dough recipe by substituting half the amount buckwheat flour for half all-purpose flour. Mix the flours and the salt and add the diced cold butter. Mix the butter in the flour either by rubbing with the tip of your fingers or with a mixer, till you obtain a sandy-crumbly mixture. Then add the cold water and knead by hand or with a mixer just until the water is thoroughly incorporated and the dough forms a ball. Don't overprocess. Butter and flour the molds you're going to use (mine are around 7cm in size). Roll out the dough to an approximate thickness of 2mm, and line the molds. Be careful as this dough is not as elastic as an all-wheat dough. Once the molds are lined I usually put them in the freezer for the dough to freeze lightly (small size tartlets freeze very quickly). This prevents the dough from bubbling when blank-baked, you don't even need to prick it with a fork. This trick works for me.

Preheat the oven to 180ºC. Blank-bake the tartlets for 10 minutes, enough for the dough surface to seal. Take the molds out and leave them to cool a little, so that you don't burn yourself. Lay the filling by spreading a teaspoon of tomato sauce on the base, then carefully crack one egg and lastly sprinkle the previously boiled peas and the Spanish jamón or chorizo, uncooked.


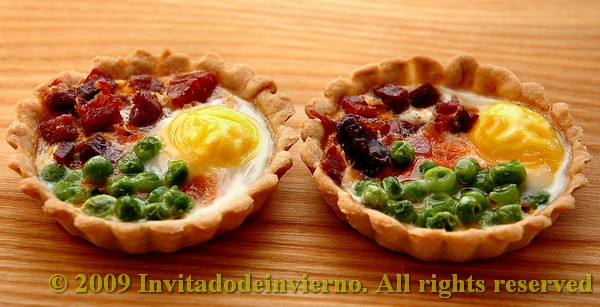
Put the filled molds into the oven. The tartlets don't need much time to get cooked, but it really depends on the oven; mine took around 10 minutes. The perfect outcome is a thoroughly hard white with a liquid yolk... but it's tricky to get with such small eggs. My eggs were hard all over, grrrr. I made a second batch where I separated the yolks (tricky stuff!) and put them aside, then cook the yolk-less tartlets, only to add the yolks for a final 2 minute cooking. Well, maybe you don't care about hard yolks, but I do. I prefer them liquid, so that their juices spread when you bite and drip down your chin... ahem... yum. Despite all imperfections, D. loved the tartlets... and me too... with a tasty red wine... they make for a very traditional appetizer. (Why is it that I almost always finish my posts with a drink?)


Eager to know more?

Followers

About This Blog

Lorem Ipsum

  © Blogger templates Palm by Ourblogtemplates.com 2008

Back to TOP