Related Posts Widget for Blogs by LinkWithin
Showing posts with label jamón. Show all posts

School of tapas: Melon soup shots

>> Friday, July 15, 2011

Melon soup 1

This is no traditional tapa. But due to the wild popularity tapas enjoy and the endless variations on the same theme found nowadays, sometimes small glasses or shots of cold soups or creams are also seen served as a tapa or appetizer before a copious meal. When summer is already at full speed and you long for cold and fresh drinks and dishes, a shot of chilled soup might be exactly what you need. This simple melon soup is prepared by processing melon, white wine, honey, lemon juice and salt to a pureé. It doesn't call for the use of any heat in the kitchen, which is something I am quite thankful for when temperature rises above 85 degrees.


Melon soup 2

The recipe is inspired in this Spanish website for Mediterranean cuisine.


Melon soup shots 
Yields 8 servings

  • 1 small melon *
  • 2/5 cup (100ml) good white wine
  • 1 tbsp honey
  • Juice of 1 lemon
  • 2 pinches salt
  • 1 thin slice good Serrano ham
Melon soup 3
  1. Cut the melon in wedges and discard the seeds. Scoop out the flesh and transfer it to a food processor or blender.
  2. Add the wine, the honey, the lemon juice and the salt. Process to a fine pureé. Chill thoroughly before serving. 
  3. For the jamón serrano garnish, place a slice of jamón on a plate lined with 2 sheets of kitchen paper. Cover with more paper and microwave it briefly, until dry and crispy. Crumble the jamón by hand and sprinkle the "shards" on top of the melon soup shots. 
* Regarding the melon used, Spanish melons are egg shaped and quite large in size. A "small" melon can easily weigh 5 pounds.

Porrón

For a more "sophisticated" experience, previously chill the serving glasses in the freezer. The contrast between the sweetness of the soup and the saltiness of the jamón is simply superb. Serve with a glass of chilled dry Sherry. And enjoy...

Eager to know more?

Daring Cooks' challenge July: Fusion pierogi

>> Tuesday, August 17, 2010

Pierogi 3

If today's 17th August, I'm in Denmark. But I didn't want to miss this month's challenge. We've been carried to Eastern Europe, to Poland, to make pierogi. At Wikipedia we are told that pierogi are baked or boiled dumplings, in crescent shape, that most commonly are filled with sauerkraut, cheese, mashed potatoes, cabbage, onion, meat, hard boiled eggs, or a combination of any of those. They are made with fruit fillings too. They are served with generous amounts of sour cream and with a bacon or fried onion garnish. The most popular are the pierogi ruskie, filled with cheese, mashed potatoes and onion. Pierogi filled with meat are called pelmeni and originate from Siberia; they are widely popular all over Rusia, as well as in some of the ex-socialist countries. We were given permission to use a filling that reflected our local diet, therefore I chose a succulent chesnuts filling with Ibérico ham. That's why I called them fusion pierogi...


I loved the idea of making these pierogi related to the Siberian pelmeni. I have a fond memory of the first time I tasted pelmeni. It was 15 years ago that D. was participating in a project with some British colleagues. Among them was Claire, a charming linguist that was married to a Russian guy from Vladivostok. At a certain moment D. needed to go to London for some project meeting and I joined him. One evening Claire invited the whole bunch for dinner to her place. Her parents-in-law, Siberian russians, happened to be visiting and they had brought along several tons of pelmeni. Of course the pelmeni were part of the dinner and I remember Claire begging us, encouraging us to help her get rid of their pelmeni surplus... That wasn't difficult, as they were quite delicious, boiled in a clear broth, that evening of an oddly warm January in Britain...

Pierogi 2

I've found pierogi very easy to make. The dough is similar to that of Italian pasta, but because not all the liquid is egg, the consistency is different. It's not so smooth and satiny, but somewhat easier to handle.

The August 2010 Daring Cooks’ Challenge was hosted by LizG of Bits n’ Bites and Anula of Anula’s Kitchen. They chose to challenge Daring Cooks to make pierogi from scratch and an optional challenge to provide one filling that best represents their locale.

Fusion pierogi
Yields around 35 dumplings, 8 cm round

Dough (traditional polish recipe):

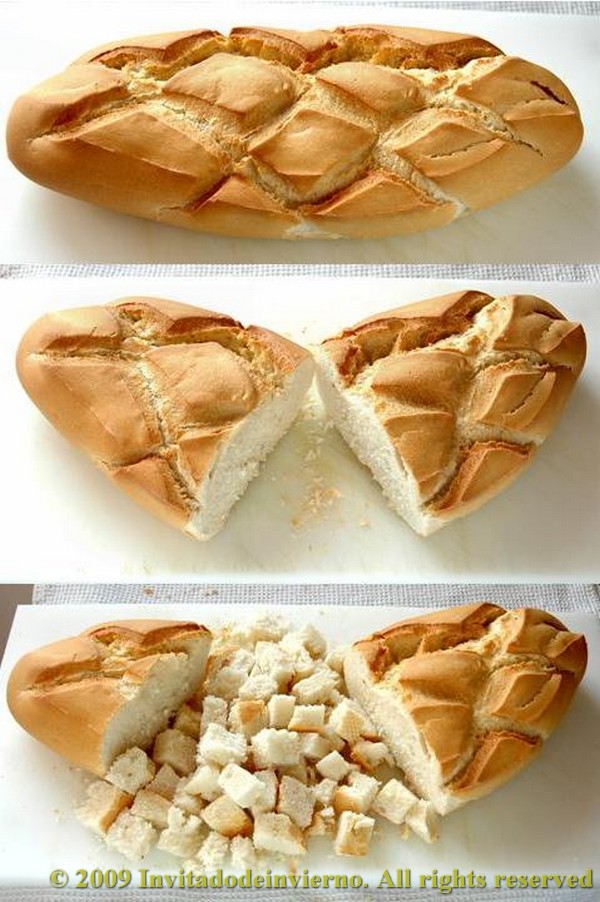
  • 300g pasta flour (the recipe calls for all-purpose flour)
  • 1 large egg
  • 1 tsp salt
  • 125ml water (1/2 cup)
  1. Mix the egg, water and salt in a food processor. Add the flour and mix. Roll it a couple of times on the countertop with a rolling pin. Wrap in plastic foil and leave to rest 20 minutes.
  2. Take a portion and roll it to a maximum thickness of 3mm. Using a glass or a cookie cutter of 8cm diameter (the recipe calls for 5cm rounds) cut dough in rounds and fill them with a heaped teaspoon of the filling of your choice. This video of an Ucranian granny teaching to make the dumplings is just adorable. Set the dumplings aside on a lightly floured surface. The dough only slightly adheres to the surface, but it's sticky enough to seal the edges without moistening them.
Pierogi 1

Filling:
  • 150g dried chestnuts
  • 1/2 cup sweet Sherry wine
  • 1 cup homemade beef stock
  • 5 large slices of Ibérico ham
  • 1 dash of cream
  1. Put the chestnuts in water to soak overnight. The next day, bring them to a boil with the stock and the Sherry. Add some water if necessary to cover the chestnuts. Boil 3/4 hour, until cooked through.
  2. Drain the liquid but don't discard it, then mash the chestnuts. Add a dash of cream to soften the puree and some spoonfuls of the boiling liquid if it's too dry.
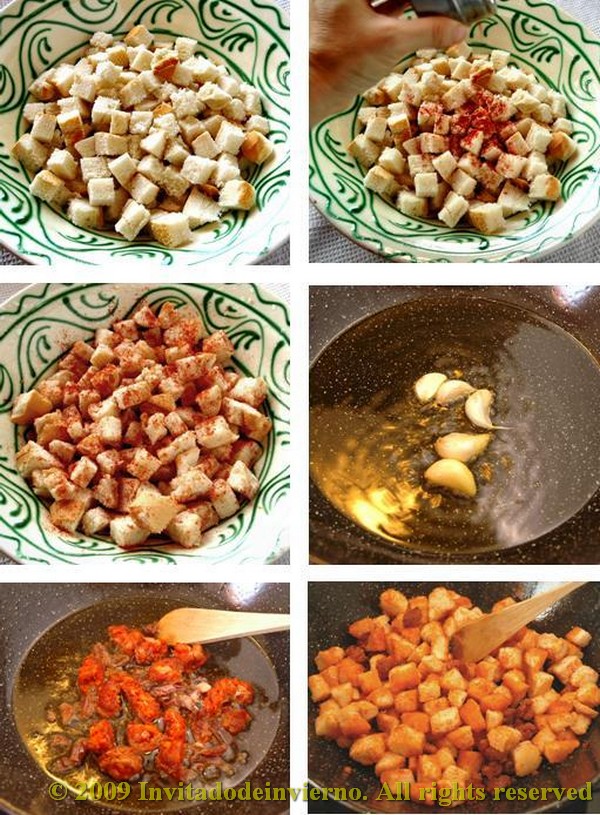
  3. Finely cut the ham and fry it in a pan, slowly heating it till it starts releasing its own fat. When crispy, add it to the chestnut puree along with the fat. Mix well and add salt if necessary.
Finishing the pierogi:
  1. Bring salted water to a boil and add the pierogi. When the pierogi float to the surface, se count 5-8 minutes, depending on how much al dente you like them (the original recipe calls for a shorter boiling time, but my dumplings where too hard with only 3 minutes boiling, I guess it depends on the type of flour).
  2. For not to affect the delicate flavor of the chestnuts, I decided to serve the dumplings with a simple sage butter. But I believe that a mushroom sauce would be a wonderful pairing too.
  3. If you have pierogi or filling leftovers, just freeze them and wait till the cold arrives... I'm sure I will feel more like eating them than in this heat, don't you agree? These Eastern dishes and the chestnut filling make me long for the fall or the winter...

Pierogi 4

Eager to know more?

My grandmother's migas

>> Sunday, November 15, 2009


I had been feeling like making migas for some weeks already, so I was very happy when charming Mel from Bouchon for 2 asked me to put up a guest post for her while she's on vacation (lucky girl!). She wanted a Spanish family dish and I couldn't have found a more traditional one than migas. Thanks, Mel!


First of all I shall explain what migas are. Migas means crumbs,
literally. To prepare them you just need a hunk of stale bread, some charcuterie, cloves of garlic and olive oil for frying. It was formerly shepherd's fare, something easy to prepare for the shepherds while up on the mountains, and also popular among peasants. Everybody had a piece of bread and some garlic and chorizo or ham to add. And apparently there is a version of migas in every region of Spain, which is not too frequent. They were eaten everywhere. And I warn you: this is not a diet dish. It has lots of olive oil and animal fats and I won't apologize for that... that's why it's so delicious. It was perfect for warming you up in the cold winter nights, up on a mountain hut.

It was my grandmother María who taught me to make migas. She was my paternal grandmother and she lived with my family till her death, some over 20 years ago. She was a very good cook, especially for pastry. She had been born in the Philippines while the country was a Spanish colony, her father being an army officer. She returned to Spain with her family when the Spaniards were expelled from the Philippines by the Americans (no hard feelings...) in 1898. Within a few years she unfortunately lost her parents and ended up in a religious boarding school for orphans in Aranjuez, where she stayed until she was 18. In the photo she's the blonde girl in the foreground, tightly holding the doll... wasn't she cute? I wonder where she learned to make migas, I never asked her...


As far as I know there are two main types of migas: diced and pulled. My grandmother used to make the diced type. According to the traditional standards, the dices must be chickpea-sized. The best bread for migas is the Spanish peasant bread, with a very dense crumb. The very open crumb of baguettes or ciabattas is not good for migas. And normally stale bread a day or two old is used. Remember migas is a poor man's dish... this makes it just perfect for the current crisis. I don't measure anything when I make them, but I'll try to figure the amounts:

My grandmother's migas

  • 1 hunk of dense crumb bread
  • 1 tsp salt
  • 2 tsp sweet Spanish pimentón (essential!)
  • 4 cloves garlic
  • 2 chorizos for frying (not very dry, not all chorizos are good for frying)
  • 2 tbsp diced Spanish jamón
  • 1 handful bacon rashers
  • Virgin olive oil for frying (essential!)

Well then, are you ready to start? Pick a nice hunk of stale bread and dice it carefully. I never get to make the dices as small as a chickpea... I'm not a skilled miguera, but I manage. Put the diced bread in a large bowl. Then sprinkle the bread with water, enough to slightly moisten it. The purpose of this is to soften the bread, remember migas are supposed to be made with sometimes very dry bread. Sprinkle the salt and turn them around to evenly distribute the salt. Do the same with the pimentón. Then cover with a damp cloth and leave to rest overnight.

By the way, I remember one family meal, with all my in-law family as guests, when I cooked migas for first course and a goulash-like stew for second course. I mistook the hot paprika for the sweet... on both courses... That day I had the evidence of how very well-mannered they all are... they still talk to me.

To prepare the migas the next day, pour 6-8 tablespoons of olive oil in a deep frying pan and put it on medium heat. Cut the garlic cloves in half, there's no need to peel them. Fry the garlic until lightly browned, then discard. The purpose is to flavor the oil. Then add the crumbled chorizo, the ham and the bacon. Stir-fry till they're almost done, the oil will be nicely colored, then tip the bread on the pan. Toss and turn around for the bread to thoroughly soak the oil. They will start to turn nicely red because of the paprika and chorizo drippings... Go on tossing for 3-4 minutes, depending on the heat. The migas should be lightly toasted and crisp on the outside, while they should remain soft in the inside... yes, that's the key to making good migas, my little children...


Serve the migas on a beautiful earthenware dish, while warm, and distribute them with a large wooden spoon... this is just for the sake of authenticity. You can add some grapes to the migas too, although I don't remember my grandmother doing it. This was very typical in the wine growing regions, but then they are called migas de vendimia or grape harvest migas. I love the contrast between the roughness of the migas and the sweetness of the grapes. Some other day I've got to try to add some pomegranate... it must be an interesting addition. And also you can serve the migas in small bowls or portions for a very tasty tapa... yum!

Eager to know more?

Followers

About This Blog

Lorem Ipsum

  © Blogger templates Palm by Ourblogtemplates.com 2008

Back to TOP