Related Posts Widget for Blogs by LinkWithin

Marble cookies and the Best of Food Blogs Cookbook

>> Monday, November 29, 2010

Galletas mármol 1

The original name of these cookies was zebra cookies, but I don't like it. So I changed it to marble cookies. I don't marbleize them much though, they are more bicolor cookies... I love icebox cookies, they are easy and practical to make, you can keep them in your freezer and bake them whenever you have guests. And don't forget to keep the carton cylinder inside your plastic wrap or foil rolls, because you'll be needing it.


To change the subject, remember I told you one of my recipes had been published in the
Foodista Best of Food Blogs Cookbook? Well, I recently received my book... I feel siderally connected to all the home cooks in the Universe... I must admit I loved to see my story and my recipe on print. And in a book sold in Amazon... I can imagine what it will be like to have a whole book on sale... Beside I was so lucky to have my photo featured in king-size in the book's introduction. I guess I overdid the resolution. So I'm giving away a copy of the book, check it out here. You just have to shout "hey, I'm interested in the book" in the comments section and leave your e-mail, so that I can contact you should you be the lucky winner. And after this "tooting my own horn" moment, let's get to the recipe.

Foodista 1

This is the only recipe I've ever tried from this book. But it's never too late to do something you never did before, right?

Marble cookies (adapted from The Art of the Cookie, Jann Johnson)

  • 1 large egg
  • 115g butter at ambient temperature
  • 160g sugar
  • 210g A-P flour
  • 1 tsp baking powder
  • 1/4 tsp salt
  • 30g dark chocolate
  1. Measure the flour and sieve it with the baking powder and the salt.
  2. Measure the butter and the sugar, and whip with a hand or stand mixer till white and fluffy.
  3. In the meantime, melt the chocolate in a bowl, on bain-marie or in the microwave (be careful not to overheat it if using the microwave).
  4. Beat the egg and add to the butter and sugar mixture. Then add the flour little by little, until well mixed. Divide the dough in two portions and add the melted chocolate to one of the portions. Then knead for the chocolate to distribute evenly. It may be necessary to flour the counter top, but if the dough has right consistency it is so buttery that it hardly sticks to the surface.
  5. Now you have two doughs of different color. Then you can do whatever you want to make both colors mingle; you can lay one beside the other like I do, make a ball with both and knead slightly for the doughs to mingle or you can even roll them, put one on top of the other and roll them together to get spiral cookies. Once you've made up your mind about what to do next, you should make rolls as long as the carton cylinders in the center of you foil or plastic wrap rolls, you'll need 2 or 3.
  6. Make dough rolls that can fit into one of these cylinders, then wrap them in plastic and put them into the carton. This helps keep the round profile of the cookies, because if you let the dough rest on a flat surface it will flatten slightly on its base.

Galletas mármol 3

I think I learnt this trick at Martha Stewart's website. It's wonderful as it's so easy and at hand.

Galletas mármol 2

Once you have your dough cylinders ready, chill them overnight or a minimum of 2 or 3 hours. When you're ready to bake, preheat the oven to 185-190ºC, slice the rolls, place the cookies on a cookie sheet with parchment paper and bake for 8-10 minutes, watching closely so that they don't brown too much. Take them out to cool on a wire rack and you're all set. For Christmas I'm thinking of adding matcha tea for green dough and red food coloring for red dough... freaking awesome.

Eager to know more?

Gnocchi with shellfish sauce, seaweed and a winner

>> Friday, November 19, 2010

Ñoquis patata 1

A Spanish blog was challenging us to prepare gnocchi this month. As I had already tried my hand at gnocchi in the past, in order to bring a little joy into my humdrum life, I decided to add a-not-so-common ingredient: seaweed. Because I have a confession to make: I like seaweeds. Not because I have tried them in sushi, I had tasted seaweeds before trying the ubiquitous sushi, (no, not before sushi was invented, I'm not that old). I must say sushi doesn't really thrill me, to put it mildly. However, some seaweeds can be really good when fried or boiled in a salad. So I added powdered nori to the gnocchi dough and ate them with an accompaniment of fried sea spaghetti. This is what I call an adventurous life... And my Italian readers, if any, will probably be shocked at my impudence.

Hmmm, and I'm also revealing the name of the winner of the CSN giveaway!


First to the winner of the CSN giveaway: Domestic Diva! I will soon give CSN your name and e-mail address for them to send you the code.

Giveaway 2

And... back to the recipe, for the gnocchi sauce we were free (whoops!) to make whatever we wanted, so I decided to do some refrigerator cleaning by using up some crab boiling juice that had been frozen since the Jurassic, and because this week seemed to be my improvisation week so far I devised a roux sauce of crab and saffron. The recipe for the gnocchi is the following:

  • 1kg potatoes
  • 300g pasta flour
  • 1 egg
  • Salt
  1. Wash the potatoes, unskinned, and cook them in salty water until tender. Leave to cool a bit to peel them without too much suffering, skin and pass through a food mill. Cover the mashed potato with plastic and allow to cool.
  2. Add the beaten egg along with salt to the puree in the bowl of a stand mixer and mix well. Then add the flour and knead until you get a smooth dough that doesn't stick too much to your hands and can be manipulated. I do not know if it is very normal, but I had to add much more flour than the recipe called for, for dough to be manageable, so that at one point I gave up weighing the flour. I am afraid my potatoes were overcooked. I know, it's not very technical nor professional to ignore the total amount of flour I added... how I miss those times when the recipes instructed you to "add as much flour as it can take on" and everyone understood. If you think this is a cookbook, you are mistaken, it's a therapy-blog. If I did not write here I would be seeing a therapyst or something. Note that I spend most of the day alone, working on my stuff, without any nice colleagues to make caustic remarks nor a jerk boss to criticize... and I'm forced to swallow all my desire to criticize, gossip and talk-bad-about-my-neighbor... this healthy and relieving habit. And all that repression ends up accumulating in my stomach. As soon as I start to feel it, I write a post. Or something similarly blameworthy.
  3. I added a teaspoon of dried powdered nori to the dough, but it was hardly noticeable, maybe because of the loads of flour.
  4. Make little rolls of 1.5-2cm wide and cut them with scissors or a knife into pieces of about 2 cm. You can find an enlightening gnocchi-making video here. Each little dough pellet is crushed with a fork so that it gets the imprint of the well-bred gnocchi. Put them on a floured surface.
  5. If you intend to cook them immediately, get plenty of salt water to boil. When boiling, but not rolling boil, toss the gnocchi in and when they rise to the surface, they are al dente. Drain them and serve with the sauce. If you're not going to eat the gnocchi right away, they freeze beautifully on trays, apart from each other so that they do not stick together. When frozen you can keep them together in freezer bags.
Azafrán

For the crab sauce (yields enough for 3-4 servings of gnocchi):
  • 1 small onion
  • 1 carrot
  • 1 tbsp flour
  • 1 cup of crab, shellfish or plain fish stock
  • 1 pinch saffron
  • Water
  • 4 tbsp virgin olive oil for the sofrito
  • Salt
  1. Dice the veggies and fry them in the olive oil on medium heat till tender.
  2. Add the tablespoon of flour and stir-fry a couple of minutes.
  3. Lightly toast the saffron (I put it on a piece of aluminum foil and use a lighter to heat it from underneath), crush it in a mortar and add it to the sofrito.
  4. Then pour the stock, add some water if needed, puree everything and leave to cook on low heat until it thickens, around 5 minutes.
  5. Try the seasoning and adjust if needed.
I know, if the sauce had pieces of crab or fish it would be tastier, but this is good enough for an improvised sauce.

Ñoquis patata 2

For the sea spaghetti crisps:
  • 1 bunch of sea spaghetti (himanthalia elongata)
Himanthalis

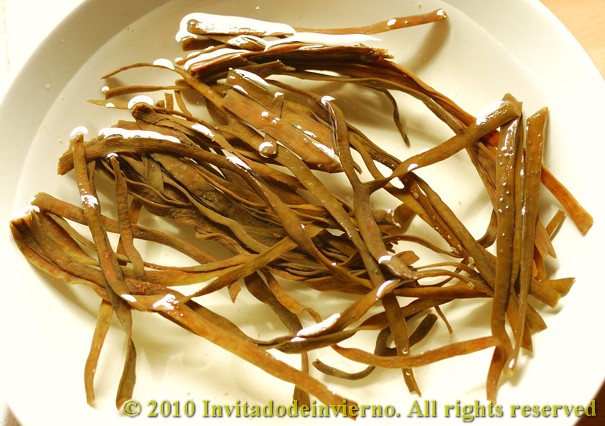
In Spain seaweeds are sold dried or canned. I buy them dried, they last very long and you can hydrate them for use at any time. You take the dried seaweed and place it in a bowl with water, as long as directed on the package, to be well hydrated. Separate the stems and drain well. Then fry the strips in a deep fryer or skillet until crispy, about 2 minutes. Then you can add the seaweed to the dish in small bits, like you would add some shavings of toasted Serrano ham. And both ingredients have the umami flavor. Long live the umami. Oh, and you better try seaweeds and like them, because very soon they will be the only thing left in the oceans that we can possibly eat.

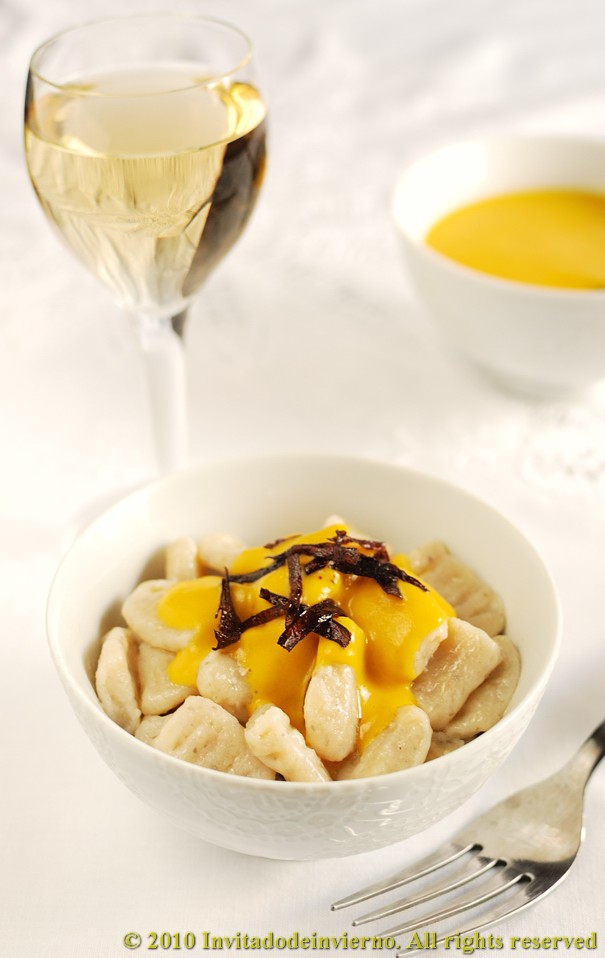
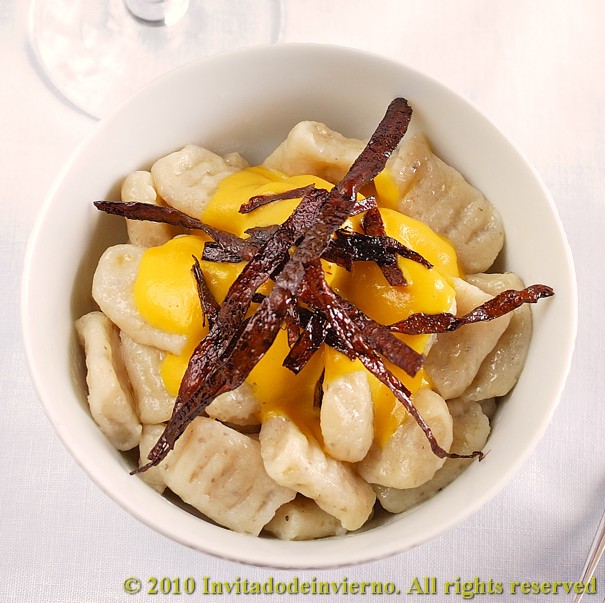
Then... plate the whole thing by heaping some gnocchi, pouring a generous serving of the steaming sauce and topping it with a bunch of crispy sea spaghetti... the assembly had a deep and delicious sea flavor.

Eager to know more?

Spicy and savory butternut squash tart with a rye crust

>> Sunday, November 14, 2010

Squash tart 1

Oh my , this is a long title. For a very uncomplicated dish. I thought I would be able to let the fall go by without making a squash recipe, but I did not succeed. It has been weeks already of squash hype in the blogs and I was feeling a bit stuffed. But as I wanted to try a new recipe for pastry case using some homemade fresh cheese that was decidedly past its prime, I decided to make a small quiche with a nice organic butternut squash I happened to find at the market. I confess I'm not a big fan of squash, I find it a bit... cloying, except when accompanied by a large amount of spices, as in this case, when it can turn out to be quite addictive actually. Still, the quiche did not quite blow away Mr. Winter Guest... but he is a bit of a picky eater. But fortunately I have other relatives who live nearby and are grateful recipients of my dishes. Nothing is wasted at the Winter Guest's household.


As I said, I think squash is an ingredient that cries out for vast quantities of spices, including hot, so it was an excellent opportunity to elaborate on my addiction to... you guessed it: ras-el-hanout. Although a good curry powder is too the perfect match for the sweetness of the squash. The result was excellent considering it was completely improvised just to use up the cheese in the pastry case.

Spicy and savory butternut squash tart with a rye crust
For the pastry case (yields enough for 2 tarts), adapted from The Nordic Diet

  • 75g AP flour
  • 160g rye flour
  • 150g fresh cheese
  • 50g butter
  • 30g cold water
  • 1 pinch salt
  1. Weigh the flours, put them in a food processor and add the cold butter in small pieces. Pulse several times to obtain a crumbly mixture.
  2. Add the fresh cheese and the salt and knead by hand or with the processor until the dough coheres. If it doesn't, start to add the water little by little, until you get a ball. The final amount of water needed depends on the consistency of the cheese and on the hydration of the flours.
  3. Divide dough in half and spread one of the portions with a roller on a floured counter top (you can freeze the other portion for later use). Butter and flour a cake pan and lay the dough on it. Fit it well and prick the bottom with a fork. Put it in the preheated oven (180 ºC) 10 to 15 minutes to seal.
For the filling
  • 400g butternut squash
  • 1 medium potato
  • 2 eggs
  • 50g fresh cheese
  • 50ml milk
  • 1 tsp ras el hanout or curry
  • Olive oil for roasting the squash
  • Salt
  1. Cut the squash into large slices and remove the seeds. Lay onto an oiled baking dish, add salt and brush the slices with more oil. Bake in the oven at 180°C covered with aluminum foil to avoid drying out, until tender, about 3/4 hour, depending on the quality and size of the pieces. You can cook the potato at the same time, though it will take a little shorter (I usually cook the potato in the microwave). You can vary the proportions, decreasing the squash and adding more potato, I find potato makes a great addition to this type tart.
  2. Once the veggies are al dente, let them cool till you can touch them and slice as you like. Arrange the veggies on the half-baked pastry case in a nice pattern.
  3. Then mix the batter for the filling: eggs, cheese, milk and seasonings, and pour it on the veggies. Tap the dish on the counter for the batter to distribute evenly and bake half an hour at 180ºC. Enjoy!
Squash tart 2

My verdict about the pastry case was excellent, you save yourselves a portion of butter by substituting the cheese and the rye flour also gives it a different flavor twist that makes for a pleasant variation to the classical dough. I will definitely use it again.

Eager to know more?

Sparkling wine jelly and a giveaway

>> Sunday, November 7, 2010

Cava jelly 1

I want to share something with you: my kitchen is one of my favourite places. It has a southern exposure, that means scorching heat in the summer but simply lovely autumn and winter afternoons... Like right now. I go through my many cookbooks sitting there on our bar stools, at our table, and sometimes I take my laptop too. I was there when I received another CSN gift code to giveaway among my readers (are you there?). It's time to start planning Christmas shopping already, don't you think? Maybe you'll also fancy the main ingredient in this recipe for your celebrations. This is a great way to use up sparkling wine or champagne leftovers, now that Christmas is approaching (yes, summer was over and the next thing you know is Christmas is around the corner). But my conscience is at ease because, after all, this is a fridge-cleaning recipe... ahem. Although in my household it is not a common occurrence that there is sparkling wine left while I am around. I know that the first step to overcoming a problem is acknowledging it, and I acknowledge it bluntly but I do not want to change. Nononono, no matter what. I looove a good cava. Slurp. But despite my dedication to the cause, life recently provided us with half a bottle that was quietly degassing, poor thing, and I decided to try this concoction I had seen in a French magazine, here. And I liked it, because in addition to having it for dessert, I find it could make an excellent addition to other dishes, also savory... Can you imagine a good liver terrine with diced cava jelly? And pink colored cava can be very decorative.


As for the giveaway, it amounts exactly to $75 to be spent on any of the varied CSN Stores (my favourite is the kitchen&dining section... go figure). And what do you have to do?

  • Just subscribe to my blog on Google Connect and leave word of it in a comment. All readers already subscribed just need to say so to enter. Complicated? ...
  • Deadline: you have till November 20th, 12pm GMT, to do so, each comment will be given a number and then I will use a random number generator to pick the winner.
  • As usual, unfortunately the giveaway is open only to US and Canada residents.
And now to the recipe. This dessert is so easy to make that I feel almost embarrassed to explain how. Here we go.

Sparkling wine jelly
Yields 2 plentiful glasses or 3 scant glasses
  • 350ml cava brut or other sparkling wine (watch for the sweetness, cava brut is not very sweet, so reduce the sugar or agave nectar if using a sweeter wine)
  • 4 sheets gelatin
  • 2 tbsp agave syrup (say 3 tbsp sugar)
  • Red berries for garnish
Cava jelly 3
  1. Hydrate the gelatin sheets in a bowl with cold water according to the package instructions.
  2. Take a cup of the wine and warm it up to about 60-70ºC, the minimum amount possible in order to dissolve the gelatin. Only a portion is used to prevent degassing the wine completely. Add the softened gelatin and stir in the warm wine until it is dissolved.
  3. Then add the remaining wine and mix thoroughly. Choose some nice wine glasses and pour the jelly very carefully to avoid splashing on the sides, for the sake of an "elegant" presentation just like we deserve... Cool to room temperature first (do not put hot things in the fridge, that's ecological terrorism.) When cooled, transfer the glasses to the fridge to finish setting.
  4. Serve chilled garnished with the red berries, a perfect match.
Cava jelly 2

So what do you think? Do you fancy a glass of chilled cava? I do. (And how very eye-catching are glass objects...)

Eager to know more?

Followers

About This Blog

Lorem Ipsum

  © Blogger templates Palm by Ourblogtemplates.com 2008

Back to TOP