Related Posts Widget for Blogs by LinkWithin
Showing posts with label chorizo. Show all posts

School of tapas: Chorizo a la sidra

>> Friday, June 24, 2011

Chorizo a la sidra

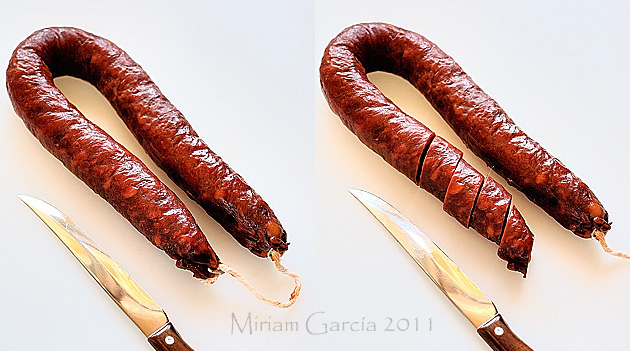
Traditional Spanish cooking is uncomplicated most of the times as it basically relies upon premium quality ingredients. Like good chorizo. Chorizo a la sidra or chorizo cooked in cider is one of the simplest tapas and simplest pairings you can find, fine charcuterie fried in good virgin olive oil and then stewed in cider until the liquid is reduced and the slight sweetness of the drink infuses the chorizo… heaven in a tapa. Skeptical? Don’t judge before you try it. This is a tapa that originates in the northern region of Asturias, a lusciously green, misty and humid area where apple orchards are abundant and so are sidrerías or cider houses. Asturian natural cider is a mildly alcoholic beverage made by fermenting apple juice; it is traditionally poured from the bottle from a certain height so that the liquid crashes into the glass and gets somewhat oxygenated. This fizzying effect only lasts a few seconds, that’s why the cider glassful must be gulped down in one go… Fortunately cider can be enjoyed in this tapa in a less compromising way.


Chorizo a la sidra

Chorizo a la sidra

  • 1 good quality chorizo (not the drier type, but tender)
  • 1 cup natural cider
  • 1 tbsp virgin olive oil
Chorizo a la sidra
  1. Slice the chorizo in 1/2 inch slices and set aside.
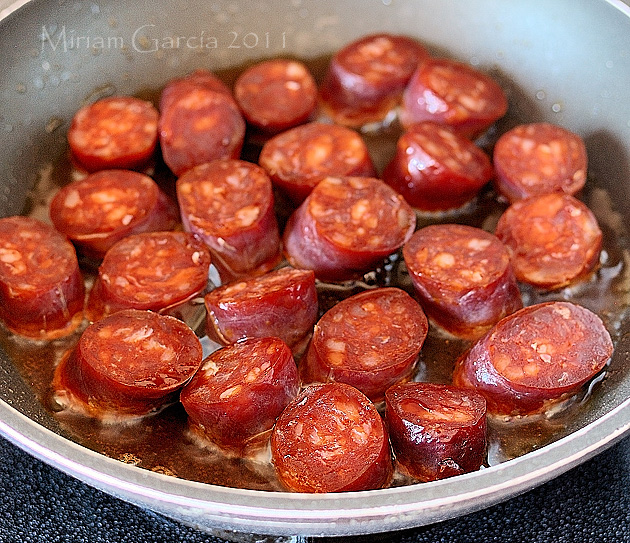
  2. Pour the oil on a skillet and heat on medium. Add the chorizo slices and fry until they change in color, but don’t overdo it.
  3. Add the cider and toss to coat the chorizo. Boil for 10-15 minutes, until the sauce has reduced by one fourth.
  4. Serve in small bowls while still warm, though chorizo a la sidra can also be served at ambient too.
Pour yourself a good glass of red wine or cider and enjoy! And don’t forget to finish the resulting sauce by dunking large pieces of bread in it, what is called mojar in Spanish, literally to wet. I believe the act of mojar is in our genes…

Eager to know more?

My grandmother's migas

>> Sunday, November 15, 2009


I had been feeling like making migas for some weeks already, so I was very happy when charming Mel from Bouchon for 2 asked me to put up a guest post for her while she's on vacation (lucky girl!). She wanted a Spanish family dish and I couldn't have found a more traditional one than migas. Thanks, Mel!


First of all I shall explain what migas are. Migas means crumbs,
literally. To prepare them you just need a hunk of stale bread, some charcuterie, cloves of garlic and olive oil for frying. It was formerly shepherd's fare, something easy to prepare for the shepherds while up on the mountains, and also popular among peasants. Everybody had a piece of bread and some garlic and chorizo or ham to add. And apparently there is a version of migas in every region of Spain, which is not too frequent. They were eaten everywhere. And I warn you: this is not a diet dish. It has lots of olive oil and animal fats and I won't apologize for that... that's why it's so delicious. It was perfect for warming you up in the cold winter nights, up on a mountain hut.

It was my grandmother María who taught me to make migas. She was my paternal grandmother and she lived with my family till her death, some over 20 years ago. She was a very good cook, especially for pastry. She had been born in the Philippines while the country was a Spanish colony, her father being an army officer. She returned to Spain with her family when the Spaniards were expelled from the Philippines by the Americans (no hard feelings...) in 1898. Within a few years she unfortunately lost her parents and ended up in a religious boarding school for orphans in Aranjuez, where she stayed until she was 18. In the photo she's the blonde girl in the foreground, tightly holding the doll... wasn't she cute? I wonder where she learned to make migas, I never asked her...


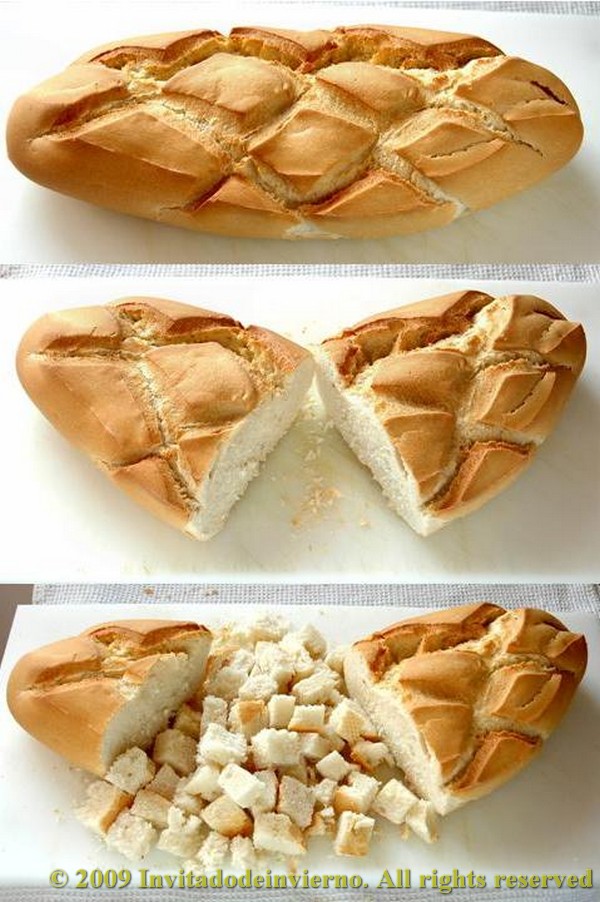
As far as I know there are two main types of migas: diced and pulled. My grandmother used to make the diced type. According to the traditional standards, the dices must be chickpea-sized. The best bread for migas is the Spanish peasant bread, with a very dense crumb. The very open crumb of baguettes or ciabattas is not good for migas. And normally stale bread a day or two old is used. Remember migas is a poor man's dish... this makes it just perfect for the current crisis. I don't measure anything when I make them, but I'll try to figure the amounts:

My grandmother's migas

  • 1 hunk of dense crumb bread
  • 1 tsp salt
  • 2 tsp sweet Spanish pimentón (essential!)
  • 4 cloves garlic
  • 2 chorizos for frying (not very dry, not all chorizos are good for frying)
  • 2 tbsp diced Spanish jamón
  • 1 handful bacon rashers
  • Virgin olive oil for frying (essential!)

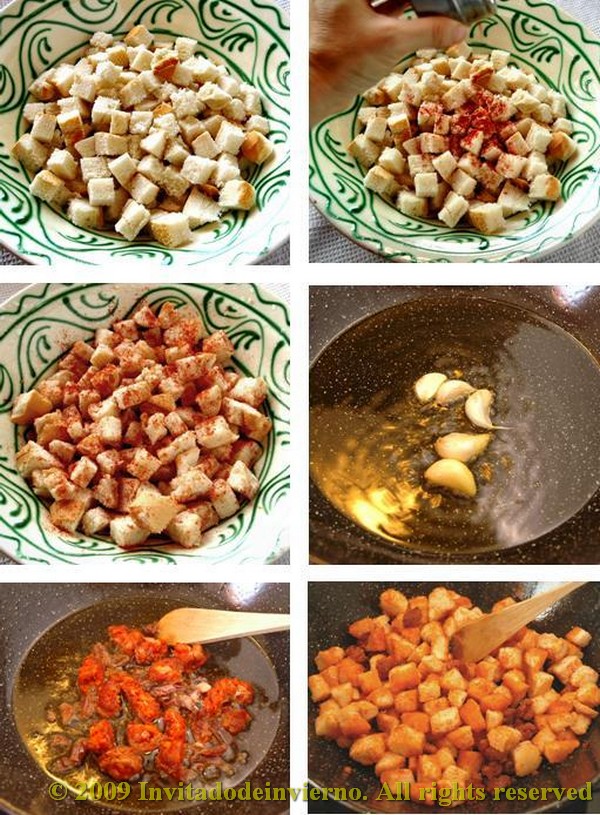
Well then, are you ready to start? Pick a nice hunk of stale bread and dice it carefully. I never get to make the dices as small as a chickpea... I'm not a skilled miguera, but I manage. Put the diced bread in a large bowl. Then sprinkle the bread with water, enough to slightly moisten it. The purpose of this is to soften the bread, remember migas are supposed to be made with sometimes very dry bread. Sprinkle the salt and turn them around to evenly distribute the salt. Do the same with the pimentón. Then cover with a damp cloth and leave to rest overnight.

By the way, I remember one family meal, with all my in-law family as guests, when I cooked migas for first course and a goulash-like stew for second course. I mistook the hot paprika for the sweet... on both courses... That day I had the evidence of how very well-mannered they all are... they still talk to me.

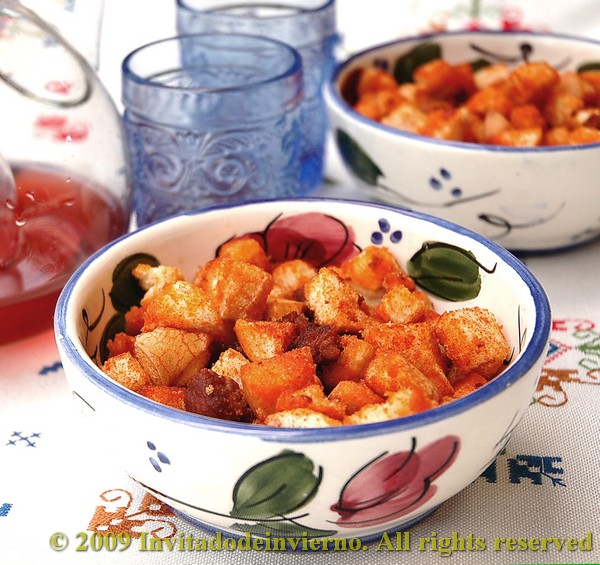
To prepare the migas the next day, pour 6-8 tablespoons of olive oil in a deep frying pan and put it on medium heat. Cut the garlic cloves in half, there's no need to peel them. Fry the garlic until lightly browned, then discard. The purpose is to flavor the oil. Then add the crumbled chorizo, the ham and the bacon. Stir-fry till they're almost done, the oil will be nicely colored, then tip the bread on the pan. Toss and turn around for the bread to thoroughly soak the oil. They will start to turn nicely red because of the paprika and chorizo drippings... Go on tossing for 3-4 minutes, depending on the heat. The migas should be lightly toasted and crisp on the outside, while they should remain soft in the inside... yes, that's the key to making good migas, my little children...


Serve the migas on a beautiful earthenware dish, while warm, and distribute them with a large wooden spoon... this is just for the sake of authenticity. You can add some grapes to the migas too, although I don't remember my grandmother doing it. This was very typical in the wine growing regions, but then they are called migas de vendimia or grape harvest migas. I love the contrast between the roughness of the migas and the sweetness of the grapes. Some other day I've got to try to add some pomegranate... it must be an interesting addition. And also you can serve the migas in small bowls or portions for a very tasty tapa... yum!

Eager to know more?

Savoury cake with chickpea flour and chorizo

>> Tuesday, March 24, 2009

I'm getting hooked on this blog... another addiction, ooooh.


For the wonderful "merienda" (*) of last saturday I made two savoury cakes, a very common dish in some areas of France. People here are always surprised when I bake this kind of cake because it's not known at all in Spain. I found the recipes in a little French book on "cakes", they give them the English name in France, this one. Sorry, it's in french of course, I haven't been able to find any translation. One of the recipes is made with... ¡chickpea flour! Yes, it caught my eye when I read the book. Before falling asleep I usually read cookbooks instead of best-sellers, it's wicked of me, I know.

These savoury cakes can be eaten cold, slightly warmed in the oven or even sliced and toasted. In French "boulangeries" they are sold in wedges or slices... yummy.

To cut a long story short, I chose the chickpea flour and chorizo cake and also another one with cheese, hazelnuts and green olives for my "merienda"... Chickpea flour is more widely used in Andalusia than in the bleak dry plateau where I live... It is used there to coat fish and shellfish before frying it and also for the incredible "tortitas de camarones", a kind of crispy pancake made with tiny shrimps. Surprisingly enough this post includes another gluten-free recipe. Here's the recipe for the first cake:

Savoury cake with chickpea flour and spicy chorizo

  • 200g (7oz) chickpea flour (organic is best!)
  • 4 eggs (organic too if possible)
  • 10cl olive oil (Spanish is best :-))
  • 10cl milk
  • 4 tsp baking powder
  • 100g (3.5oz) spicy chorizo (the best you can find, it really makes a difference)
  • Salt (I put two generous pinches)
  • Herbes de Provence (I forgot them, getting old)
Heat the oven to 170 ºC (340ºF, slightly more if your oven is not convection-type). Mix the eggs, oil and milk and add the sieved flour with the baking powder. Mix well and add the salt and herbs to your taste. And lastly add the diced chorizo.

Pour the mixture in a buttered and floured loaf pan. Bake in the oven for 40 minutes (be careful, maybe less is needed, mine came out a bit dry, keep an eye on it). This cake tends to develop a crust very quickly, so the recipe suggests to cut the surface with a knife after 15 minutes (don't worry, it doesn't deflate, at least mine didn't).

After 40 minutes you can check if it's done with a knife or any other sharp kitchen tool. If the knife comes out clean, the cake can be taken out of the oven and be left to cool in the pan.

Even though the cake picture is rather... eeeh... poor, you can see it shows a very spring-like yellow color... nice. I don't think the chickpea flour gave it a very sharp or special taste, at least I don't really notice it. In fact I have found at some websites sweet cake recipes with chickpea flour, like these brownies. I've got to try them some day.

If you bake the cake in advance I advise you to reheat it a bit before eating or even better, slice it and toast it. This really makes it release its aroma...

(*) Merienda is Spanish for end-of-afternoon-beginning-of-evening-snack which turns into some extravagantly copious meal when you gather friends or relatives or both. Typical Spanish, to stuff yourself I mean.

Eager to know more?

Followers

About This Blog

Lorem Ipsum

  © Blogger templates Palm by Ourblogtemplates.com 2008

Back to TOP