Related Posts Widget for Blogs by LinkWithin

Matcha noodles with basil cream and giveaway winner

>> Monday, June 28, 2010

Pasta matcha 3

Well, the long-expected moment of revealing the winner of the giveaway has come. I'm sure you've been biting your nails the whole week long... Thanks to all participants! Also I'm giving in this post my first pasta recipe in the blog... I'm not a great pasta lover. It's not that I dislike it, but it's never among my favourites. I find it a bit boring (I feel your hatred coming my way...). But let's get to the point...


First to the giveaway winner: Tsue of That's what she said. Congrats, Tsue! I hope you enjoy your giveaway. To all the non-winners, thanks for participating, it's always nice to see there's someone out there. You can make the matcha pasta to help you get over the mighty blow of not winning...

Giveaway result

And now to the recipe. As I said, I don't eat pasta myself that often. I make it for my kids, which are great pasta lovers like most children are. They're the reason for me to buy a pasta machine a year ago (or maybe the excuse for more experiments?). I must admit though that fresh homemade pasta has a far superior flavor and a texture than store-bought pasta. And I especially like stuffed pasta, it allows you to play with really crazy fillings, although making it is quite time-consuming. This time I wanted to try and add some matcha tea I still had left from this cake.

Homemade pasta with matcha tea
Yields 3-4 servings

  • 260-270g hard wheat flour
  • 3 heaped tsp matcha tea
  • 3 medium eggs
The ratio is usually 100g flour to 1 egg, but I prefer to add less flour and add more later if needed. It depends on the size of the eggs and the hydration capacity of each flour.
  1. Break the eggs and put them in the bowl of a stand mixer or food processor. Add the flour and the tea.
  2. I use my Thermomix, 15 seconds mixing on speed 6 and 1 minute kneading. The mixture will be crumbly at the beginning but it starts to become more cohesive at a certain point during the kneading. Make a ball with the dough, wrap in plastic foil and leave to rest for half an hour. See this link for some tips on using the food processor for making pasta dough.
  3. You know a pasta machine makes things a lot easier, although it's not really essential to make pasta. You can roll the dough with a rolling pin and cut it with a knife. I dry the pasta on a floured tray and freeze it in small portions when I'm not going to use it immediately. Boil the noodles for 4-5 minutes in salty water. Drain and add the cream.
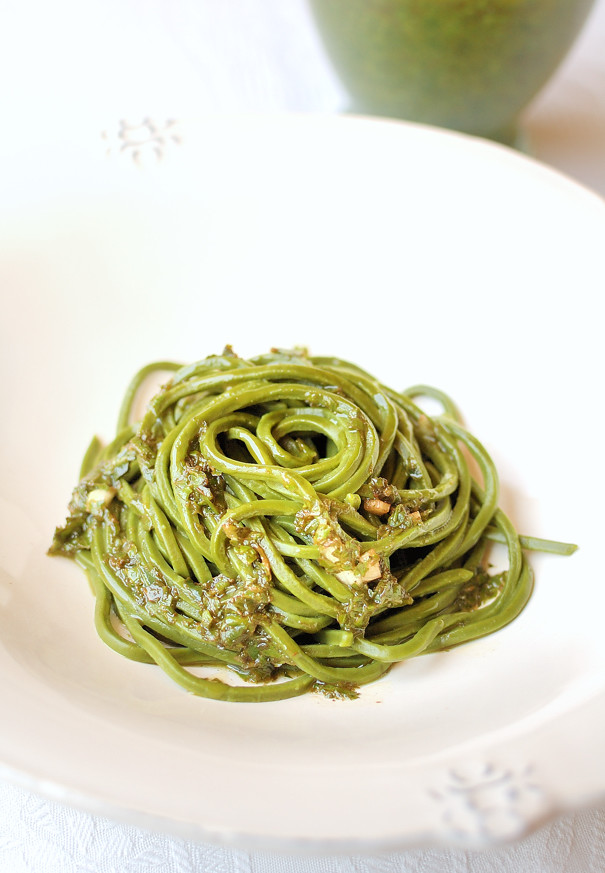
My noodles were indeed very cute, but the tea flavour was hardly noticeable. Next time I will add more tea.

Matcha tea pasta 1

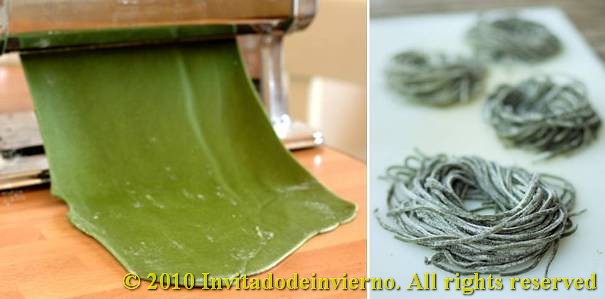
The concept for the basil cream comes from a book on Medieval cooking by a modern cook, Mincka, that I bought in Provence 2 years ago (how cool of me!). It's just a mixture of good olive oil, a lot of fresh basil and garlic.

Basil cream
  • 250ml virgin olive oil
  • 2 large handfuls of basil
  • 2 cloves of garlic
Separate the basil leaves from the stems, peel the garlic cloves and throw everything with the oil in the bowl of a food processor. Pulse until it gets the desired consistency. Transfer it to a nice bottle or container. This mixture lasts for very long in good condition, there's no need to keep it in the fridge. Only the basil loses its green fresh color through time, turning brownish. Just a drizzle of this cream on any pizza or focaccia is enough to give it a delicious basil aroma. It's so delectable that I like it plain spread on a warm toast...

Eager to know more?

Horchata de chufa, tigernut cake and Saint John's Night

>> Thursday, June 24, 2010

Tigernut cake 1

Horchata de chufa or tigernut milk is a staple drink consumed during the scorching Spanish summer throughout the country. Tigernut milk can be made at home by processing the tigernuts in a food processor, then passing the thick slurry that's obtained through a muslin or cheese cloth and pressing the solid residue to extract as much liquid as possible. I recently made horchata for the first time... What an enriching experience, to crush the poor little tigernuts, sieve this tigernut puree and watch the tigernut milk flow through the cloth... It almost made me cry. That's what I call going back to one's primal roots. Well, not exactly to my roots, as I've never even been close to my primal roots, since I was born and raised in the city. However, I adore this kind of traditional skills, essential to survive without supermarkets and horchata street stalls (but not without my Thermomix... ahem). The thing is that the making of horchata leaves you with a reasonable amount of deliciously smelling residue. It was a pity to throw it away, therefore I looked for some interesting recipe to put it to good use, and I found a cake. Being that tigernuts eaten as a snack and horchata are as popular in the South-East coast of Spain as the celebration of Saint John's Night, I thought the cake arrived timely...


If you happen to find some plump and healthy tigernuts, here goes the recipe for horchata, as simple as it can get (
this store carries all things tigernut you need for the cake, tigernut oil and flour included):

Horchata de chufa or tigernut milk (from this blog)

  • 250g dried tigernuts
  • 1 liter water
  • 100g sugar (you can use other sweetener if you like, I use agave syrup)
Horchata de chufa 1
  1. First soak the tigernuts overnight in water. That's essential. I leave them in the refrigerator. The wrinkly little guys will get plumpy.
  2. The next day, drain the tigernuts, which will be hydrated by now, and put them in the bowl of a food processor. Add 700 ml of water and puree thoroughly. I puree mine for as long as 2 minutes.
  3. Lay a cheese cloth or something similar on a sieve or funnel placed on a container to collect the juice. Pour the tigernut puree, tie together the ends of the cheese cloth and press the mixture by wringing the cloth. Wring until there's no more liquid coming out.
  4. Add the sugar and the rest of the water to the milk, stir to dissolve. You can choose to add this same amount of water in the form of icecubes instead, if you intend to drink the horchata immediately. Otherwise, put the container in the fridge and chill thoroughly.
Horchata de chufa 2

And then you can enjoy the horchata, which is really delicious, or make the tigernut cake:

Bizcocho de chufas or tigernut cake
  • 200g sugar
  • 3 medium eggs
  • 150g tigernut oil (substitute by sunflower oil)
  • 250g horchata
  • 20g baking powder
  • 350g all-purpose flour
  • 50g tigernut flour
  • Powdered sugar for sprinkling (optional)
Tigernut cake 3

You need to dry the horchata solid residue in the oven in order to use it in the cake. Half a day at 50ºC... not very energy-saving. Although interesting as an experiment.
  1. Preheat the oven to 180ºC.
  2. Cream the eggs with the sugar till pale. Add the horchata and the oil, mix lightly.
  3. Sieve both flours with the baking powder, add to the liquid and mix carefully to avoid any lumps.
  4. Line a rectangular cake pan with parchment paper. Brush the paper with oil. Pour the cake batter and bake for 30 minutes. Be careful not to overbake the edges.
Tigernut cake 4

The cake is moist and fluffy, only with a slight horchata undertone. It looks and tastes really very similar to the bicas. It has a crunchy feel due to the high amount of fiber in the tigernuts. I loved it, though maybe it's not suitable for everyone because of the whole-flour feel it has. I will make it again, no doubt. It's different, original and very nourishing.

Tigernut cake 2

Eager to know more?

Peach gazpacho and a giveaway!

>> Sunday, June 20, 2010

Peach gazpacho 1

This year I'm in the mood for fruity gazpachos or so it seems. I happened to have some delicious peaches which were almost past its prime and I had seen an interesting peach gazpacho recipe by famous Basque chef Martín Berasategui, so I set to work. Just to compare with the cherry gazpacho I made recently... I should innovate, because at home we have gazpacho and salmorejo every other day. The only house inhabitant who doesn't eat gazpacho is my youngest boy. He says he doesn't like it. But he's never tasted it... does it sound familiar?

And... I'm announcing a giveaway!


Again, CSN stores have been so kind to consider me for a $80 gift certificate to give away to my readers! First of all, I should say finding readers out there every day is such a thrill... because it still feels unexpected to me! Although CSN pretty much have everything you can think of (bed being one of the items) I've been browsing through their cookware site and I wouldn't find it hard to choose something for my kitchen... I never have enough gadgets and I know most of you have the same illness!

So, what to do to enter the giveaway? Nothing too difficult, making it complicated would definitely be beyond my skills. Just start dreaming about what item you'd choose at CSN websites and leave a comment about it here, including your e-mail address. And one more thing: in order to count your name twice, I just kindly ask you to visit Kiva's site, check if it speaks to you in any way and leave me word of it. That's it.

The giveaway is open to any person living in the USA and Canada, and the deadline is Monday 28th, 11pm GMT. I will assign a number to each comment and use this site to generate a random number. The winner will be announced on Tuesday 29th.

Back to my point, this gazpacho has such a balanced flavor that when I first tasted it I could distinctly make out every ingredient: the peaches, the tomatos, the green pepper... And that doesn't happen often, but maybe my palate is not sensitive enough. The color was beautiful, salmon-like, iridiscent-but-like-riding-into-the-sunset... ahem.

Peaches 3

Peach gazpacho

  • 500g peaches, peeled and pitted
  • 500g tasty tomatos
  • 15g green sweet pepper
  • 40g onion
  • 1 small clove garlic
  • 30g cider vinegar
  • 50g virgin olive oil
  • Salt to taste
  1. Weigh the peeled and pitted peaches and set aside. Cut the tomatos in chunks. Cut the pepper and the onion. Peel the garlic clove.
  2. Throw everything, except the salt, together in a food processor. Process to a very smooth puree. Pass it through a food mill or a sieve if you want it really fine. Add one teaspoon salt, taste and adjust if needed. Saltiness is a very personal matter, so I only give a starting point.
I wish you luck for the giveaway!

Peach gazpacho 2

Eager to know more?

Daring Cooks' challenge June: Pâtés and bread

>> Monday, June 14, 2010

Paté spices 1

This month the Daring Cooks' challenge has turned out pro-French and I found it's been an excellent proposal, although in reality there were two challenges in one. It so happens that I had recently attempted a campagne-style pâté with a not-so-satisfactory result, so it was a good opportunity to undertake a tried and tested recipe and use a surplus of pork liver that I keep in the freezer since January... And the experience has been a success... I'm still licking my lips.


Being that I always tend to be unruly and disobedient I didn't exactly make baguettes, and I added raisins, which I think divinely combine with pâtés and foie. The possibilities of pâté offered were varied, including vegetarian options. I chose the most genuine, the pig's liver pâté. I also introduced some changes in the paté quantities, but the ingredients are the same.

Our hostesses this month, Evelyne of Cheap Ethnic Eatz, and Valerie of a The Chocolate Bunny, chose delicious pate with freshly baked bread as their June Daring Cook’s challenge! They’ve provided us with 4 different pate recipes to choose from and are allowing us to go wild with our homemade bread choice.

Paté spices 4

Three Spice Liver Pâté
For a 25 x 12,5 cm loaf or pan

  • 350g pork liver (454g in the original recipe, but I was afraid that the liver taste would be overwhelming)
  • 350g minced pork meat (227g in the original recipe)
  • 250g Ibérico pork lard (227g in the original recipe)
  • 2 garlic cloves
  • 2 shallots
  • 1 whole egg y 1 egg yolk
  • 1/2 tsp cinnamon
  • 1/2 tsp cilantro seeds
  • 1/2 tsp cumin
  • 1 tsp salt (3/4 tsp in the original recipe)
  • 1 tbsp peppercorns
  • 2 tbsp sweet wine (cognac in the original recipe)
  • 2 bay leafs
  • 1 package bacon
Paté spices 2
  1. Preheat the oven to 180ºC.
  2. Cut the liver and bacon into pieces and put them in a food processor (I use my Thermomix). Process briefly.
  3. Grind the cilantro and cumin seeds in a coffee-grinder.
  4. Add the minced meat, the peeled garlic cloves, the diced shallots and all the spices and salt, except the peppercorns, in the processor bowl. Process till you obtain a fine puree. Add the wine, the coarsely crushed peppercorns and the eggs and mix thoroughly.
  5. Line a loaf pan or terrine with bacon slices. Place a bay leaf on the bottom and pour the meat-liver mixture in the terrine. Smooth the surface, place another bay leaf and cover with more bacon. Cover with a lid or aluminum foil.
  6. Place a deep dish in the oven and place the terrine on it. Fill with boiling water till it reaches 2/3 of the height. Bake for 1 1/4 hours.
  7. When done, take out the pâté and leave to cool completely. I preferred to leave it to rest overnight in the fridge for the flavors to develop.
Being that I already have some practice in baking bread, I won't dedicate much attention here to the bread part of the challenge. I used this recipe, but shaped into small batards and I added a couple of handfuls of raisins, previously boiled in sweet wine. The bread was not perfect-looking, but it was delicious with the pâté. The pâté itself was quite addictive, even though I would reduce slightly the amount of cinnamon. I liked the sweet wine instead of the cognac. But I'm a real sweet-wine-geek, I would add it everywhere. If you think the amount of pâté is too much, consider that is freezes beautifully if you don't feel like eating the whole terrine in one go. I will make this recipe again, no doubt.

Paté spices 3

Eager to know more?

Paciencias, Castilian cookies

>> Friday, June 11, 2010

Paciencias 1

This is the story of a failure. No, my dear little creatures, not everything in my life is success. Not everything in my life is luxury, beauty, power and gigolos, as you would imagine. Sometimes I suffer reversals of fate. I don't know if I'll ever recover from this setback in particular.I fear that it can ruin my incipient and already uncertain career as a master pastry chef... it could force my confinement in bed, reduced to a wreck without the strength to overcome it, as Charlie's grandparents, yes, Charlie of the chocolate factory. So much distress in such a small body (in vertical direction). I shall now tell everything... Everything? Yes, everything... I will spare no gory details.


I happened to have a substantial surplus of egg whites, from past cakes, custards and various pastries. So I rose one day and I told to myself, you could try to make paciencias (literally patiences), you liked them a lot when you were small. Paciencias are small round cookies typical from various parts of Castilla, the central part of Spain. So intelligent of me. There's little information about them in the net, poor creatures, but I found a recipe for a regiment (which I divided by four) in one of my cookbooks. I had to convert the old units in the recipe to less ancient units, but I was determined to overcome any obstacle to prepare my dear paciencias (which in certain places are also called pedos de monja, nun farts...). The recipe, from some pastry shop in Soria, was utterly vague about the stiffness of the egg whites, about the type of sugar to be used and about the temperature of the oven... I interpreted the recipe as best as I could, but I obviously did something wrong.

Paciencias 4

Paciencias
Yields around 200 (yes, sooo many)

  • 280ml egg whites (10 in my case)
  • 400g sugar
  • 460g flour
  • 1 pinch salt or cream of tartar
  • A few drops of lemon essence
Paciencias 3
  1. Preheat the oven to 250ºC.
  2. Weigh the sugar and the flour and set aside.
  3. Pour the egg whites in a food processor with the salt or cream of tartar and start to whip them. When they start to foam, add the sugar little by little till you get a stiff meringue.
  4. Then add the sifted flour and the lemon essence. Mix well with a spatula or in a stand mixer, till no flour lumps can be seen.
  5. Prepare a pastry bag and fill it with dough. Line a couple of cookie sheets with parchment paper and pipe little mounds of approximately 3cm diameter. Keep the bag tip close to the paper, so that the cookies stay flat.
  6. When you've filled one of the sheets with cookies, rap the sheet on the counter for the cookies to spread a little and flatten. Leave them to rest for 5 minutes.
  7. Put them in the oven and bake for 4-5 minutes. Take them out and leave them to cool on the sheet for 5 minutes. Then slide the paper out of the tray with the cookies on it, sprinkle water on the sheet and return the paper. Wait a couple of minutes for the paper to soak the water. The cookies can now be easily released. Cross my heart.
Well... genuine paciencias have a finer texture and a more uniform color than mine. These were a tad grainy. I remember paciencias as fine and hard little things, toasted on the outside. Maybe it's not necessary to make the meringue so stiff, but somewhat more runny. Maybe the sugar has to be superfine instead of regular. I don't know. If anyone owns the secret for making perfect paciencias, I'm willing to buy it. Make yourself apparent. Now.

Paciencias 2

Anyway, my kids loved them, they found them addictive and the cookies were gone in no time... They were pretty yummy, as the flavor was indeed almost as it should be, but I should give mine another name... templanzas, esperanzas, caridades or... failures. You can't always get what you want.

Eager to know more?

Rose petal sorbet

>> Thursday, June 3, 2010

Sorbete rosas 1

This time the British in my veins has surfaced. My anglophile (and dark, of course) side recently drove me to buy a family recipe collection by Norwegian-descent British writer Roald Dahl. For those who do not know him (?), Roald Dahl is the author of the books in which the movies Charlie and the Chocolate Factory, Matilda, James and the Giant Peach are based, as well as of a lot of other famous works. In short, reading the book I came across an amazing recipe for rose petal sorbet and oh, serendipity! Being that the roses in my garden are in full bloom, I set to work.


Sorbete rosas 2

The book is beautifully edited, with great photos of Mr. Dahl and his family in the typical English cottage where he lived most of his life. I've always envied those English writers in their English cottages, leading an idyllic English life... dedicated to writing English books in a cute little house, surrounded by lush vegetation, eating tomato soup and kidney pie, and soaking in sherry... Also the photos never show the eternal English rain... In short, these are the consequences of reading too many Agatha Christie novels when I was young and too many Enid Blyton books as a child. And they say that reading is good.

Rose petal sorbet
Yields 6 servings

  • 4 large handfuls of rose petals (at least half of them should come from pink or red roses, otherwise the sorbet won't have the right color)
  • 570ml water
  • 230g sugar
  • Juice and zest of 1 lemon
  • 2 tsp glycerin, food grade
Rose petal sorbet 4
  • Collect a few roses that have not been treated with insecticide or similar crap, like mine (honestly, we don't pay any attention to them until they bloom). Carefully examine the petals to get rid of any bugs.
  • Put the water in a saucepan. Add the sugar and take everything to a boil. Boil for five minutes, just enough to concentrate the syrup a little bit.
  • Turn off the heat and add the rose petals. Mash slightly with a wooden spoon (actually, cooking the syrup and the addition of the petals could also be done in a Thermomix). The petals thoroughly lose their color. In contrast, the liquid becomes a light tea color. Cover the saucepan and let stand overnight in a cool place (the fridge if it is warm).
  • The next day, pass the mixture through a cheese cloth placed on a sieve (I caught an earwig... earwig flavored sorbet...). Discard the petals.
  • The funny thing about this recipe is that an unattractive colored liquid yields a rather gaudy pink sorbet. And the miracle is worked at this time: by adding the lemon zest and juice to the rose syrup... Voilá! The color changes. Trust me. I'm supposed to be a chemist and I have no idea why this happens... what a waste of money spent on college. I guess it's caused by the acid in the lemon. I've found on the Internet that it happens too with violet syrup... Intriguing.
Rose petal sorbet 5
  • Add the glycerin. I suppose that it's added to help prevent the formation of large ice crystals, but there's no explanation for it in the book. Maybe it's a family secret...
  • Mix well and put in a container that can go into the freezer if you have no icecream maker. Mix well every hour to prevent it from becoming a single block of ice, until very cold. I filled with the syrup some of those plastic bags to make ice cubes. Then I mashed the cubes in the Thermomix. Once the sorbet is ready, serve in the finest glasses you have, because the color is wonderful...
If roses have a a flavor, this is it, no doubt. Its aroma is instilled in the sorbet. The flavor is intriguing, you wouldn't guess the origin if you weren't told. But once you're told about the key ingredient, then you say: right, it tastes of roses! (And earwigs... but that's my secret ingredient, haha.)

Sorbete rosas 3

Eager to know more?

Followers

About This Blog

Lorem Ipsum

  © Blogger templates Palm by Ourblogtemplates.com 2008

Back to TOP