Related Posts Widget for Blogs by LinkWithin

Kulich, a Russian Easter bread

>> Tuesday, March 30, 2010

Kulich 1

No, I don't have any Russian relatives, friends, not even an acquaintance... pity. But last Saturday I attended an excellent course on Easter breads at La Cocina de Babette, an alternative cooking school in Madrid. We prepared Russian kulich, British hot cross buns and Jewish challah. We had a grand time, though we did work hard. Making three leavened breads in just one day is quite an effort!


The course was taught by Paul Merry, an Australian baker based in England, owner of a baking school in Dorset (my dream life...). And baking side by side with a professional, you always "absorb" some expertise... at least that's what I like to believe. Kulich is a typical leavened sweet bread eaten at Orthodox households on the Easter Vigil. This Merry man knows this bread at first hand, as one of his aunts is married to a Russian. According to Tatiana M. Maslenikof, owner of the Russian restaurant El Cosaco, in Madrid:

On Holy Saturday, during the day, it can be quite hectic at a Russian home while preparing for the grand night. Children paint eggs and mark them with the letters X. B., the initials of Xristos Boscrecie (Christ is risen). The housewife has already been preparing the various dishes for several days, among them the traditional desserts paskha and kulich; the first one need to be pressed under some weight for two days... Fish is forgotten and hams, piglets, poultry and lamb take over the kitchens.
It's time for a general house cleaning and for adorning every corner with flowers. The table is covered with a white tablecloth and the colourful delicacies are laid on it.

I wonder about the age this is describing... I doubt this would be possible under the communist rule. I found this sweet bread is something in between stollen and brioche, with a soft inside and bursting with almonds and dried fruit. I loved to learn how to prepare it, as I had been eyeing the recipe in Tatiana's book for ages, but never had the guts to make it. The kulich recipe in the book is slightly different, with a lot more egg yolks. I'll try it some time. The main problem here in Spain is the bread shape. It's almost impossible to find a commercial mold with that height ratio (double height than width), so at the school we used empty tomato cans, scrubbed clean and lined with parchment paper.

Kulich according to Paul Merry
Makes 2 medium-sized kulich

First sponge

  • 150ml milk
  • 250g bread flour
  • 10g fresh baker's yeast
Mix everything, cover and leave to ferment overnight at ambient temperature.

Second sponge

  • 150ml milk
  • 100g bread flour
  • 30g fresh baker's yeast
The next day, mix the ingredients together and then add to the first sponge. Leave it to ferment for an hour, until the surface is bubbly.

Final dough

  • 650g bread flour
  • 1 pinch salt
  • 50ml vodka
  • 100ml honey
  • 100g vanilla sugar
  • 250g butter, at ambient temperature
  • 4 eggs
  • 150g sultanas
  • 100g raisins
  • 1 tsp saffron threads
  • Zest of 2 lemons
  • 50g candied peel
  • 100g blanched almonds
  • 15-20 cardamom pods
Kulich 3
  1. While the second sponge is rising, prepare the rest of the ingredients. First put the saffron to soak in the vodka. Coarsely chop the almonds and zest the lemons. Cut the candied peel in small pieces. Open the cardamom pods and grind the seeds in a mortar or coffee grinder.
  2. Mix all the liquid ingredients, which must be at ambient temperature. Warm up the honey if needed to make it more fluid. Add the vodka with the saffron and the eggs. Mix the liquids with the second sponge and then add the rest of the flour, the salt and the ground cardamom.
  3. Knead thoroughly till you have a homogeneous and smooth dough. Then add the butter cut in chunks. Knead to incorporate the butter.
  4. Once the gluten has developed, add the raisins, sultanas, almonds, lemon zest and candied peel. Distribute them evenly.
  5. Form the dough into a ball, then place it into an oiled bowl and leave to double in bulk (around an hour).
  6. Prepare the molds in the meantime. Line the inside with parchment paper, cut a circle for the bottom and a large strip for the sides. Let the paper extend over the tin edge as needed if the tin is not tall enough. Use double paper if you like.
  7. When the dough has doubled, divide it in two; then loosely shape each portion into a cylinder that can be inserted into the mold. Let it carefully fall inside and press it a little bit to fill all the gaps. The tin should be half full approximately.
  8. Leave to proof again, loosely covered in plastic so that the dough has place to rise 3-4cm above the tin or paper edge.
  9. Heat the oven to 170-180 ºC. Then bake for around 40 minutes. Check for doneness with a wooden skewer. If the kulich tops brown too quickly, cover them with foil.
  10. When they're done, take them out and leave to rest in the mold for 15 minutes. Then carefully tip the molds onto a wire rack and extract them from the mold in a horizontal position. Put them in an upright position and check that they're set enough to stand (otherwise they would need some more time in the oven).
  11. You can optionally ice them with a mixture of water and sugar once they've cooled.
Kulich 2

Eating kulich is a wonderful way to celebrate Easter... though that doesn't mean we won't be making Spanish torrijas this year, no, no, no. We are gluttonous...

I'm sending this Easter bread to Susan's YeastSpotting.

Eager to know more?

Eggplant beignets

>> Thursday, March 25, 2010

Eggplant beignets 2

Nothing too special, the eggplant beignets. Another very traditional side dish or tapa with a different twist in every Spanish household. It's difficult that they are exceptional rather than just good though. And one of the key factors is the eggplant quality without a doubt. The ones I get around my neighborhood are mediocre, to say the least. Some times they are not ripe, while others are absolutely insipid. Maybe the only way to get excellent eggplants is to grow them yourself, at least in the vicinity of huge cities, like where I live...


Eggplant beignets 3

Rather a depressing opening for a post, isn't it? I think I should plant some vegetables in my garden. The problem is that I have a slipped disk and that prevents me from much garden work. Besides some laziness too... okay, I admit it. But let's stop beating around the bush: I loooove eggplant beignets, I find them one of the most wonderful side dishes or tapas one can serve. Hot straight from the pan, fried in a perfectly clean olive oil, they are excellent. I remember to have eaten some of the tastiest eggplant beignets in my life in a small village hotel at Sierra Mágina, a beautiful massif covered with neverending olive groves in Andalusia, where we were treated like kings. They were cut into sticks, instead of sliced in rounds like mine, wonderfully crispy and drizzled with sugar cane syrup, like they're served all around Andalusia. I recall we stuffed ourselves that evening and we laughed our heads off with the children. The happiness effect of good food.

This is how my mother makes them. And imagine I wouldn't even hear of them when I was a child... you can miss really good things out of stubbornness:

Eggplant beignets
Serves 2 or 3 as a side dish

  • 1 large eggplant or 2 small ones
  • All-purpose flour or chickpea flour, for coating
  • 2 large eggs, beaten
  • Salt
  • Virgin olive oil for frying
Eggplant beignets 1
  1. Slice the eggplant in approximately 1cm thick slices. Place them in layers on a colander. Salt the slices in a layer thoroughly before placing the next layer on top. Leave them to rest for one hour so that they release their bitter juices.
  2. Pat them dry with a paper towel and rid them of all the juice (after an hour they'll be covered in little drops of juice).
  3. Pour olive oil in a large frying pan, at least 2cm deep (believe it or not, the more oil you use, the less oily the beignets will be). Heat it to medium-high.
  4. Coat the slices of eggplant in flour and then bathe them in the beaten egg. Fry them in batches.
  5. When golden, take them out to a large dish lined with paper towel, so that part of the oil is soaked. It's better to lay the slices in one layer till they're all done, because they get a bit soggy when left to cool one on top of the other. They should be crispy, more or less. Serve them immediately, while warm.
Eggplant beignets 4

Eager to know more?

Baileys and mascarpone cake

>> Saturday, March 20, 2010

Mascarpone Baileys cake 1

I've loved Baileys as far as I can remember, way back in the Middle Ages... okay, maybe not so long ago. Maybe I have some Irish ancestors. Maybe not, as I hate beer. Or maybe yes, as I think that potatoes are a very nice fruit indeed... The thing is that it appears that this liquor is not very often used for cooking. And it's a pity. That's why I want to contribute to a wider use in baking and to celebrate Saint Patrick's day at the same time (I'm late, I know) with this yummy Baileys cake... And I warn you: this cake tastes a LOT of Baileys. It's only fit for Baileys' lovers. So refrain if you're not a Baileys addict. Like me.


While searching for some recipe to use some homemade mascarpone cheese, I stumbled upon a nice cake recipe with amaretto in a Spanish website. But being that unfortunately amaretto is not my cup of tea, I decided to use Baileys, which makes a good match with mascarpone. And I adapted the recipe to skip the sugar and used agave syrup instead.

Sugar-free mascarpone cheese and Baileys cake

  • 4 medium organic eggs
  • 120g agave syrup
  • 250g mascarpone cheese
  • 100g Baileys
  • 200g flour
  • 1 package baking powder (around 4-5 tsp)
  • 1 pinch salt
  1. Preheat the oven to 180ºC.
  2. Separate the egg yolks and whites. Whip the whites till stiff. Set aside.
  3. In the bowl of a food processor, add the cheese, the yolks and the syrup, mix thoroughly.
  4. Add the Baileys and mix again. Then add the sifted flour with the pinch of salt and the baking powder. Mix softly and finish the mixing with a spatula.
  5. Then add the whipped whites, stirring delicately so that the whites keep their volume. Butter and flour a cake mold, pour the cake mixture and bake for 30 minutes.
  6. Use a wooden skewer to try for doneness. Take the cake out of the oven, unmold and leave to cool on a wire rack.
Mascarpone Baileys cake 2

The result is a super-moist cake with a delicious Baileys flavor. It keeps really well inside a plastic bag. Everybody loved it at home, except my little one. But he's a picky eater...

Eager to know more?

Matcha tea and mascarpone tart

>> Sunday, March 14, 2010

Matcha mousse tart 4

The Spanish page HEMC was asking us to prepare a tea-based dessert this month. You already know I'm not a tea lover, at least not in drinking form. But it's never too late to find another method or presentation so that I can get to like this weed. I've been spotting recipes with matcha tea for a long time now in the blogosphere, where its qualities are praised everywhere. Really everywhere... So I decided for once to stop resisting it and join the matcha initiated gang...


Good matcha tea is incredibly expensive. Fortunately you don't need a lot of it to make a good dessert. So I proceeded to spend an obscene amount of money in a 100g bag of matcha tea... it's so hard being a foodie. In case you've never seen matcha, it's a powdered form of tea with a lovely green hue. You can infuse 1 or 2 teaspoons in a cup of very warm water, never boiling, then stir it thoroughly to break the lumps, till it's frothy. You don't need to filter it. The result is a suspiciously looking green suspension. The day my tea arrived I decided to be bold and give it a try. Unfortunately it didn't change my mind, not a bit. The infused tea looked a lot like slime from the bottom of a nearby pond. But I still had to try it in a dessert. Why do I always give tea another chance? Like if it was any old boyfriend...

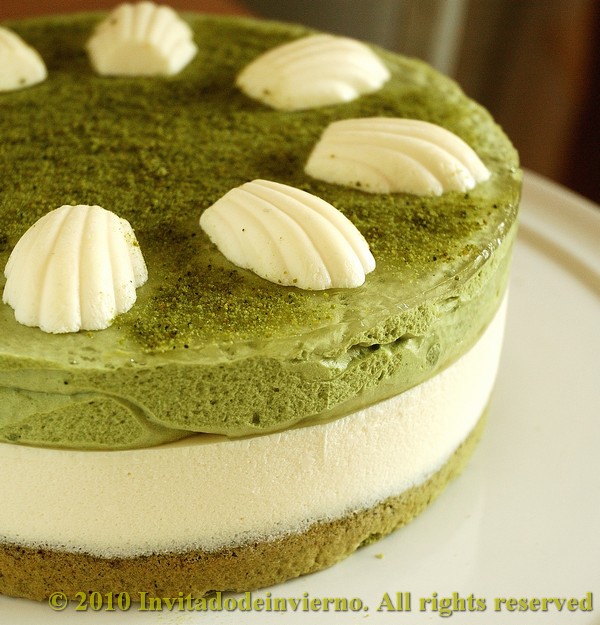
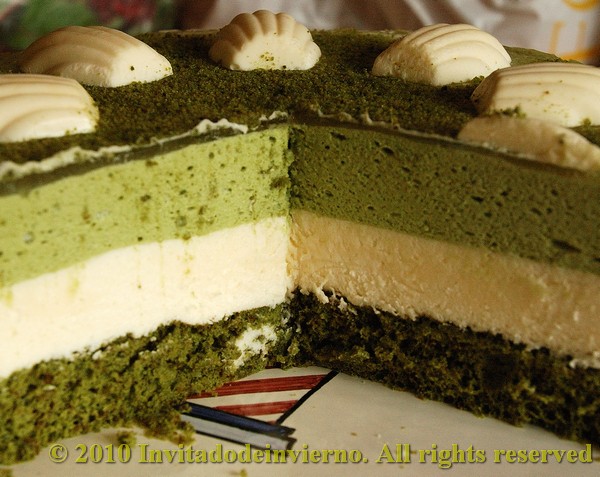
I opted for a light mousse tart. I would use a sponge layer, then a mascarpone mousse layer and a second layer of matcha mousse. The concept and recipes come from this web and this web.

Matcha and mascarpone mousse tart
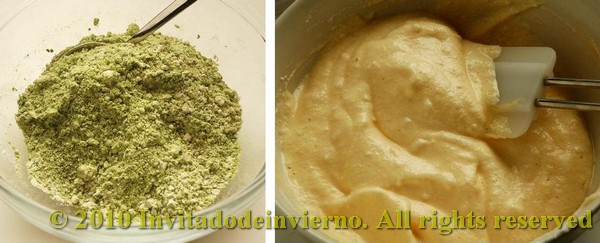
Matcha sponge from Nordljus:

  • 10g matcha tea
  • 50g flour
  • 2 egg yolks
  • 2 egg whites
  • 60g sugar
  1. Preheat the oven to 170ºC.
  2. Weigh the flour and the tea, mix, sift and set aside.
  3. Mix the yolks with half the sugar and cream them till pale.
  4. Mix the whites with the rest of the sugar and whip them to a meringue.
  5. Delicately mix the yolks and whites. Once homogenized, add the flour and tea mixture, little by little and mixing gently.
  6. Pour the mixture on a removable ring mold (I put parchment paper on the base to prevent it from sticking to the bottom). Bake for 12 minutes or until done. With a 20cm mold the sponge is 2.5-3cm tall. When done, tip it out of the mold carefully and let cool on a wire rack.

Mascarpone mousse adapted from Eddy Van Damme:
  • 3 gelatine sheets
  • 180g whipping cream
  • 4 egg yolks
  • 60g water
  • 90g sugar
  • 250g mascarpone cheese
  1. First place the gelatine sheets in a bowl filled with cold water.
  2. I make my custard in my Thermomix 21: put the egg yolks in the mixer with the water and sugar, fit the butterfly on place and mix at speed 1 1/2, around 8 minutes at 80ºC. I've got a roast-beef thermometer I use to check that the temperature has really reached 80ºC, as time can vary depending on the eggs size and fridge temperature. If you don't have a Thermomix, make the custard on a bain-marie, in a double boiler or in a bowl over boiling water, till the mixture reaches the right temperature. When done, rinse the gelatine sheets and add them to the bowl. Stir to dissolve and let cool.
  3. Whip the cream to soft peaks. According to the recipe you should never whip it to hard peaks.
  4. When the custard reaches ambient temperature, mix it with the mascarpone cheese. Mix it with a hand-mixer if necessary, to break the mascarpone lumps. Then add the whipped cream and mix gently.

Matcha tea mousse, adapted from Nordljus
  • 3 gelatine sheets
  • 100g milk
  • 10g matcha tea
  • 1 egg yolk
  • 1 egg white
  • 40g sugar
  • 100ml whipping cream
  1. Put the gelatine sheets in a bowl with cold water.
  2. Pour the milk in a pot, add the tea, stir to break the lumps and heat it, but do not bring it to a boil.
  3. Cream the egg yolk with half the sugar till pale. Then add the milk-tea mixture and heat the mixture to 85ºC to make a thin custard. Better measure the temperature, like in the previous mousse. Add the rinsed gelatine sheets to the warm custard, stir to dissolve and let cool.
  4. Whip the cream to soft peaks like in the mascarpone mousse, set aside.
  5. Then whip the egg white and the rest of the sugar to a meringe.
  6. When the custard is cold, mix the cream gently. Then mix the meringue carefully, not to deflate it.

To lay out the tart
This needs some previous planning. Once the sponge is ready and cold, I freezed it to cut it. The top surface was somewhat domed, as any decent sponge surface should be. Therefore it needs to be cut to a flatter surface. I thought it would be easier on a frozen sponge.

Matcha mousse tart 8

Once the sponge is ready, put it into a mold that fits snugly around it or use an adjustable cake ring like me. Fit the ring snugly around the sponge, laid on a shallow mold or dish, and pour the mascarpone mousse when it's ready. If you use a removable ring mold, butter and sugar the sides thoroughly and take this into account: you must bake the sponge in a mold that's slightly larger than the one you'll be using for the whole tart, as the sponge shrinks in diameter upon cooling. If you'd bake the sponge in the same mold you'd use for the tart, the mousse would cover the sides of the sponge and you wouldn't see it from the side in the final result. If you use a slightly larger mold, just trim the sponge to the final size. I hope I've made myself understandable...

Matcha mousse tart 5

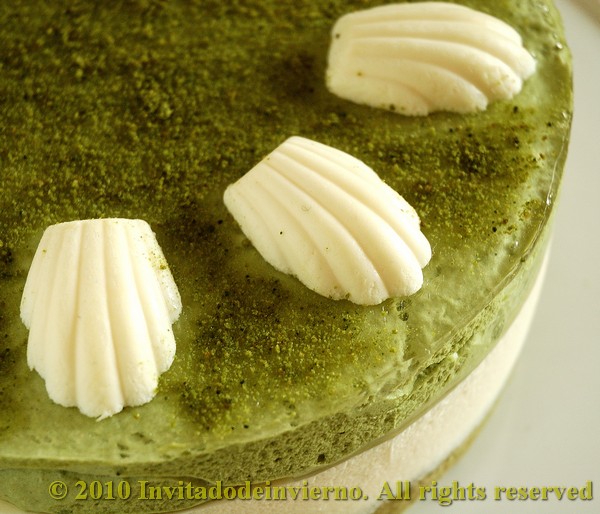
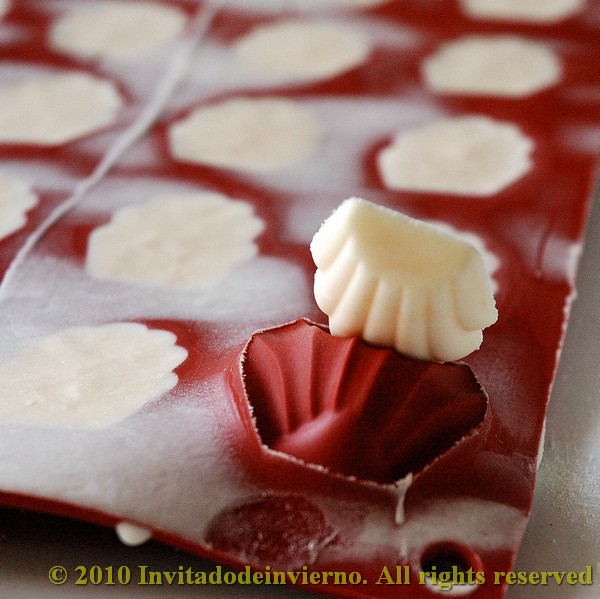
Regarding the mascarpone mousse, the amount is somewhat larger than you need for a double mousse layer tart. So I used the surplus to fill these little shell molds for bonbons. Then you freeze the little shells to be able to unmold them easily. If you don't have this kind of mold, you can use fancy ice cube trays. Once the mousse is poured on the sponge, you have to wait for it to set before laying the second mousse layer. I put it in the fridge while making the tea mousse. By the time you're done with the tea mousse, the cheese mousse will be set enough. Take the tart out of the freezer and pour the tea mousse. My remark on this: the difference between both mousses is that the tea mousse includes meringue, which the mascarpone's hasn't. I didn't notice much difference between them regarding consistency and creaminess but the tea mousse was a lot more difficult to handle in order to smooth the surface, for example. Although the original recipe doesn't mention it, I believe the meringue has to be whipped only to soft peaks for the mousse to softly "flow" upon layering. The cheese mousse flowed perfectly, filling all the surface irregularities of the sponge and yielding a beautifully homogeneous surface, on top and sides. However the tea mousse would not "flow" and I had to use a spatula to smooth it. In spite of that, the surface was quite uneven and the sides where not properly filled. Next time I'll make it right!

Matcha mousse tart 1

Once the tea mousse is laid, return the tart to the freezer so that you can easily remove the ring or mold. I made the tart in advance and left it in the fridge overnight. You've got to take it out of the fridge at least 2 hours in advance. To improve the horrible surface, I said to myself: don't worry, just pipe a thin gelatine layer on top for a shiny smooth surface. And so I did, but then I returned the damn thing to the freezer... big mistake. For those of you who, like me, thought you could set the gelatine by freezing it, you're wrong. The gelatine crystallizes into an uneven and matt surface, just the opposite of what I intended. Ignorant. But I'm a woman-of-infinite-resource-and-sagacity. I had collected the sponge trimmings, which by now were completely dry and crumbly. So I thought I'd made them into a powder and sprinkle the surface to hide the horrible gelatine. Then I laid the cute little shells and sprinkled the green powder... I've made uglier tarts. My kids said I should have placed a mini SpongeBob in the middle... To cut a long story short, the green layer was very uneven on the tart side and the gelatine permeated at some points, you can see it in the photos. But practice makes perfect. And I've got to publish a failure every now and then. Not everything in my life is sheer success.

Matcha mousse tart 7

The tasting result: I must admit in this case the tea flavor was delicious. The tart was very soft, light and with a subtle tea flavor that didn't overwhelmed you. The same for the mascarpone flavor, which by the way makes a great combination with the tea. A real keeper, I will repeat it no doubt, as all the guests loved it. In spite of all its flaws.

Matcha mousse tart 6

Eager to know more?

100% rye, cider and walnut bread

>> Tuesday, March 9, 2010

Rye cider bread 4

I haven't been baking bread lately. My sourdough passed away and my efforts to resuscitate it weren't successful. Maybe it's because of this year's neverending winter and my kitchen being the coldest room in the house. And being that I've become a real bread snob, using commercial yeast doesn't seem an elegant option anymore... it would be sooo totally unlike me... ahem. The thing is that I should already be feeding a new sourdough, but the mere thought of it makes me very lazy... However I recently found this recipe and I couldn't resist making it with commercial baker's yeast (yikes!), even renouncing my principles. Let's roll in the mud.


Mr. Lepard man publishes a new recipe every weekend in the British newspaper The Guardian. His recipes are always original; I love them. This recipe was published last February 6th and it caught my eye for various reasons: the first is that it's a 100% rye bread, which I love, the second is that includes cider, and the third is that the baking starts in a cold oven. I wanted to try the cold-oven-thing. I guess that as rye breads hardly exhibit any oven spring, a high start temperature is not as critical as for wheat breads, which need a sudden increase in ambient temperature to rise properly. To spice up the bread a bit, I added a large handful of walnuts, a good match with rye.

100% rye, cider and walnut bread adapted from Dan Lepard

Preferment:

  • 200g dry cider
  • 1 tsp cider vinegar
  • 5g fresh yeast (the original calls for 1 tsp active dry yeast)
  • 150g rye flour
Dough:
  • 150ml warm water
  • 1½ tsp salt
  • 300g light rye flour, plus some more for shaping
  • 2 handfuls walnuts
Use organic flour if possible, with germ.

Rye cider bread 1
  1. The night before baking, mix the cider, vinegar, yeast and flour in a container, then cover and let it ferment at room temperature.
  2. The next day add the rest of the ingredients to the preferment and mix well till you get a smooth paste. A 100% rye mixture can't really be called a dough... you can't knead it. Cover and let it rest for half an hour. The dough smells of cider... if you close your eyes you can imagine you're in a cider brewery.
  3. Place the dough on a floured counter and pat it into a ball, not too flat, as it will expand horizontally when fermenting and in the oven. Prepare a nice piece of parchment paper, flour it and lay the ball on it.
  4. Score a cross on top of the bread, grab the paper, lift the paper awith the bread on and place the whole thing into a Dutch oven or a similar ovenproof pot, large enough to hold the bread. Cover with the lid and leave to rise.
  5. When doubled in bulk (my bread took 1 1/2 hours), put it into the cold oven. Turn the heat on to 200ºC (180ºC convection type like mine) and bake for 30 minutes. Then take out the lid and bake for another 15 minutes. After the first half hour my oven hadn't reached the instructed temperature, so I waited for 5-8 additional minutes for the oven to get to 180ºC. I took the lid off then and baked for somewhat longer than the instructed 15 minutes (the bread didn't look golden enough). As a summary, I baked 35-40 minutes lidded and 20-25 minutes unlidded. The real baking time depends on the oven, so you must watch the bread carefully and adjust the times.
Rye cider bread 3

The result is fantastic. A soft bread with a very pleasant cider aroma. The crust could have been a bit crispier, but this way the bread is easier to cut. Sometimes you really have to wrestle with rye breads in order to cut them. This is not the case: Mr. Lepard man, you got it right as usual.

Rye cider bread 5

And after a long time, this one goes to Susan's Yeastspotting!

Eager to know more?

Butternut squash and tomato soup with ras el hanout

>> Tuesday, March 2, 2010

Ras el hanout soup 2
I've been hooked to the spice mixture ras el hanout ever since I tried it in this lamb dish. After buying it, the moment I remembered once in a while about the jar quietly resting in my cupboard, I went to the kitchen, I opened the jar and sniffed... Absolutely true. As I already told you everything about it in the mentioned post, I won't repeat it here. Just read it, study it and I will cold-call you one of these days... At that time, I used the sauce remaining from the lamb tagine to make a tasty veggie soup that disappeared almost immediately. So here it is another delicious soup with ras el hanout.


This rustic soup is in fact inspired in this one, which is made with roasted vegetables instead of the boring boiled variety, and it's then pureed. Let's get to work.

Tomato and butternut squash soup with ras el hanout

  • 1 medium-small butternut squash
  • 5 good tomatos (organic is better, then maybe they'll have some taste)
  • 5 cloves garlic
  • 1 onion
  • A dash of olive oil
  • 1 cup water
  • 1/2 tbsp ras el hanout (or 3/4 if you like a spicier soup)
  • Salt to taste
This soup is incredibly simple to prepare and it's good for lunch and as a first course. The roasting gives it a very different flavor from that of plain boiled vegetables. But remember it's not the best choice for kids, because the ras el hanout adds a slight heat.
  1. Preheat the oven to 180ºC.
  2. Cut the butternut squash in quarters. Cut the tomatos in half. Put both on an oven tray (better lined with aluminum foil). Drizzle with some olive oil. Add the unpeeled cloves of garlic.
  3. Peel the onion and wrap in aluminum foil.
  4. Slide the tray in the oven. Watch the garlic carefully, if it's tender will only take 10 minutes to roast. The rest of the vegetables will take around half an hour, except the onion, which usually takes longer.
  5. Once all the vegetables are tender and thoroughly cooked, take them out and leave to cool slightly. Then peel the garlic and squash.
  6. Put all the vegetables in a food processor or blender, add the water and puree to the desired fineness. You won't need to peel the tomatos if you're device is powerful enough. You can add more water if you like it thinner. I personally like my soup thick and chunky... very rustic.
  7. Then add the spice and salt and boil the soup for 5 or 6 minutes for the flavors to meld. Test for salt and serve!
Ras el hanout soup 1

When you smell the aromas in your house after preparing this soup, you'll also get hooked to ras el hanout...

Eager to know more?

Followers

About This Blog

Lorem Ipsum

  © Blogger templates Palm by Ourblogtemplates.com 2008

Back to TOP