Related Posts Widget for Blogs by LinkWithin

Lola's easy apple pie

>> Sunday, January 31, 2010

apple pie
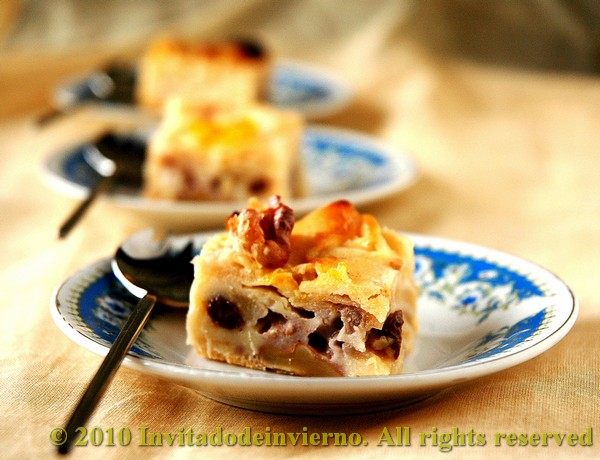
I love almost any dessert with apple in it. This simple apple pie is similar to an apfelstrudel, only without the dough wrapping. It's something in between cake and pudding, with an enormous amount of apple, mixed with raisins and walnuts, and just enough batter/dough to keep the whole thing together. I've adapted it from this lovely blog, tweaked the ingredients a little bit and subtituted agave syrup for the sugar (fantastic photo blog, I recommend it). By the way, I tell you... it 's hard for me to follow cup measurements... and I'm not getting used to it, but this pie was worth the effort.


Easy apple pie adapted from Lola Mansurov's
Yields around 8 servings

  • 1 cup all-purpose flour
  • 3/4 cup rhum to soak the dried fruits (the original calls for plain water, but... I don't know, I think this is a bit too cruel on the fruits ;-))
  • 4 medium cooking apples
  • 60g raisins (I would add more next time)
  • 60g dried apricots
  • 1/2 tsp rising agent
  • 1 pinch salt
  • 1/2 cup shelled and chopped walnuts (I would also add more of this next time)
  • 4 medium eggs
  • 7 tbsp melted butter (or 8 if you're using sugar)
  • 1/3 cup agave syrup (or 1/2 cup sugar)
  • 1/2 tsp cinammon

Place raisins and dried apricots in a bowl and cover with the rhum. I microwave them for a minute or so on full power to aid the soaking and leave the whole thing to infuse. Leave to cool. Peel, core and slice the apples. Sprinkle the slices with some lemon juice to prevent them from oxidizing. Set aside. Cream the eggs and sweetener until light and fluffy. Sift the flour with the baking powder and add them to the cream. Lastly add the melted butter and delicately stir to incorporate.

apple pie
Preheat the oven in the meantime, to 160ºC if using agave syrup and to 180ºC if using plain sugar. This distinction doesn't work for me, my oven doesn't make any difference between 200ºC and 150ºC, it just goes back and forth... Well, then mix the apple with half the walnuts, the raisins and the dried apricots, drained from the rhum. I made a mistake by laying the dried apricots on top of the cake for a nice touch of color and indeed I got it... a beautiful black color because they simply charred, so... just mix them with the rest of the ingredients. I had to get rid of my charred apricot bits and cut off the top of the least damaged ones. Let's see... where was I? Then add the egg mixture on the fruits and toss carefully to mix. Butter and flour a large pie dish. I used for the first time a beautiful Le Creuset dish I bought last summer... soooo cute. When everything is acommodated in the dish, sprinkle the remaining walnuts and bake for 40-45 minutes (at least that time was enough for me). Try for doneness with a skewer and take it out of the oven. It can be left to cool in the mold.

apple pie
The result is a delicious pie with a predominant apple flavor, of course, and a little bit of crunchiness because of the walnuts. This type of pie is my favourite, light and brimming with fruit. Have a serving while still warm, with a scoop of good vanilla ice cream... and a dash of maple syrup or a sprinkle of cinammon...

apple pie

Eager to know more?

Marinated anchovies or boquerones en vinagre, the ubiquitous tapa

>> Tuesday, January 26, 2010


Boquerones en vinagre, meaning fresh anchovies in vinegar, is one of the most typical and easy to make tapas in Spain and one that can be found almost everywhere. I've loved these small fish ever since I was little, and they always remind me of the beer-garlic-olive oil smell in Spanish tabernas. The fish is cured in vinegar for a short time, which gives it a whitish colour and firm consistency, and then left to rest in oil. In Spanish bars they are served in a tiny boat-shaped dish, sprinkled with minced raw garlic and chopped parsley. Either on a slice of bread or on their own... they're delicious.


This kind of marinated fish doesn't feel like raw fish at all, at least not for me. I must say that I usually hate marinated fish, for example marinated salmon, in spite of me being a salmon lover. Marinated salmon feels like raw fish to me, while I don't feel the same about the smoked variety... weird, isn't it?

I've followed the detailed step-by-step recipe of the Spanish web Pepekitchen (in Spanish...). I will try to give you as detailed an account as Pepe does. The method is easy, but you need to follow it closely, please don't improvise because if you for example marinate the fish too long you could end up with a flabby mess.

Boquerones en vinagre (adapted from Pepekitchen)

  • 1kg fresh anchovies
  • 300ml white wine vinegar (I used cider vinegar, it's somewhat milder and it's the type of vinegar I prefer)
  • 100ml water
  • 1 tsp salt
  • Virgin olive oil
  • Garlic and fresh parsley for serving

If you can't find degutted and deboned fresh anchovies, you've got to do it yourself... I have never done it myself, I could... vomit. I usually find a fishmonger to do it for me. Or my mother. Right. The photo sequence at Pepekitchen shows you how to do it: you insert your thumb nail on top of the fish head, break off the head, open the belly with your fingers and pull to extract the guts. Yeah, messy. You have to extract the backbone too, but breaking it off to just leave intact the last piece of tail, with both butterflied fillets attached to it. No, it's not as difficult as it seems. Next you have to wash the fish really well in cold water to extract all the blood. This is an important step for good results. Until a reasonable level of bloodlessness is reached, no need to dissolve the fish in the water...

Perfect, now you have a bunch of beautiful beheaded, degutted, deboned, dead, silver little anchovies... Now comes the easy part. Measure the vinegar and the water, mix and add the salt to dissolve. Lay the fish in a plastic container, skin side down, in layers. Add the marinade and lightly tap the bottom of the container for the marinade liquid to fill all the gaps. Cover with a lid and put in the fridge to marinate for 2 hours.


After that time, you'll notice the colour of the fish has changed. Check that all the anchovies have turned whitish all over, that there are no raw portions. If the fish don't look wholly cured, keep marinating somewhat longer. When the curing is done, discard the marinade liquid. Place the anchovies in another container without hardly draining them, again in layers, and finish off each layer by covering it with virgin olive oil. In the fridge they keep longer than one week. You can freeze the fish for at least 24 hours at this stage in case they were completely fresh, to make sure you kill any anisakis (at least that's what we're told to do here in Spain). I didn't freeze them because my anchovies were originally kindly frozen by my mother, who this time bought them for me.


Whenever you wish to serve the boquerones, mince or finely chop one or more peeled cloves of garlic (according to taste), chop a couple sprigs of parsley, and sprinkle on the anchovy fillets, nicely arranged on a plate. Or make a flavorful pincho by placing a couple of fillets on a Piquillo pepper. It's very usual to eat them on their own as an appetizer, soaking the dripping juices by resting each boquerón for a second on a slice of bread held on your left hand (if you're right-handed, that's understood). Enjoy on a sunny day with a beer or a glass of chilled manzanilla, though some will tell you that vinegar and wine are not a good match... I don't care.

Eager to know more?

Salmon escabeche

>> Tuesday, January 19, 2010

salmon escabeche
I've said it before, I'm a real fan of salmon. It's a flavorful fish and very versatile, either smoked or fresh. And besides it's an oily type of fish, brimming with healthy fatty acids. On the other hand, I love those dishes you can keep for several days and that get even better after some time, like escabeches, which by the way are incredibly easy to prepare. There are thousands of escabeche recipes, buy I've used the recipe by Spanish chef Martín Berasategui, from his book Cocina en casa con Martín Berasategui, that I got from my mother a few days ago. Of course I've tweaked it a tiny bit... couldn't help myself. This escabeche is the type that includes Spanish pimentón, like the recipe used for the ubiquitous canned mussels in escabeche, different from the one I use for tuna fish.


I like that this very old preservation method, said to originate in ancient Persia, from where it spread all over the Mediterranean to end up as a dish identified as genuinely Spanish, can help us to make refined dishes today.

Salmon escabeche

  • 850g fresh salmon
  • 2 tbsp coarse salt
  • 1 tbsp black pepper grains
  • 2 bay leafs (I doubled the amount, I love bay)
  • 10 sprigs parsley, chopped
  • 2 sprigs thyme (I used plain dried leaves, a couple of pinches)
  • 1 clove
  • 2 tbsp sweet Spanish pimentón (I strongly recommend you to go for the real thing, the flavor is very distinct)
  • 1l virgin olive oil (I think this amount is just crazy, I covered the salmon in oil and half a liter was more than enough. And please, don't use any. Other. Type. Of. Oil)
  • 4dl cider vinegar (I also changed this to adjust it to the oil amount, I used around 1,5dl)
  • 1dl good white wine (Berasategui doesn't include wine, but I like it!)

Get yourself a good-looking and skinned piece of salmon. Cut the salmon in cubes (let's say 2"-3" pieces) and lay them on a shallow pot, large enough to keep the salmon in one layer. Avoid metallic utensils when using vinegar, as it reacts with some metals. Sprinkle the salt first and then the rest of the herbs and spices. Toss the salmon lightly to distribute more evenly. Then pour all three liquids, wine, vinegar and oil and put the pot on the stove; turn the heat on. Bring slowly to a boil and turn the heat off immediately the moment the first bubble appears. Cover with a lid, set aside and let the salmon cook in the remanent heat while releasing its juices.

salmon escabeche
My dear Mr. Berasategui lacks restraint because he instructs to eat the salmon immediately, just after cooling. But I preferred to leave it to rest overnight, just because I have more self-control... ahem. Now seriously, I believe this type of dish needs some time for the flavors to soak into the fish. It easily keeps one week or even longer in the fridge. Escabeche is always eaten at ambient temperature, always let it warm up to ambient. This escabeche is simply delicious as a tapa or pincho on toast with some finely sliced tomato and some greens. It's also brilliant flaked on a salad, on top of boiled and sliced potatoes... just feel free to experiment!

salmon escabeche

Eager to know more?

Daring Cooks' challenge January: Thai pork satay with peanut sauce

>> Thursday, January 14, 2010


The Daring Cooks proposal for this month was a typical Thai dish, though widely known in other Southeast Asian countries like Indonesia and Malaysia. A satay consists of broiled skewered meat (almost any type), previously marinated in a mixture of onion, garlic and spices. The cooked meat is dipped in a peanut sauce. The meat gets its striking yellow color from the turmeric in the marinade. I had tried this dish an obscene amount of years ago, while living in The Netherlands, where it's a very popular fast food due to the large Indonesian community. I remember at the time I found the sauce the most disgusting thing I had ever tried... something warm with peanut flavor... yikes! Again the Daring Cooks were challenging me with something I'd never even think of cooking if left to my own devices. Nevertheless I've completely changed my mind about it this second time... has time taught me something?


The January 2010 DC challenge was hosted by Cuppy of Cuppylicious and she chose a delicious Thai-inspired recipe for Pork Satay from the book 1000 Recipes by Martha Day.

You could choose any type of meat or tofu, I chose a pound of pork simply because I had some pieces in the freezer. I stuck strictly to Cuppy's directions and didn't add or eliminate any ingredient.

Pork satay with peanut sauce

  • 1 pound pork, sliced or diced
Marinade:
  • 1/2 small onion, chopped
  • 2 garlic cloves, crushed
  • 1 T ginger root, chopped (optional) (2 cm cubed)
  • 2 T lemon juice (1 oz or 30 mls)
  • 1 T soy sauce (0.5 oz or 15 mls)
  • 1 tsp ground coriander (5 mls)
  • 1 tsp ground cumin (5 mls)
  • 1/2 tsp ground turmeric (2-2.5 mls)
  • 2 T vegetable oil (or peanut or olive oil) (30 mls)
Peanut sauce:
  • 3/4 cup coconut milk (6 oz or 180 mls)
  • 4 Tbsp peanut butter (2 oz or 60 mls)
  • 1 Tbsp lemon juice (0.5 oz or 15 mls)
  • 1 Tbsp soy sauce (0.5 oz or 15 mls)
  • 1 tsp brown sugar (5 mls) (my peanut sauce had sugar in it, so I didn't add any and I didn't miss it)
  • 1/2 tsp ground cumin (2.5 mls)
  • 1/2 tsp ground coriander (2.5 mls)
  • 1-2 dried red chilies, chopped (keep the seeds for heat)
First marinate the meat. Cut the meat in pieces. I used pork sirloin and cut it in thick strips. Put all the marinade ingredients in a food processor and process until you get a yellow paste. Put the meat with the marinade in a freezer plastic bag and toss to coat evenly. The minimum time for marinating was 4 hours, but I preferred to leave it in the fridge overnight. By the way, all those who don't like the flavor of coriander or cumin seeds should refrain from trying this recipe. I love them though.

The sauce can be prepared in advance or on the spot, it's very easy and quick. But I must warn you that it's somewhat delicate, as it can separate like mayonnaise if overheated. Yes, it did happen to me. Therefore I recommend you to do it just before serving the satay, then you avoid the risk in reheating it.

Grind the spices in a clean coffee-grinder if you don't have them ground, like myself. Put all the ingredients in a small saucepan and heat very gently for the peanut butter to melt. Watch it carefully to prevent it from boiling. The moment the mixture is more or less homogeneous, turn off the heat and stir. We ate our separated sauce all the same... ahem.


Before making the sauce then, turn the grill on. It must be nice to cook this in a barbecue in the summer, but we had snow. Slide the meat onto the skewers. First soak the skewers in water for 20 minutes if you're using the wooden ones. Lay the skewers under the grill, around 10 minutes on each side, until the edges start to brown. Don't overcook the meat or it will be dry. When done, transfer to a beautiful serving plate and eat immediately, dipped in the peanut sauce. Everybody, including our guests for lunch, loved the satay. I must admit though that the sauce is a bit shocking at first... in Spain we're only used to eat peanuts as one of the most famous tapas of all: panchitos, peanuts fried in oil and salted, extremely popular in all kinds of tabernas. But on the whole the result was very positive, even though I had to buy an imported peanut butter, laden with hydrogenated vegetable fats (peanut butter is not very popular in Spain).... all for the sake of blogging.

Eager to know more?

Crab salpicón

>> Wednesday, January 13, 2010

crab salad
Salpicón is a very popular Spanish seafood salad, normally made with an assortment of shellfish, green pepper, onion, garlic, sometimes tomato, of course seasoned with olive oil and vinegar. In Galicia, a region famous for its fresh seafood and fish, both of excellent quality, salpicón made only with crab can be found at many restaurants and bars. I've followed the recipe in this Galician blog, brimming with good family recipes. Almost every summer we spend some time in Galicia (we've got some relatives there) and very likely we have dinner some night at a certain seafood restaurant by the sea, where I very often order crab salpicón. Probably watching the sun set over monte Louro through the large windows. And probably drinking the most delicious albariño... To bring some Atlantic breeze to our table on New Year's Eve, I prepared this dish with the rest of my crab cargo.


Crab salpicón from La Cocina de Lechuza
Makes four servings

  • 2 crabs of 700g each
  • 1/2 yellow pepper (red is normally used, only I saw this color at the market and I picked it, it's quite unusual where I live)
  • 1/2 green pepper
  • 1 medium onion
  • 2 eggs
  • Olive oil
  • White vinegar
  • Salt
Boil the crabs if they're not boiled. Let them cool. Break their shells and pick all the meat from shell and legs. Set aside. Next prepare the vinaigrette; finely dice both peppers and onion. Put 4-5 tbsp olive oil and 1 tbsp white vinegar in a bowl. You can play with the ratio, depending on how strong you like your vinaigrette. Then add one tsp of salt, not heaped. Try for seasoning; it must be on the strong side, enough for giving flavor to the vegetables and crab. Then add the diced vegetables and toss.


Hard-boil the eggs in the meantime. Leave to cool and peel. To serve the salad, put the crab meat on a pretty serving dish, add the vinaigrette and toss to coat. Finely cut the eggs into pieces and lay on top of the salad, you can sprinkle some salt on the egg too. And serve... don't you feel the sea breeze?

crab salad

Eager to know more?

Sweet sourdough bread with cinnamon, sugar-free

>> Monday, January 11, 2010


I made this bread last Christmas for the first time and it's bound to become a classic at my household, because it's delicious. In spite of the name, it's not very sweet. It's excellent as toast for breakfast, with some ham or a sharp cheese... I found the recipe at this blog (thanks Tess for the great idea and check out her amazing painted breads!) and it originally contained ginger and orange. As I usually do, I took her recipe and turned it upside down, so that the result is almost unrecognizable. But that's what globalization is about... you pick ideas and concepts here and there, shake them in a cocktail shaker and pour the concoction on your cultural heritage, don't you?


Sweet sourdough bread with cinammon and dried apricots, sugar-free

  • 100g white flour sourdough (baker's percentage: 100%)
  • 160g light spelt
  • 130g bread flour
  • 130g whole spelt
  • 8g fresh yeast (I didn't trust my sourdough in this cold)
  • 9-10 dried apricots, soaked in Cointreau or Triple Sec (the original included candied ginger instead, but I'm no big fan)
  • 65ml maple syrup (dark molasses in the original recipe)
  • 40ml agave syrup (1/4 cup sugar in the original recipe)
  • 65ml melted butter
  • 200ml water (250ml if sugar is used instead of the agave)
  • 1 tsp Cointreau from the apricots soaking
  • 1/2 tsp anise seeds
  • 1 tsp cinnamon
  • 1/2 tsp salt

If you don't want to use such a ridiculous mixture of flours, just follow the original recipe, which is more sensible. But you know I loooove spelt. If you happen to dislike dried apricots, you can of course substitute for any other dried fruit or even nuts. These would be a great match too.

Weigh your solid ingredients and mix them. Crumble the yeast on top of them. Add the sourdough. In other bowl mix the liquid ingredients with the melted butter. Knead well, around 10 minutes by hand or 6-8 in a stand mixer, till you have an elastic and smooth dough. Then add the drained apricots. Make a ball, put it into a well oiled bowl, cover and leave to proof. My bread took 4 hours to double in bulk, because my kitchen is quite chilly these days. When doubled, I made a roll and dumped it into a loaf pan, covered it with a plastic cap and put it in the fridge to raise overnight. The next day the bread had nearly doubled, so I immediately turned on the oven to 180ºC, and there went the bread. Bake it around 40-45 minutes, depending on your oven's fierceness (watch it closely at the end of the baking so that the top doesn't brown excessively). You can test the inner temperature for doneness. The original recipe calls for an inner temperature of 75ºC. But maybe because of the change in ingredients, my bread was not thoroughly baked at 75ºC (I checked it with a skewer), but at 90ºC, so watch out. When done, unmold it carefully and leave to cool on a wire rack.


The consistency of this bread is very cake-like and the dried fruit gives it a delicious touch. Today I had a toasted slice, with cheese and quince jelly, while gazing at our snow-covered garden...

I'm sending this bread over to Susan's Yeastspotting, at Wild Yeast.

Eager to know more?

Spelt carquinyolis or Catalan cantuccini

>> Tuesday, January 5, 2010


No, no, no... these are not cantuccini... these are carquinyolis... totally different... (ahem). I'd been wanting to make these typical Catalan cookies for a long time (do I start my posts like this too often?...). As you probably know, this type of twice baked cookies, first as a loaf and then sliced, are known as cantuccini in Italy and they also exist in Jewish ashkenazi cookery, with the name of mandelbrot, almond bread. They are typical in Catalonia, on the Northeast corner of Spain. When I was a child we used to spend part of our summer holiday camping in Catalonia and my parents used to buy carquinyolis. I didn't eat them though... didn't know what I was missing.


I've found the recipe at the lovely Catalan blog La cuina vermella. I've increased the amounts by 50 %, I've used white spelt instead of regular flour, and I've "adulterated" the cookies by adding some dried cherries... just to add a colour touch (heresy! I beg the Catalans pardon... please bear with me).


Spelt carquinyolis (yields approx. 35 carquinyolis)

  • 600g spelt flour, white (all-purpose flour can be substituted, of course)
  • 350g sugar
  • 90g almond meal or ground almonds (what's the right name?)
  • 100g unskinned, unroasted almonds
  • 90g dried cherries (or any other colorful dried fruit)
  • 1 tbsp leaven, not completely heaped
  • 3/4 tbsp cinammon
  • Lemon zest
  • 4-5 medium eggs (it depends on the size of the eggs, the dough mustn't be dry, but sticky) and another egg for brushing the loafs before baking
Put the almonds in a bowl with water to soak. Weigh the dry ingredients and make a well in the middle. Add the eggs in the well and mix slowly and carefully with the dry ingredients. Knead the resulting dough until all the liquid has been absorbed. If the result is too crumbly, just add another egg. Finally add the almonds, rinsed and dried with a paper towel, and the cherries. Knead to incorporate.


In the meantime heat the oven to 180 ºC. Divide the dough in two and, on a well-floured counter, form two loafs that can fit in one baking sheet. Transfer the loafs to the sheet, lined with parchment paper. Brush the loafs with the beaten egg (I forgot this step!). Put the loafs in the oven and bake half an hour. The loafs have to be somewhat thin, as they rise quite a lot in the oven. After 30 minutes, try for doneness with a toothpick. Take them out to a cooling rack and leave to rest for 5 minutes. Then slice them with a good serrated knife into 1 cm-thick slices, more or less. I'm not capable of cutting thinner slices. Then put the slices back on the baking sheet and back into the oven for 10 minutes to brown. Turn them once when half baked, to brown on both sides. When done take them out to cool on a rack.


For those who've never had this type of cookie before, they are hard and very crunchy. Catalans dunk them in mistela... mmm. I vouch that at home we have dunked them in cava last Christmas. A lot of cava. Really a lot. Loads of cava. I don't know if this is accepted as a traditional way to have carquinyolis, but what the hell, they're delicious that way...

Eager to know more?

Old-fashioned potted crab by Jamie Oliver

>> Friday, January 1, 2010

potted crab
I'm so thrilled today. It's the first time I prepare a recipe by Jamie Oliver... wow, my first time. This recipe can be found in the book Cook with Jamie which I bought last summer while on vacation at Santiago de Compostela. So cook with Jamie if you dare. I admit Mr. Oliver had never really caught my attention before, except for branding him as a bit... dirty: dear Jamie, how can you mix the salads with your hands? But then I started to read the book, which by the way has the loveliest food photography and well, all I can say is... now I'm a believer, not a trace of doubt in my mind.


I've found this dish delicious, how can not be a mixture of shellfish and butter? The only drawback is that it's somewhat time consuming, as you need to pick all the meat inside the crabs. But it's worth the effort. According to Jamie this was a traditional British way of short-term preservation, used not only with shellfish, but with meat too. It lasts around one week in the fridge.

This recipe is easier and shorter to prepare if you buy a crab that's already boiled. I used an Irish crab, which weighed more or less half the weight required in Jamie's recipe. In fact it was a female crab that was full of roe, poor thing. Thanks to that I could gather all the brown crab meat required in the recipe (well, I mean, half of it).

crab
Jamie Oliver's potted crab (adapted)

  • 40g brown crab meat or roe
  • 110g picked white meat
  • 1 small dried chilli
  • 1/4 tsp fennel seeds (I didn't have any and I've never used them therefore I didn't add them)
  • 1 good dash of lemon juice (the recipe calls for lemon zest, but I'm lazy)
  • 2 good pinches nutmeg
  • 100g butter
  • Salt to taste
potted crab
Let the butter soften at ambient temperature. Boil the crab, in case you've bought it uncooked, and let it cool. Then pick all the meat in the crab... be patient. Put the brown meat/roe that's found inside the body of the crab aside from the white meat. Smash the chilli in a mortar and add half the softened butter, lemon juice and all the brown meat/roe. Then mix and smash everything together till you have a soft paste. Add the nutmeg, mix and then the white meat. Mix thoroughly and season well. Jamie recommends to try a small portion on a toast to adjust the seasoning. He advises to over-season the mixture because it's going to be served cold and the flavors are somewhat dimmed.

potted crab
Find a beautiful pot to pot your crab and fill it with the mixture. Flatten the crab and smooth the surface with a spoon, then melt the remaining half butter, mix some fresh herb like dill, and pour it on the crab. Put it in the fridge to set and leave it overnight for the flavors to meld... delicious on a toast.

dill

Eager to know more?

Followers

About This Blog

Lorem Ipsum

  © Blogger templates Palm by Ourblogtemplates.com 2008

Back to TOP