Related Posts Widget for Blogs by LinkWithin

Sourdough blinis

>> Wednesday, April 28, 2010

Blinis sourdough 1

Blinis ... how they're yummy. These pancakes typical of the Russian cuisine, similar to American pancakes or, in flatter versions, to crepes (just similar), served as accompaniment to savory dishes, have several features that distinguish them. The main one is that they rely on bakers' yeast and beaten egg whites to raise, and another characteristic is that they often include buckwheat flour in their composition, which gives them an intriguing herbaceous smell. Well, here I use blinis to use up a fraction of the massive amounts of sourdough that sourdough geeks need to throw away when they don't make bread every day (my case).


Sourdough is just a mixture of flour and water, so if we do have leftovers at some point, they can be added to any preparation that carries flour and water in its composition and that can't be disturbed by its special flavor. "Recycling" extra sourdough instead of throwing it away is a perfect excuse to make blinis, don't you agree? To raise the intellectual level of the blog, here's a quote on blinis from Tatiana Maslenikoff's book La cocina rusa:

As in most European civilizations, Russia gathered and assimilated the beliefs and pagan traditions with its Christian equivalents, which were imported from the Byzantine Empire in the 10th century.
After the long winter, when the first signs of thawing were felt, the northern tribes coming out of their lethargy prepared a feast in honor of the Blazing Sun. Pancakes as round and golden as suns, made with mixed flours, were cooked and offered to Sun God for him not to forget to warm Mother Earth. This would in turn make the next harvest sprout. These pancakes (blini) were then eaten with butter, dried fish and meat. According to historians and archaeologists, the tribes celebrated a sort of costume party where the burning of an effigy of the Prince of Winter took place.
In the Christianized Russia, this feast was moved to the beginning of Lent (...) Blinis are served with smoked herring or caviar, but never meat.

Blinis sourdough 3

The idea of using sourdough on blinis is not originally mine, but found in the book Breads from La Brea Bakery, by Nancy Silverton. I've adapted the recipe, because she adds baking soda and baking powder to avoid a long time rising and speed up the process. She also adds far too much sugar to my taste, that I consider unnecessary, apart from not being very faithful to traditional recipes. I usually have that problem with American recipes, they're too sweet for me. I've also halved the amounts, because the original recipe produces eight dozen small blinis ... yes, you read that right. I only made around 40 small blinis. Here's the recipe:

Sourdough blinis
  • 250ml milk
  • 3/4 tbsp fresh bakers' yeast
  • 185g sourdough (100% bakers' percentage, mine was spelt's, but any white bread flour will do)
  • 85g all-purpose flour
  • 1 tsp agave syrup or 1 1/2 tsp sugar
  • 70g buckwheat flour (60g if you use sugar instead of agave syrup)
  • 1/2 tsp salt
  • 2 medium eggs
You know that the amount of liquid depends on the absorption capacity of the flours, so maybe you'll need to adjust the final thickness. The batter must be almost as thick as pancake batter.
  1. Lightly warm up the milk and add the fresh yeast, crumbled. Blend until dissolved. Add the sourdough and mix well. Add all the flours and the agave syrup, cover and let it ferment until double in bulk and bubbly, depending on ambient temperature and activity of yeast, something between 1 hour and 1.5 hour.
  2. Break the eggs and separate the whites from the yolks. Add these to the batter along with the salt and let it ferment again, I think one hour is enough. Leave the egg whites in the fridge in the meantime.
  3. When the batter is risen again, beat the egg whites to stiff peaks and gently add them to the batter, so as not to deflate them.
  4. Heat a skillet or pancake pan and add half tablespoon of butter. The traditional method is to coat the skillet with pork fat, but I didn't have any. Ladle small portions of dough to make the blini size you choose. I made little ones, 2 or 3-bite sized, but they can be made much larger. So you decide. They cook quickly, you have to turn them over with a spatula within seconds and cook them on the other side. It is recommended to lay them on a kitchen towel as you go, covered to prevent them from cooling, and also put them just outside a hot oven to keep them warm.
Blinis sourdough 2

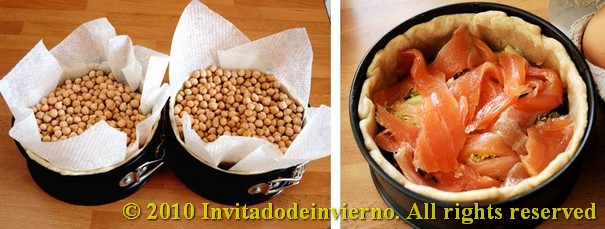
They're delicious when warm, very light and airy, thanks to the egg whites. They have a rich bread-like flavor, with the sour note from the sourdough, and a very tender consistency. A surprising and addictive combination with savory accompaniments. With a good smoked salmon they are simply superb. We did make a lot of tiny sandwiches of salmon, even without the typical addition of sour cream ... We apologize to any Russian in the room for our heresy. We only missed the vodka ... ¡na zdorovje!

Eager to know more?

Salsa brava... on some potatoes

>> Sunday, April 25, 2010

Salsa brava 3

Spring is here. At last. Warm weather. This year I thought winter would never end. And I was on the verge of hibernating. I mean it. Around here fair weather goes necessarily together with having some tapas in a sunny bar terrasse, sipping a beer or a wine in good company. I was so much in need of it already... Patatas con salsa brava are a really good choice then, deep-fried potatoes bathed in a tomato-based spicy sauce, a very popular tapa. This post goes to this month's challenge by Ben at México Sabroso, on homemade sauces and condiments.


Salsa brava 5

And I will reveal something private here (enjoy it): patatas bravas have a kind of sentimental value for me and a special place in my (culinary) heart. When my partner and I were something more than friends, we used to go out every evening for a short visit to a nearby café (both our families lived in the same neighborhood). We always ordered some patatas bravas with our drinks. Yes, the same thing day after day. A glimpse of our future. I think that sauce was store-bought... but never mind, it's the memory that counts... And if I look back I believe I've hardly had patatas bravas ever since, I don't know why because I still love them (my subconscious trying to tell me something?). So I'm presenting here one of the endless varieties of salsa brava, adapted from this one.

Salsa brava 2

Salsa brava

  • 400g crashed or pureed tomatoes
  • 2 cloves garlic or 2 tbsp roasted garlic puree
  • 1 tbsp virgin olive oil
  • 1 tbsp sweet Spanish pimentón
  • 1/2 tbsp hot Spanish pimentón (add more if you like it really spicy)
Salsa brava is spicy for Spanish standards, but Spanish food is not spicy at all in general terms. We do like a slight tickle every now and then... but that's all. And see below for an explanation on roasted garlic puree, for the non-initiated.
  1. I made the salsa in my Thermomix, but a regular frying pan can be used. Pour the olive oil in the pan and add the garlic, either the mashed raw garlic or the roasted puree. Fry till the garlic is toasted (softer in the case of the puree).
  2. Then add the rest of the ingredients, mix well and cook on low heat for around 10 minutes, or as needed for the sauce to thicken. In Thermomix, 100ºC and speed 1.
Those who dislike the strong taste of raw garlic can try roasted garlic instead. It's a great invention, the taste is softened to a great extent, as well as the effect on your... breath. If you try it, you'll find yourself thinking: "I thought I didn't like garlic!". I promise. After I first heard about roasted garlic puree, some 16 years ago, I found the pretty "garlic oven" in the photo below. I bought it then and I admit I had never ever used it... ahem. Till now. For a good cause. Let me patiently explain you how to prepare this delicious roasted garlic puree, at least to those who've never tried it.

Salsa brava 1

Roasted garlic puree
  1. Preheat the oven to 150ºC. If you're not a clever person with a gnome-sized garlic oven like me (¿?), wrap 2 garlic heads in aluminum foil and put them into the oven when it's hot. Cook for one hour.
  2. When done, you'll find the garlic cloves have turned into a soft, fragrant and caramelized mass, that can be squeezed out just by pressing the clove's peel. Just open one end of the peel and squeeze the flesh out. Empty all the garlic flesh into a bowl, then mash it with a fork to make the puree. And that's it. Good for boosting the flavor of a lot of dishes without the aggresive taste and smell of raw garlic. And delicious on toast too.
Salsa brava 6

Fine, now that you have your spicy salsa brava, you need some potatoes to use it, don't you? Take 2 plump potatoes, cut them into chunks (not too big), fry them in olive oil till thoroughly cooked, but not crispy. Serve them in a beautiful cazuela and pour the sauce on top. There you have an excellent tapa for a Sunday brunch or aperitivo... Pour yourself your favourite drink and imagine you're on a terrasse under the April sun. Or just don't imagine anything, because maybe you feel so much at ease at home as I do at my own.

Salsa brava 4

And if you want to see a wonderful deconstruction of this popular tapa, visit this.

Eager to know more?

Limequat-whey cheese tart or serendipity

>> Monday, April 19, 2010

Limequat-ricotta tart 5

You know what serendipity is... right? Well, one of the entries in the dictionary says it is "the faculty of making fortunate discoveries by accident". Fortunate discoveries can really be charming. I recently visited a plant depot in search of volcanic pebbles, but couldn't find any. Instead I bought a lovely zinc container, like the ones used as plant pots. I decided to use it as a fruit basket, for my photos. And then the day after I stepped into my favourite greengrocer's and what did I find? Some incredibly beautiful little fruits called limequats. I admit I had never heard about them in my life. They are hybrids of lime and kumquat, more similar to kumquat in shape, slightly bigger, and with a lighter and more yellow hue. Their pulp is acid like lime's. They were born to nestle in my fruit bowl... don't you think this is plain serendipity?


Limequats 3

Limequat jam

  • 600g limequats
  • 250g sugar
  1. Well, you know how a jam is made. First you look for an enameled pot. Then finely slice the limequats with a honed knife and layer the slices in the pot, sprinkling them with the sugar as you go, while you cut all the little fruits.
  2. When they're all sliced, heat the pot on medium heat and bring to a soft boil. Boil the mixture until the peel is tender. I had to add some water, it mustn't dry out. You can also add some water at the end if it's too thick. To test the consistency, pour a tablespoonful on a plate and let it cool.
I warn you that I don't like sweets that are overly sweet, so maybe you'll need to add more sugar. I thought this jam had the most incredible aroma. Addictive. Maybe lime jam is as good, but I've never tasted it. Maybe I'll take to visiting the fridge and sniffing the jam jar, like I used to do with ras el hanout.

This jam was so good that I had to figure out something to add it to. Something that provided the perfect background for that acid note. The next day my parents showed up, just arrived from a trip to the Mediterranean island of Ibiza, bringing me a cookbook with traditional recipes. Among them was the famous fláo a delicious tart made with whey cheese.... Mmmm, it could be a good idea... yum. Don't you think this is plain serendipity? I finally didn't opted for flaó, as it includes aniseseed and fresh mint and I thought that would be too many different flavors in one single tart. But I did settle for the whey cheese tart concept (that is, ricotta cheese). So here it is, inspired by this wonderful recipe, and with whipped egg whites to make for a fluffier filling. Take into account that the recipe calls for the tart to be prepared in advance, so that it can cool down inside the oven as slowly as possible.

Limequat-whey cheese tart
  • 500g whey cheese or ricotta cheese
  • 250g white chocolate
  • 80ml creme frâiche (plain whipping cream is good too)
  • 70g vanilla sugar
  • 3 medium eggs
  • Pastry crust
For the pastry crust, please follow my usual recipe, here. Of course, you can always use store-bought crust. But I won't forgive you. A couple or more tsp of cocoa powder can be added.

Limequat-ricotta tart 6

Tart directions:
  1. Preheat the oven to 180ºC.
  2. Prepare the shortcrust pastry if you choose so. Divide it into 2 portions and freeze one of them (I always do it). Roll out the dough until it fits in the desired mold. I used a round mold of 27cm diameter. Butter and flour the mold, lay the pastry on top, press to fit and trim the edges. Put the mold into the freezer.
  3. When the oven is hot, take the mold out of the freezer, lay parchment paper on the pastry, put some beans on top for weight and bake for 15 minutes. Then take it out and leave to cool.
  4. Lower the oven temperature to 160ºC and slide in a tray for the Bain-marie water.
  5. Make the filling in the meantime. Tip the whey cheese in a large bowl and crumble with a fork. Then add the creme frâiche or cream and mix.
  6. Melt the white chocolate in the microwave or in a double boiler. Stir and add it to the cheese mixture. Add the sugar and mix thoroughly. Don't overbeat, as too much air in the batter can cause the filling to crack or collapse.
  7. Crack the eggs and separate the whites from the yolks. Add these to the cheese mixture and mix well. Whip the whites to stiff peaks and then add delicately to the rest of the filling.
  8. In the meantime, bring some water to the boil in a teapot, for the Bain-marie.
  9. Pour the filling on the tart base. Never mind if the filling appears to be excessive, nearly overflowing. Take into account that the filling shrinks when baked. Flatten the surface with a spatula.
  10. Cover with aluminum foil, avoiding to contact the filling. Slide the mold onto the oven tray or dish. Then pour the boiling water in the tray.
  11. Bake for 70 minutes (mine took this time). When done, turn off the oven and let the tart cool inside, covered, overnight if possible.
  12. The next day spread the jam on top of the filling. If the jam is too thick, like mine, warm it up a bit and add a couple tbsp water to make it runnier. Then refrigerate for a while, at lest I like it cold.
Limequat-ricotta tart 3

The combination of the cheesy filling with the jam was just incredible, as I expected. The only "imperfection" was the crumbly texture, a bit too crumbly. I guess the cause was the whey cheese, the consistency must be creamier if cream cheese is used. The white chocolate was hardly noticeable, only like a very far touch... delicious. I've got to find something else to use the jam, because it's just sublime...

Limequat-ricotta tart 4

Eager to know more?

The Winter Guest on TV...

>> Friday, April 16, 2010

Basic Dan Lepard's bread

May I have your attention, please? Today I feel brimming with self-esteem. Yesterday I was on the Spanish TV, La Sexta, in a short report on homemade bread, thanks to my friend Bea from La cocina de Babette. She does have a leading role in the video, teaching her pupils to knead, haha... oleeeé.


You can find the video here, for you to see that the breads I post are real and that I even know how to knead... ;-). Yes, I'm sorry, it's in Spanish... enjoy it!

And building upon my self-esteem rise, I forgot to post about this collaboration in the excellent blog Learnfoodphotography. Thanks a lot, Neel, for thinking I had something interesting to say about the subject.

Eager to know more?

Daring Cooks' challenge April: Brunswick stew

>> Tuesday, April 13, 2010

Brunswick stew 1

This month's challenge is a United States southeastern classic: Brunswick stew. I must admit I had never heard of it before. But that's not surprising, is it? Have you heard of the Spanish cocido? I thought so. This hearty stew is really not difficult to make... But the essential thing is that it should be so thick that a wooden spoon should be able to stand up in the middle. This recipe yields 12 servings, but somehow I was not aware of it and I didn't halve it... We better like it.


The 2010 April Daring Cooks challenge was hosted by Wolf of Wolf’s Den. She chose to challenge Daring Cooks to make Brunswick Stew. Wolf chose recipes for her challenge from The Lee Bros. Southern Cookbook by Matt Lee and Ted Lee, and from the Callaway, Virginia Ruritan Club.

Brunswick stew, slightly adapted

  • 1/4 lb / 113.88 grams / 4 oz slab bacon, rough diced
  • 2 Serrano, Thai or other dried red chiles, stems trimmed, sliced, seeded, flattened (I used 2 Spanish guindillas, medium hot)
  • 1lb / 455.52 grams / 16oz rabbit, quartered, skinned
  • 1 4-5lb / 1822.08- 2277.6 grams / 64-80oz chicken, quartered, skinned, and most of the fat removed (I used 1500 g only)
  • 1 Tablespoon / 14.235 grams / ½ oz sea salt for seasoning, plus extra to taste
  • 2-3 quarts / 8-12 cups / 64.607-96.9oz Sunday Chicken Broth (see below)
  • 2 bay leaves
  • 2 large celery stalks (I skipped them... sorry, I hate them)
  • 2lbs / 911.04 grams / 32oz potatoes, or other waxy type potatoes, peeled, rough diced
  • 1 ½ cups / 344.88 grams / 12.114oz carrots (about 5 small carrots), chopped (I used 2 large)
  • 3 ½ / 804.72 grams / 28.266oz cups onion (about 4 medium onions) chopped (just used 2 onions)
  • 2 cups / 459.84 grams / 16.152oz fresh corn kernels, cut from the cob (about 4 ears) ( I halved it...)
  • 3 cups / 689.76 grams / 24.228oz butterbeans, preferably fresh (1 ¼ lbs) or defrosted frozen (I added slightly less here)
  • 1 35oz can / 996.45 grams / 4 cups whole, peeled tomatoes, drained
  • ¼ cup / 57.48 grams / 2.019 oz red wine vinegar (I used white vinegar, I find red vinegar too strong)
  • Juice of 2 lemons (I didn't dare to add the lemon juice, I thought it would be too acidic for me)
  • Tabasco sauce to taste (I didn't add any)
Chicken broth:
To make the chicken broth, I simply boiled 2 chicken carcasses along with a piece of hen, plus the carrots and the onions that the stew recipe calls for. Boil everything for 45 minutes, while skimming the foam. You'll get a beautiful fatty and yellow stock. It couldn't be easier.
  1. In the largest stockpot you have (I used my French Le Creuset oven), fry the bacon over medium-high heat until it just starts to crisp. Transfer to a large bowl, and set aside. Reserve most of the bacon fat in your pan, and with the pan on the burner, add in the chiles. Toast the chiles until they just start to smell good, or make your nose tingle, about a minute tops. Remove to bowl with the bacon.
  2. Season liberally both sides of the rabbit and chicken pieces with sea salt and pepper. Place the rabbit pieces in the pot and sear off all sides possible. You just want to brown them, not cook them completely. Remove to bowl with bacon and chiles, add more bacon fat if needed, or olive oil, or other oil of your choice, then add in chicken pieces, again, browning all sides nicely. Remember not to crowd your pieces, especially if you have a narrow bottomed pot. Put the chicken in the bowl with the bacon, chiles and rabbit. Set it aside.
  3. Add 2 cups of your chicken broth or stock, if you prefer, to the pan and basically deglaze the4 pan, making sure to get all the goodness cooked onto the bottom. The stock will become a nice rich dark color and start smelling good. Bring it up to a boil and let it boil away until reduced by at least half. Add your remaining stock, the bay leaves, celery, potatoes, chicken, rabbit, bacon, chiles and any liquid that may have gathered at the bottom of the bowl they were resting in. Bring the pot back up to a low boil/high simmer, over medium/high heat. Reduce heat to low and cover, remember to stir every 15 minutes, give or take, to thoroughly meld the flavors. Simmer, on low, for approximately 1 ½ hours. Supposedly, the stock may become a yellow tinge with pieces of chicken or rabbit floating up, the celery will be very limp, as will the chiles. Taste the stock, according to the recipe, it “should taste like the best chicken soup you’ve ever had”.
  4. With a pair of tongs, remove the chicken and rabbit pieces to a colander over the bowl you used earlier. Be careful, as by this time, the meats will be very tender and may start falling apart. Remove the bay leaf, celery, chiles, bacon and discard.
  5. After you’ve allowed the meat to cool enough to handle, carefully remove all the meat from the bones, shredding it as you go. Return the meat to the pot, throwing away the bones. Add in your carrots, and stir gently, allowing it to come back to a slow simmer. Simmer gently, uncovered, for at least 25 minutes, or until the carrots have started to soften (I skipped this stage, as I already had boiled my carrots).
  6. Add in your onion, butterbeans, corn and tomatoes (and my carrots). As you add the tomatoes, crush them up, be careful not to pull a me, and squirt juice straight up into the air, requiring cleaning of the entire stove. Simmer for another 30 minutes, stirring every so often until the stew has reduced slightly, and onions, corn and butterbeans are tender. Remove from heat and add in vinegar, lemon juice, stir to blend in well. Season to taste with sea salt, pepper, and Tabasco sauce if desired (I thought it didn't need it).
  7. You can either serve immediately or refrigerate for 24 hours, which makes the flavors meld more and makes the overall stew even better. Serve hot, either on its own, or with a side of corn bread, over steamed white rice, with any braised greens as a side.

Brunswick stew 2

My potatos were not starchy enough, so the broth wasn't really thick. In fact you can see the potato dice have kept their shape pretty well through almost 2 hours of boiling. Indeed the whole thing should have been a bit more "amalgamated", but still it was truly stomach-warming.

Eager to know more?

Broccoli, salmon and manchego quiche

>> Sunday, April 11, 2010

Broccoli salmon quiche 3

Quiche is another staple in my household. Quiches are very versatile and straightforward to make. They're also appealing and eye-catching when on the table, perfect for a dinner party with guests, when you want to impress them (is there any chance when I don't want to impress them?). The original quiche Lorraine, from what all the rest of the quiches in the world are derived, originally uses béchamel sauce in the filling, besides the eggs and the cream... I prefer to keep calories a bit lower (only a bit...) and skip the béchamel. That also makes it quicker to cook.


I find the combination of greens and salmon gives a wonderful character to the quiches. And I don't really know what happens to the vegetables when cooked in the company of cream and eggs, but they mellow and yet taste delicious. In fact this is the only way I can get D. to eat broccoli. One of our friends used to tell me that her husband only ate greens when they came for dinner and I would serve quiche. On the other hand, I've been reading lately that broccoli is packed with antioxidants and it's a very healthy vegetable to eat, therefore... I can find no better way to antioxidize myself than putting broccoli into a moist quiche.

Broccoli, salmon and manchego quiche
Yields 2 generous servings

  • 3 eggs
  • 50ml whipping cream
  • 3 slices smoked salmon
  • 100g broccoli
  • 50g manchego cheese
  • Salt to taste
  • Pastry dough (the one I used here)
  1. Prepare two individual molds or one medium mold. Butter and flour them. Roll the dough on the floured counter and cut two circles. Then carefully place them on the molds. Press to acommodate and trim the excess. To bake them blank, I put them into the freezer for a while and then I bake them with parchment paper and beans on top (am I too cautious?) to prevent the bottom from rising. In the meantime preheat the oven to 180ºC and then bake them for 10 minutes.
  2. Prepare the filling while the crust is baking. Cut the broccoli in several florettes. I either microwave it or steam it. I can't give you the microwaving time, as I always cook it at 5 minutes intervals, I check everytime because it really depends on the quality of the vegetable. Steaming should last around half and hour, but this is variable too. Set aside when cooked.
  3. Shred the manchego cheese and set aside.
  4. Break the eggs, mix with the cream and add salt to taste. Be careful with the salt, as the salmon and the cheese are already quite salty. Set aside.
  5. Once the pastry crusts are ready, take them out on the countertop and fill them. Divide the broccoli into yet smaller florettes and lay them on the bottom. Then place the strips of salmon on top. Pour the eggs-cream mixture and tap the molds on the counter for the liquid to distribute evenly. Lastly sprinkle the cheese on top.
  6. The smallish molds will be baked in around 20 minutes. If you use a larger mold, it should be ready in around half an hour, but always test for doneness with a skewer.
Broccoli salmon quiche 1

Broccoli salmon quiche 2

Enjoy!

Eager to know more?

San Francisco sourdough bread

>> Wednesday, April 7, 2010

San Francisco sourdough 1

Those of you out there who are among the followers of the Holy Sourdough know that the only rite of passage that allows you to qualify for a gold-plated bread-scoring tool is to make a San Francisco sourdough bread... I admit I had always wondered, somewhat skeptically, if San Francisco yeastie beasties would be much different from the ones in the Spanish plateau (the rain in Spain doesn't stay mainly in the plain...). But I've been lucky enough to get some of these bugs from my generous friend Bea... so that I could check myself. I haven't reached a definite verdict though.


Here's what baker Peter Reinhart says about the bugs and San Francisco sourdough:

(...) a wild strain of yeast called Saccharomyces exiguus is used to make sourdough bread, as opposed to S. cerevisiae used in regular breads. But the complex sour flavor is not created by the wild yeast. Other bacterian organisms, specifically lactobacillus and acetobacillus, create lactic and acetic acids as they feed off the enzime-released sugar in the dough, and these are responsible for the sour flavor. San Francisco sourdough bread, for example, has a particular type of local bacteria called Lactobacillus sanfrancisco (...) that gives this bread a different quality, more sour with a thicker crust, than any other wild-yeast bread made in other parts of the world.
If Reinhart says so... The peculiar flavor that this sourdough imparts comes from one of those bacterias, from the lactobacillus type. Well, I only know that I have baked two breads with this sourdough so far and either I've finally learnt to bake decent bread or this sourdough is really special. Both breads were wonderful, with a delicious flavor that caused them to disappear in no time. The recipe I used is nothing special:

San Francisco sourdough 2
  • 200g San Francisco sourdough, fed with spelt for several days (baker's percentage: 100%)
  • 300g water
  • 500g white bread flour (I had to add 50g more)
  • 2 tsp salt
  1. Mix all the ingredients and knead by hand or in a stand mixer, till the gluten is well developed. Make a ball and put it inside an oiled bowl, cover with a plastic shower cap and put in the fridge. Leave to proof overnight.
  2. Take the dough out of the fridge the next morning and leave it to temper on the counter and to further proof. It must double in bulk. It will take at least 2 hours.
  3. When doubled in bulk, tip the dough on a well floured counter and shape in whatever shape you like. Then put the formed loaf on a floured cloth, a bannetone or a large bowl, depending on the bread shape, and leave to rise again.
  4. I usually bake my loafs in a Dutch oven. Preheat the oven to 250ºC (that's the maximum reached by my oven) with the Dutch oven inside. When the loaf is doubled, take the Dutch oven out on the counter and slide the bread into it. Score it, cover with the lid and put it back into the oven. This bread hardly took 30 minutes to bake. Check the inner temperature, it should be at least 92ºC (large tears rolled down my cheeks when I opened the Dutch oven to find such a stunning bread... I had never baked such a beautiful bread before... so well risen, with such an appealing color...).
  5. Then let the loaf cool on a wire rack and... devour it. I can't express how delicious it was with butter...
And being that I am a studious little girl, I'm more than willing to try this sourdough again just to check if its flavor and aroma are really special or not... as many times as needed. Sorry, I must be going, I've got some baking to do. Bye.

San Francisco sourdough 3

I almost forgot! I'm sending this bread to Susan's Yeastspotting... don't forget to check it tomorrow for a weekly showcase of breads!

Eager to know more?

Date, coconut and spice truffles

>> Sunday, April 4, 2010

Date truffles 2

I guess you know that traditional truffles mainly consist of sweet chocolate and cream... a lot of cream. But vegans and raw vegans invented a healthier type of truffle already some time ago... yes, you can make truffles without the cream and the sugar. And I find they are a truly interesting kind of sweet, even though I'm neither vegan nor raw vegan. You've got to absorb any knowledge potentially good for you. Empty your mind, like Bruce Lee used to teach... Strip yourselves of prejudices like you peel the paper off a cupcake... To lend body and softness to the truffles, avocado or dates are used instead. Dates have been used in these truffles, to give them sweetness and tenderness.


The concept is adapted from this gorgeous vegetarian blog. I've substituted dry for fresh dates, cocoa butter for part of the coconut oil and ras el hanout for the hot chili (is this getting close to an addiction? No, why?). Sure curry powder would work too... I thought about adding hot pimentón, but I didn't dare. I've recently stumbled upon some spicy bonbons (they seem to be fashionable right now) and I really liked them. After all, Mesoamericans used to have their hot chocolate with chili. But you can skip the ras el hanout if you don't like spicy chocolate (prejudiced!). Being that these sweets aren't cooked in any way, the ingredients should all be premium quality, organic when possible. Okay, I'm a bit of a purist...

Date, coconut and spice truffles
Yields 30 small truffles

  • 20 organic dried dates
  • 1 tbsp organic coconut oil
  • 1 tbsp organic cocoa butter
  • 2 tbsp unsweetened cocoa (better if organic)
  • 30g shredded coconut
  • 1/2 tsp cinammon
  • The content of half a vanilla pod, scraped
  • 1/2 tsp ras el hanout
Date truffles 1

And you were wondering... is it really a good idea to leave the cream out and use coconut oil instead? Well, apparently coconut oil, after being considered a very harmful saturated fat for years (coming from the wrong belief that ALL saturated fats were harmful, especially promoted in the 60's by large producers of poliinsaturated vegetable fats... what a coincidence), is changing its reputation due to recent scientific research.
  1. Soak the dates in water for a while if they're too dry. Melt the coconut oil and the cocoa butter in a double boiler or bain-marie. Put the oils in a blender or processor with the drained dates and process till almost smooth. Don't expect the dates to disintegrate completely, some chunky bits will remain.
  2. Add the rest of the ingredients to the date mixture and process again, till a more or less homogeneous paste forms.
  3. Flatten the paste on a plate and refrigerate until the oils are solid again, around half an hour.
  4. When the paste is cool, use a teaspoon to break down little pieces and shape them into balls, rolling them between your palms (you can make them larger if you want).
  5. When they're all shaped, coat them either in more shredded coconut or in cocoa. To do this, put a couple tablespoons coconut or cocoa in a plate, place the truffles on it and move the plate for the truffles to roll and coat.
These truffles keep well in the fridge, but, as any traditional truffle, they are best if left to temper for a while before eating. The flavor of ras el hanout was hardly noticeable in the batch I made, I guess the cocoa flavor is too strong to offset, but a slight heat revealed at the end of each bite... Next time I will add more heat... yummy. And by the way, if you want to see the face of your less adventurous guests when they bite into one of these truffles, let them believe these are regular ones... it's your chance to have a good laugh.

Eager to know more?

Followers

About This Blog

Lorem Ipsum

  © Blogger templates Palm by Ourblogtemplates.com 2008

Back to TOP